Banner Sponsors


For artists and collectors sponsored by Intercal...your mohair supplier and Johnna's Mohair Store

I knew it! Something so obvious couldn't possibly have gone without someone else having used it.
Brass would be superior to copper because it won't bend...the copper is soft...thanks so much for the source...Originally I asked for it but I couldn't find any brass at the home stores...only the copper.
Originally I got hold of a plexiglass catheter which worked really well (from our surgery used for canine artificial insemination :redface: ) But, again, I didn't think that would be readily available to TT'ers. 
For those who aren't sure what we mean by eye cording I have attached a photo example. I corded these eyes using the method I described. I photographed the procedure as I did it, if anyone is interested...
...no glue, the cords are snug and secure to the eye, (once attached at the base of the neck,) by a simple stich at each corner around the cord tightening it secure across the eye.
You could use glue, I suppose if you wanted to be sure, but so far, this has worked for me.
Pat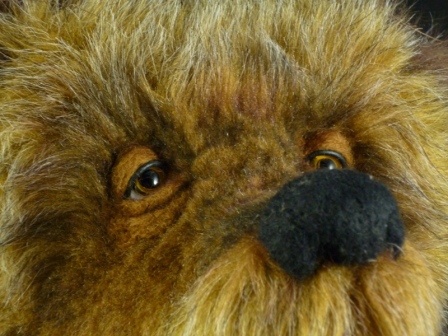
Hi all,
I've just tested a new technique and am trying to get some useful pictures of it to share. I've solved my problem I think. It's easy, fast and doesn't do any damage...and surprisingly accurate. And best of all, doesn't require any strength...or messy glue. I do this BEFORE I SET my eyes.
Best of all...the cord goes all the way through the head giving you the option of moving, tightening, loosening and adjusting it on the eyes before committing to final positioning. It is so much more forgiving then gluing. It wasn't tedious to cord the eyes. I think each one took about four or five minutes including preparing the cord. I removed some of the stuffing in the neck of the bear to facilitate passage of the catheter into the bears head.
This method is so obvious I'm sure I'm merely reinventing the wheel--someone else is probably using it. Basically I'm using the idea of a catheter. Since cord will not willingly pass through the stuffing of a bear...I decided to pass the cord through a catheter (i.e. tube) inserted through the eyelid into the head of the bear and out the neck. However, since the diameter of the catheter is wider than the cord, I found it was better to push it from the neck up to the eye, positioning it at the point of insertion of the cord. At that point you insert your awl to make a hole large enough in diameter to insert an upholstery needle which has been threaded with thread inserted into the end of the cord. Holding the catheter tightly against the fabric you replace the awl with the point of the needle and insert it down the length of the interior of the tube, and then drop it....
I found that its weight will pull the threaded cord behind it through the catheter as the needle falls off the thread and out the neck of the bear. Then gently pull the catheter out of the head leaving the cord behind it embedded in the head.
The other half of your cord will remain in place sticking out of the corner of the eye awaiting the same treatment on the other side of the lid...simply loop it over the eye and insert after you have placed the catheter into the head and inserted the awl where the second hole should go.
At the bottom of the open neck you will have the threads dangling from the end of the cords. These can be sewn to the neck to secure the cord when you have determined its final position and tension over the eye and you close the head and you have set the eyes.
For your catheter, a copper six inch rod purchased at Lowe's Home Center for $3.00 which I had them cut for me worked fine...get the smallest diameter...it will accommodate the 2mm cording easily but can go larger as well...it's 1/4" utility grade copper tubing which comes precut in the plumbing department....Iamb sure other tubing would work fine...I'm also using some plexiglass catheters from the surgery....but those are not readily available...for smaller bears...I think surgical catheters might be the way to go...
You could use the heavy long upholstery needle or a long doll needle because you want to have something to pull the cord all the way through the catheter....
I'm trying to get some reasonable pictures if you are interested...the procedure has not been easy to photograph...since everything takes place inside the head of the bear and needs an extra set of hands to do so.
Pat
Yes Joanne and Shane,
I am talking about leather cording which I use over the eye itself as part of the eyelid treatment...to attach eyes I use artificial sinew. Right now, I am actually pulling the cording through the head (and the stuffing) using 2 mm leather cording...although I have used a thicker leather cord...see my avatar. It is not easy, for me to do, and I've done it now on at least a dozen bears. Love the effect but loathe the process.
I do use an awl to start the holes and an ice pick to lengthen them inside the bear...but it is almost impossible to get a hole of that length to remain stable in stuffing to pass the needle and cord where I can tie it off...so I figured there must be a better procedure for pulling the cord I did not know about. I do know for sure that pulling the cord through the head is an accepted way of applying cording. I've seen it in the literature and Michelle Lamb told me she uses the technique.
I have just acquired some large upholstery needles and am wondering if using a very thick, long needle might be the tool needed here...the trick is trying to line the cord up perfectly behind the needle....
Regarding the glue, my primary concern using it is spillage...I really would end up glued to the bear....trust me. 
Pat
I'm using leather cording...maybe that's the problem...where to you get this thick stuff?
Pat
I never use the gather method because my furs are too thick and it would never tighten down...so I started using a cap on the head...you could try this...clear off a circle around the joint and stitch into place (I use my ladder stitch and works fine) and trim the fur around the joint for a tighter fit....you can do the same if you still don't have enough clearance with the body....or dart the body up to the top and simply close it at top depending upon your design...I've also done that. Currently I'm using the capped end for both head and body and loven' it...I can actually give my bears "NECKS!"
Hope this makes sense....
Pat
First law of MY universe: Super glue and Pat are not compatable. (Is there no emotocon for copious weeping? It would be appropriate here!) Invariably the glue ends up everywhere EXCEPT where it is supposed to be. Trust me on this. It is what it is. This includes gluing my fingers together.
But these issues aside...I don't want the possibility of the glue deteriorating and the cording popping off or out down the road. I was subjected to horror stories of that happening on bears. And with the difficulty I had gluing...it would be MY bears that would have that problem. I just know it. My general construction philosophy is to prefer 'mechanical' connections, i.e. sewn, whenever possible over chemical bonding.
Sigh
Morning, afternoon, and evening ladies (and gentlemen),
This is a REAL CONUNDRUM
I am trying to find better and easier techniques for designing and building bears...in order to expedite the process so that one bear does not take SIX MONTHS for me to complete and have come to one of my most dreaded and painful roadblocks...eye cording.
I absolutely love the effect that this gives and have in the past used a number of different techniques as described here in TT to achieve it, with varying success. Currently my method is glueless, pulling the cord through the head of the bear, preferably down the front of the face over the eye in a great loop and back down. It is really tedius, difficult to achieve symetry and physically hard...I sweat bullets poking holes in the bears head around the eyes to pull the cord...and it is hard to achieve the correct angle and tension. The eyes themselves cannot be set until the cording has been pulled and then all are tied off at the same time.
THERE MUST BE OTHER ways to do cording. Just the physics of pulling a leather cord which has a blunted end affording nothing but resistance, through polyster fiber, is on the face of it unreasonable as a methodology.  Therefore, I suspect that I missed something in the explanation of this technique.
Has anyone any suggestions as to how I may improve on my technique, expedite or mitigate it in some way before I altogether abandon the look I love...remember, these are big bears and I have to pull long pieces of cord through three or four inches of bear head one way each time....it's hard to do.
Thanks as ever for your thoughts and HELP!
Pat
Shanna,
I don't think he is 'ordinary' and the trupunto feet I would die to be able to make...all I can do are pulled toes...I do soooo want to learn how to do feet like you just pulled off with such aplumb and are pooh-poohing (pun indended  ) Enough! with this self deprivation! He is FAB! The proportions for a first big bear are fantastic...Would that I could have pulled something like this off my first time out of the gate, or second, or third, or.....fortieth, etc., etc....I finally had to take the bear designing course after a year of floundering to get the proportion and body thing right and you just DID IT with no problem...I'm green with envy.
So there is nothing ordinary about your accomplisment. This is a beautiful bear.
If you really think, however, he seems 'ordinary' and are not satisfied with his 'look' then, you must be searching for something 'else' and you will have to be more specific with yourself and with us as to what that 'something else' is, because from where I sit, this guy is really pretty darn huggable.
If that is the case, then the only thing I can suggest is this. First: absolutely leave that body design alone! and second: do another head and experiment with it and see if changing the features gets you any closer to what appeals to you. You know how to monkey around with gussets and muzzle lengths...tweak ear sets and eye placements...darts above eyes, below the eyes, etc. Maybe go off the track and try inset muzzle....sometimes even with the same fur...it allows for darting possibilities you can't get any otherway...I can honestly say my bears usually have two to three heads before I am (semi) satisfied with the expression...or all the profiles. Remember when you UPSIZE your bear, you greatly increase the possibility for so much more detail than you had with the mini...so you can really release your design skills on the head of the bear.
With the fading on the feet...I've found that after a while the fabric reaches maximum absorption and you can finally apply a final coat of dye that seems to stay put without disappearing...that has been my experience with both the fabric dye and the Prisma on felt.
Pat
Are you still planning on cording the lower lids?
Shanna,
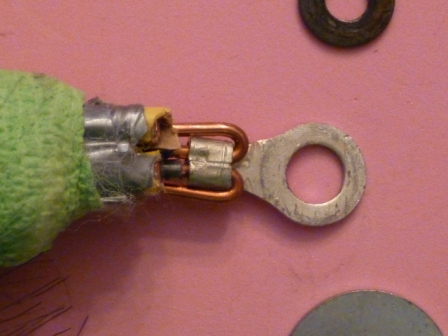
We use wire crimpers and as you can see several wires to form the attachment...and we also curl the wire over in the termal so that we have a mechanical attachment. You could also solder this attachment and make it even stronger.
I use TV cable so that I can get the multiple wires for attachment and because the wires already have insulation around them. I then wrap that in polyester quilting batting and secure that to the cable from top to bottom with vet wrap...on the end near the top joint. I use duck tape.
It forms a very secure joint and makes a strong, well padded bendable limb.
Pat
Heidi,
I know what you mean about building bigger and bigger bears...something happens and...they just keep getting bigger, and bigger, and bigger! You know you are building BIG when you are spending as much time and attention if not more to engineering the inside of the bear as you do to making the outside of the bear.
Just don't let them drive without a license...I found that can get you into trouble :crackup: :crackup: :crackup:
Pat
I just purchased for the first time some yardage of Tissavel from Prefurs. It is lovely fur, better than I had hoped. So excited! I unwrapped and hung it out overnight in my dinning room for inspection in the morning light...I had noticed an unfamiliar chemical smell when I unwrapped it and expected it to disappate overnight as it does with my other synthetics.
This morning when I walked into my dinning room, the off gassing from the fabric was overwhelming. Instant migraine! I gathered up the fabric and it is now in the garage! I am currently running the whole house fan to get rid of the fumes. :twisted:
I've been working with synthetics for over a year now and this is not normal chemical off-gassing. I have a whole closet full and no problems! What goes with Tissavel? How long does it take for this process to end? And is there anything I can do to hasten it along. Obviously I cannot work with the fabric under these circumstances and it will not do to have a bear that is 'chemically' offensive.
Pat
Anne-Marie,
She has got to be my favorite of the three...love the way you have accessorised her. She is just adorable...someone is going to just scoop her up! 
Pat
Have always admired the personality of your bears...but this one is exceptional. The feet are just over the moon! And the characterization here is charming. Terrific bear! :clap: :clap: :clap:
Pat
Awwwwwww thanx girlfriends! You guys are the best! I'll pass along all your complements to his royal fuzziness and new mom. They will be thrilled.
Yes, the course was so helpful for me. I would strongly encourage anyone floundering with designing 'their perfect bear' as I have been, to take it. No more wasting fur and rearticulating my bears over and over. What a relief!
It forced me to analyze my design problems and taught me how to work through the solutions. Even if you have Nancy's book, you will find that this course is much more than an adjunct to it. I plan to take another course in July to concentrate on techniques.
Pat
I have tinted felted noses with fabric markers and Prisma markers...then waxed the felted noses and even used colored markers over top of the wax.
Pat
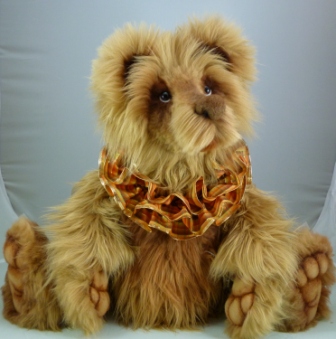
 His name's "Disposable" because I was going to harvest him for bits and pieces and all the stuffing it took to fill up his humongus 23 inches, but my girlfriend intervened and he has gone to live with her instead...she is becoming a regular repository for all my unwanted bears
He's a new body design for me which you can't see under all the fur, but the class helped me ALOT!
Pat
Faux Paw
Joanne,
OMG! You know how I loved Douglas...but this guy! Really he is too REAL! The neck and body worked beautifully for natural posing...I hope you take many more pictures of him before he goes away fur-ever. Gorgeous work, just GORGEOUS! :clap: :clap: :clap: :clap:
Pat
love the eyebrows and of course, as ever...your specialty, the perfectly waxed, felted nose.
I have always adored your bears, but the hare is 'over the moon' adorable and loaded with personality. Love him, and hope, as is the nature of the little beasties, there are many, many more to come!
Pat
Karen,
Your story about his head in the bowl made me laugh! I've had two large bear heads that have been sitting on my dresser staring at me for three months because I haven't the foggiest idea how to make a realistic body to go with them! so i guess I will be able to hang on to them for quite a bit longer...hope I don't get much more attached... At least you knew what to do with your beauty to complete him...mine may end up as wall plaques
He is so wonderful...everytime I see one of these gorgeous artist renditions of a polar bear it makes me sad, though...they have so little time left...they, I think are becoming the actual 'spirit' bears.
Like Joanne, I wonder too, with such talent for bears, why not more of them?
Pat
Tammy,
I just had to tell you how long I have admired your bears...your sculpture is to die for :clap: :clap: :clap: and those noses are just so downright adorable. But they aren't just charming and cute...they're more, they're perfect. 
Pat
Looks like you are having a ball! I know I did! Go for it. They're wonderful! I'm always working on at least four or five at one time.
Pat

