Banner Sponsors


For artists and collectors sponsored by Intercal...your mohair supplier and Johnna's Mohair Store

Wow..I love those weedy sea dragons. they really are colorful and interesting...Winney
Debbie...she is a cutie...and she does have " puffy cheeks" , actually what people are calling cheeks is the muzzle ...hmmmm, and does include the cheeks on bears...lol...
Now..I have done some puffy cheeks...it is difficult to explain. Talking dogs here ...I once saw a book at the library on clipping poodles, all kinds of cuts...that would be a great place for anyone to look for info. as poodles have ball poofs on their tails and feet.Hmmm again, wonder if there is any info. on the internet ????? You know...a web site that had photos of how to do the poofs?
I have heard of people putting a rubberband or tie a string around the muzzle to start with...I just try to visualize it.
I will try to explain...you can look at Debs bear above... I start by getting rid of what will be some shorter areas of fur like... clipping across under the eyes, then I trim the muzzle between the eyes short ( my nose is already emb. ).
Work on blending from short to longer above the muzzle on the forehead...now we are getting to the actual muzzle part....
I use a bunka brush or small comb and brush/fluff the fur UP with every clip I make. You want to create a ball shape but you have to do it in some sort of order so you dont loose your place...
fluffing the fur Up or in a certain direction does 2 things...visually you are always checking the length you clipped against length that is left...and always check for the shape you are trying to get.
Visualize a line around the muzzle ...how short will this fur line be ? Id say no shorter than 1/4" on a 10 - 12" bear ....so I fluff the fur up , hold my breath and hold the scissors pointed towards the bear nose and clip but NOT straight across the fur ...
the scissors need to grab the first part of the fur then if held at a slight angle (away from the fur ).... you can grab less fur as you cut so you are BLENDING towards the end of the cut...blending into the longer fur on the muzzle....
I did say this is hard to explain . This is a technique you have to experience to learn... so practice ..or go spend a day at the doggie parlor ?
I just go real slow..fluff and cut , fluff and cut...My first few bears I cut that muzzle line around way to short so try to leave it longer to start with then gradually nip and snip ....
Can anyone else explain better than this ?? Have at it!!!....Winney
Thanks so much Debbie....Those small curved ones would really help me...Winney
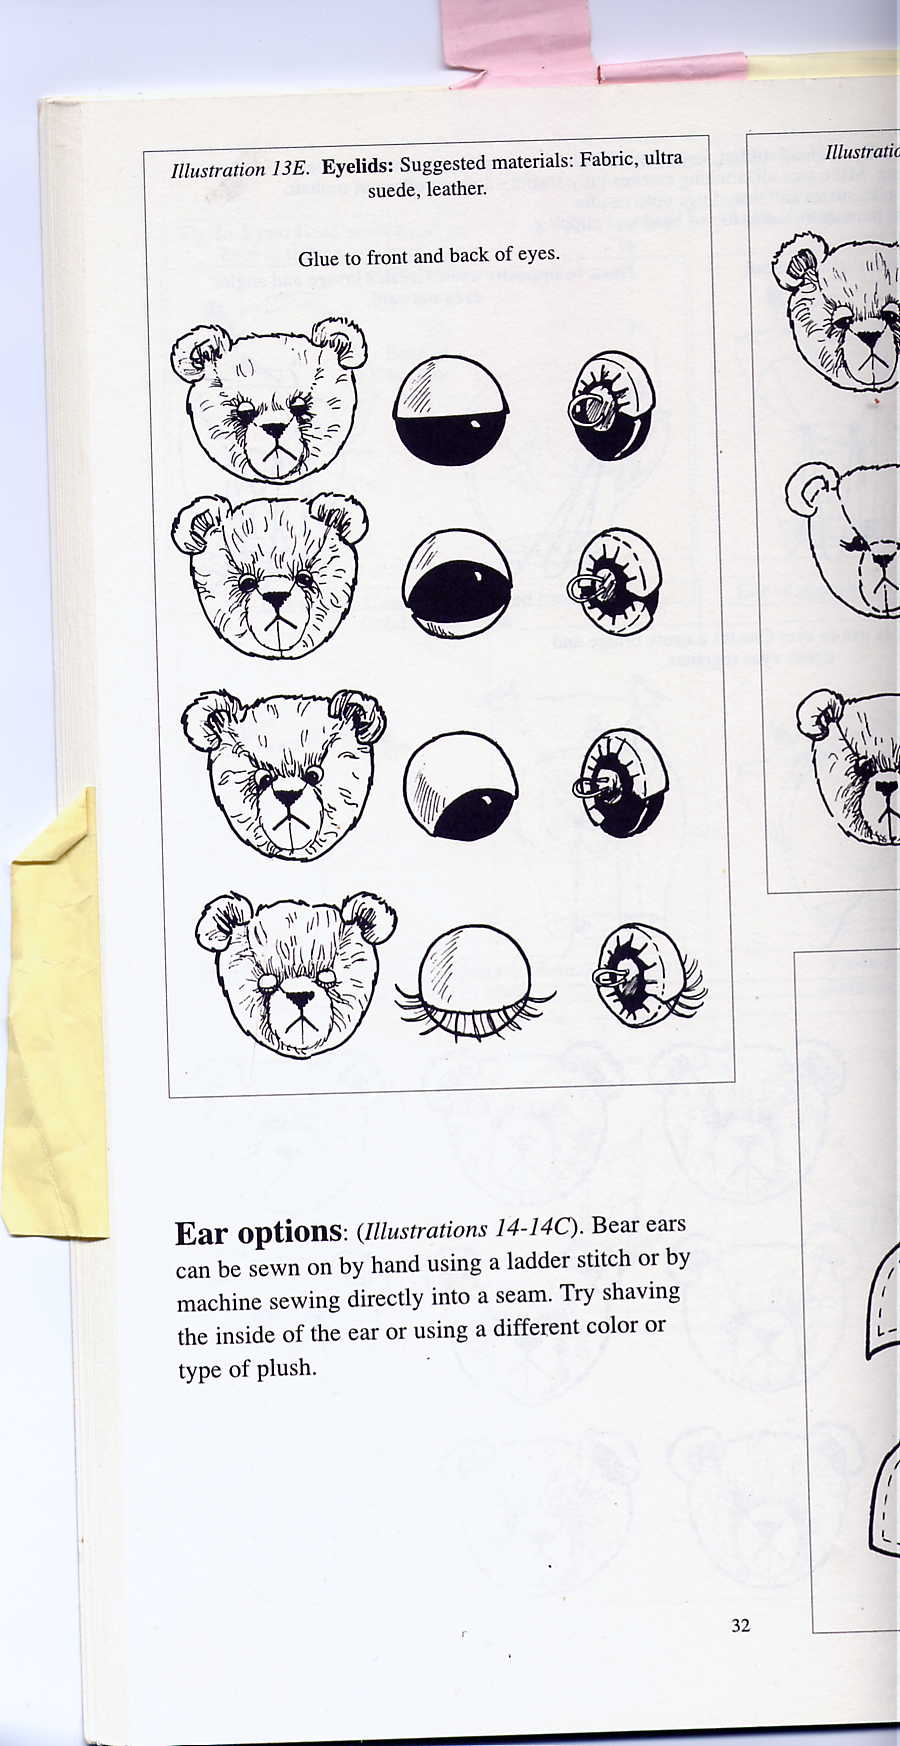
Wow...sorry its so big....this says glue to front and back of eyes...no need to do that really.
In the pic it looks like they used ultrasuede with all those little clips taken out of the back...I didn't do that, I just gathered the circle raw edge in the back ...then glued only in the back , then installed the eyes.
If you want you can take a tiny blind stitch at the elylid corners to tack them to the face fabric.... Winney
 Hey Shelli !!! I finally figured out how to get a picture, photo or a drawing up here !!!! Well. thnks to Quy, I found his detailed instructions in th HELP file...yeah hhhhhhhhhhh! Thank's Quy, you are a gem...!
Now this pic goes with my message above on doing those fabric eyelids...from now on I can draw illustrations of what I am trying to explain instead of just being stuck with wordy messages...a picture is worth a thousand words...Winney
Good tip Erin...larger eyes...to start with.... Winney
Me too...I want to get some real fur trimming scissors..... In my post above I said " Fiscars" which is wrong ...I only use to 4'" Ginghers...they are really sharp and have very sharp points that can break off easily..but any scissors gets dull real fast with real hair , probably fur too.
I bought a Gingher stone and in reading the directions it says to only sharpen one side of the blade....gotta go get it...for all of you who want to know how to sharpen your scissors with a stone or if you lost your directions....OK, its says....
Only one blade is ground with a knife edge...learn to recognize it and respect it. The blade can be resharpened in SECONDS by honing firmly witha fine grit whetstone or sharpening stone in the manner shown ...
They hold the scissors OPEN and upside down with what looks like the larger thicker blade pointed towards them...then the stone is placed flat along the side ( that blades angle ) facing them. Then they say...
CAUTION : All honing must be done on the OUTSIDE BEVEL SURFACE OF THE KNIFE EDGE ( the inside surface must not be disturbed) . ( same thing as I already said above ).Grasp scissors or shears firmly , hold sharpening stone against the outside bevel surface of the knife edge AT THE STEEPEST ANGLE which will permit contact with the extreme edge. With firm UPWARD STROKES hone the edge, working from the tip of the blade to the shank with OVERLAPPING STROKES .
Proper honing will create a continuous burr along the INSIDE CUTTING EDGE which can be removed by simply closing the blades.( but not over your fruit salad, ha ). It is important that the inside surfaces of BOTH BLADES be wiped clean before futher use.
The blade bearing the Gingher trademark is ground with a conventional edge ( what's that ? the usual thing ?) so
it therefore should, ned not ,nor should not be honed.
Ask for Ginger sharpening GS stone for sharpening stone for scissors or shears.
Notice that the directions say you can re sharpen in SECONDS...and my hubby says do not bear down on the stone/ scissors like an Amazon woman or man... any more then just firm contact is what takes the steel off too much...let the simple honing do the work for you.
I think I can handle sharpening my own scissors instead of paying $7. per shears...heck we learn to do everything else why not this ?....LOL.... gotta get some doggie shears that grab the mink...so what kind ?..... Winney
Kathy Myers !!!! I did not know you had joined here...welcome !!! I absolutly love your bears ! I met you some years ago when I lived in Anaheim and I went to my first show " Ceramic, Doll and Teddy Bear Show " right across from Disneyland. Your booth was in the very first row after getting in the door. I was so shocked....you only had a few bears left...they said you sold out within 30 min,. after the show opened ...
I had just started making mink bears....so that was a real treat seeing your in the fur ...and your workman ship is perfectly wonderful.... Winney
How cute !!!! Hes so fluffy!!!! I want to put my face down into his fur and just squiggle him....Winney
Oh my...yes...lookie...there were 2 different Kellys...so sorry Kelly from Canna Baer Paint...that did throw me for a moment....I went back a re read all the posts and it wasn't YOU...it was a Kelly lady from Colorado Springs.
Now....I can see why her good advice rubbed everyone wrong....it was not what she said but the WAY it was said. As we have seen before ,when artists give tips ... one must realize that no one artist's way is set in cement and " RIGHT" for everyone and judging eyeryone else's bears as " inferior " is not acceptable anywhere...
Altho using NO GLUE is basically good advice overall ...there ARE some good applications where it serves good common sense to use it.....like for tackings , temporary holdings;
For the muslin lining in a bear...research has shown that acrylics do not break down very well at all ( like plastic bags) and hold their color indefinately so far as known ...on all surfaces, even fabric.
I glue my leather noses on with LEATHER WELD onto real fur bears...( pelts are the same kind of material...leather ) I got that tech. from a very well known published artist...except after I glue it on..I llso ladderstitch it on.
Sizing of wool felt as for dolls for molded faces...again these are later stitched on at the outer edges...glue is just the stiffner.
Fairy wings.... would be difficult to make without the use of some glue to fabric/ wire.
I am sure you all can think of more applications. I would hate to be the one who made the bear that had the face fall off....glad someone brought that up....Yikes !
I tend to agree with Scott...to first basically use your needle as Ted creating is mainly a soft sculpture art......
Except I must..and I am compelled to go one step farther...Teddy Bear art is evolving so fast and now uses many many more materials and techniques than when it first started....new ground is breaking all the time ...and the rules haven't caught up ... that is the way art is in all mediums..that's why they call it Art.....it invents itself anew with each artist's manipulation of the materials....a different creation.
The only real rule here with materials is to test them out for your self or they may do it for you later....lol...like case of the falling face...horrors.........Winney
Kelly didnt go home...see her last post above ? Lets send out a love message to everyone and " TEDDY PILE "!!!! for a FUZZY group hug !!!!....Winney
I am laughing so hard I can hardly type...you gals are helarious...gads what a group!...
I have so many weird animals I find interesting... like the sea horse...such a dainty thing . The kids and I once found a sizable mass of seeaweed laying out of the water along the shore...it was just full of sea horses. all sizes...we spent a lot of time breaking it up in parts we could handle then putting it back into the sea....save the horses day.
I like those little 1/4" black jumpy spiders...they will actually play with you...on a table top.
They can jump in any direction from where they stand,,,good for many laughs...Winney
HEATHER I WANT THAT BEAR !!! Lookie at him..he's so precious...playing with the cat.
Tails..I have not done a one...but I think if I did I'd sit the bear down first then pin it on just so it ' grows" out where it should...I dont think he should be sitting on it... and it is just a little stubby thing and faces downward....
I hate to suggest this but..... I think it would be great if we had a Bear Photo Reference Library for anatomy, size, colorings, snozzles, ears. various bear types...or can we get that somewhere else on the web ?....Winney
Hmmm, she's right...not for realistic bunnies anyway...I'd save those great tootsies for my cats...Oh My ..Rita Harwood of Woodland Bears make the most awesome kitties with realistic tootsies, claws and the faces are to die for too....well. the whole kitty is just awsome.... I must have one !!!!!!!!!!!!!!! Winney
Yup... Hmm, I haven't tried the Show Sheen.... only to clean the top layers of the fur after I am done....
Try the 3/8" attachment, that works for me if I ever use a shaver. Its great for just doing the mid section of the muzzle just to take it down a bit....then I continue with the scissors free hand. The best teacher is PRACTICE....no one gets away with it easily when it come to mink...he, he...Winney
Shelli...Go look in your e-mailbox. I mailed you a picture to post here as I could NOT figure it out how to do it ...
It is probably already pictured in your head except I noted a few changes I had made when I made them up...and other artists may be able to visualize better with the drawing...
Now..lets see lots of eyelids !!!!...Winney
I may have confused the instructions....those sides I was talking about are actually the part
of the raw circle edge that are located just behind the eye corners...after the lid cap is made....you will see what I mean after you make it....Winney
This job sounds diffficult but its not....I designed a long legged frog once...for lids for those ball looking eyes ( sew on type ) and cut a circle of fabric ( use muslin and keep trying for the right size diameter ) fold it in half...the folded edge will be placed on the right side of the eye and you can adjust how much lid you want for it to be more wide awake or sleepy by varying the diameter sample...
Now...with thread make a running stitch all around the raw circled edge ( back of the fabric piece) ...gently pull to make the half circle gather into a cup.....this should cup up enough to where it looks like a little cap for the eye....getting the picture now ?...
OK. so try the cap onto the eye top then fit it so both SIDES in the back will touch...here is where you will overcast those sides together ...and while you are at it you could tack it to the back eye loop ....then go ahead and glue it to the back of the eye...no need to glue on the front eye...this saves it from perhaps getting glue anywhere on the front....
Anyone lost here ? Just give it a try... in experimenting you will see how easy this is...
If you plan on using real mohair fabric later for the lid it is possible to only use a little more than half of your circle then flod under the lid edge...fray check ....Winney
Lots of different ways to do it.....I tried to sculpt the sockets first..problems I had were;
I got the sockets too deep....or sockets not the SAME depth...
or when I went to install the eyes after sculpting... I happen to cut a sculpting thread ...Agh !
So now I Install the eyes TEMPORARILY...threads end up at the back bottom of the neck, under the joint.
..I'll tie it into a bow, since the thread is WAXED it will hold for now...I may take a few eye sculpting stitches which can be hidden under the eye edges, no need to worry about accidently cutting a thread here...
Now..the reason for sculpting is to sink the eyes...make a nose bridge.....and to take the pressure off the glass eyes.
Actually...my eyes look quite sunken in already...I think its because I don't stuff rock hard ( which can cause me a problem with too sunken in eyes ) I leave the neck open until the face is done so I have the option to ADD MORE stuffing anywhere it feels or looks like it needs it.. I always add stuffing after emb. the nose.
So... If I am installing eyes and find they just sink in too much then I loosen the eye threads ... and go back to stuffing !!!!
This whole process is a BALANCING act...to support and keep elements in their place...since everyone works differently because of when they add certain elements you are going to run into different problems..like I do with the eyes sinking in too much .
Sometimes a nose gets ascewed...that may be too little stuffing on one side than the other.. or I am pulling on the threads/ head in different places??? Actually I quit having this problem when I started using fine excelsier in the nose end till it was hard then stuff the rest really firm.
OK...so back to the eye thing...you may want to try changing your order of installing elements but first Id take a good look at what you are actually doing...write your order down..and the problems you have .....be analytical ...when you do something it can maybe cause a potential problem elsewhere ?...then try something different and see what happens ....
What I found out about my work is I was not stuffing the head hard enough ...no support for the things I wanted to do to that face ....Winney
Those are all some great looking pads !.....Winney
Thanks Debbie....I was looking for a good person to sharpen my Fiscars...I keep 4 pairs as hair/fur dulls them real fast.
I know a bad sharpner can ruin a good pair... so I have a stone.....I'll do it myself. ....Winney
snip. snip..hair by hair...yes, I know all about trimming mink...
To clip for LENGTH ....I use 4" Ginghers scissors.... trim with the scissors direction pointed "growing" with the fur.... ...keep the scissors rather flat , do not " dip " into the fur at any time.. ...work only small areas at a time ...first on one side then exactly on the other side. That way you wont get lost. I use a bunka brush or fine tooth comb to gently brush the fur up each time... then snip. snip...a little at a time...brush, snip. brush, snip.....and so on....
For just under the eyes I hold the scissors with the points directed towards the muzzle bridge....but be careful you do not use the whole blade to do one clip...you may cut into the bridge you don't want that....I only clip a little at a time...just under the eyes....
Clipping Mink really takes a lot of THOUGHT and time . I have never used anything but the Ginghers.. .. except once I used the electric scissors and did not like it....I started out doing minimal clipping then later did more...so go slow and stop when you are unsure of what next to do until you figure it out.... Winney
I use to get the muzzled all screwy ....but since found it WAS the way I stuffed..
If you put stuffing on the left side of the head then .... next time put it in the same spot on the right side of the head.. makes sense....well. I really have a planned way to do it now, got it down to a science.
I start with stuffing the end nose hard with fine excelsier then add a pieces of stuffing that is about the size of a lemon ( uncompressed) one at a time and FLATLY compress with my fingers ( dont dig in with you fingers) the more you add the more you can compress..
.Then I go to the head part and lay in the poly balls all around ...then in the center ...add again going all around then again in the center...you can start compressing now...I just keep adding in a BALANCED way and compressing..
.Sometimes I will use my neeedlenose pliers to slide suff along the edges...but I always seem to get into trouble evertime I use a hard tool to squash stuffing down as it make LUMPS and hard BUMPS...differenet than the rest of the stuffings... I do better at controlling my stuffing by using my fingers to flatly compress , push aside , even out and controll the finished product.... Winney
KIm..Human lashes are too long and way too big..You can cut them on half...use the part that goes nearest the nose..the hairs are shorter.
I have never had much sucess with making eyelashes stick to glass ! It will work if you first make a base eyelid out of ultrasuede that will cover the upper part of the glass SLIGHTLY that is.... if you need the eye to look more wide open...
If you want an eye to look more sultry lady like, you wioll need to pull the lid down more onto the front of the eye ....now.in eoithetr case the lash will glue on easily to the very edge of the ultrasuede. and stay there.
The only other way I have seen it done is to glue the lash above the eye right onto the mohair...kinda tricky...oh and I saw some artist bears done by ? years ago...she used mink and would cut a small piece out to fan out above the eye...Winney
Good job Kim....I love his bright nose! He is cute ...
Amanda..Thanks for the info. on Sassay long pile fabrics....I am going to order some but I didnt know about the thread and the thin needles she has making the work go easier......I am willing to try anything . Kim is a brave girl !!!....Winney

