Banner Sponsors


For artists and collectors sponsored by Intercal...your mohair supplier and Johnna's Mohair Store

LOL - we've has printers & pressmen in my family for generations! When you said folded paper hat - here's the one(s) I instantly pictured:
http://www.rny.com/fun/presshat.html
http://members.aol.com/davidpetty/mom23.htm
In Europe (England specifically) Carpenters callo the Carpenters' Hats.
Make that: Bronwen - sorry! I'd just jotted off an e to another Bronwyn in OZ....
TY, Bronwyn, I forgot to add this! I went through a period of time thinking thatr I'd save myself a LOT of time by coving the whole back. I used straight product & diluted. What amistake - it took all of the flexibility (biasing/molding/etc) out of it, and in minis you don't have a lot of area to work with anyway in say, stuffing a muzzle.
I'd been cutting out the body parts, mounting them on a pin and trying to draw the bead on the very edge. Sooo fiddly & made a mess. Then I hit on applying & drying before cutting - Bingo. Worked like a charm.
So if you have a thinner or flimsier fabric to use anywhere, you could coat the back first to give it stability.
Do you have Aleene's products in your craft shops? Their Stop Fraying & OK To Wash It are superior products to Fray Check.
Fray Check:
Alcohol based or something that gives of great fumes!
Dries stiff.
Harder to control application unless you transger it to a tiny nozzled applicator.
Other 'white' glue products: how I use.
Either cut a tiny hole in the top or transfer to an applicator. My arthritic fingers found it hard to hold the larger bottle (cheaper by the ounce!) so I purchased the curved tip Monoject 401 applicators. I drew on mty pattern, ran the glue over the cutting lines in a very narrow bead, immediately pressed the part with paper toweling. This drove the bond into the backing, while removing all of the residue.
The hardest part is waiting for them to completely dry BEFORE cutting out. When a new bear is drawn you want to start sewing immediately!!!
Voila! My bear parts often went through the washer & dryer in pockets and came out beautifully: no fraying and you could not even feel any edge coating.
Another detour from me: speaking of moving. I hope one of you UK members will describe Moving Day.
My sister & BIL (an ex-pat), (currently in CA but moving back again within the year) have dual citizenships and have bought & sold several times in England. There's a word for this chain-of-action, which I cannot remember of course, but that everyone scheduled to move on one day is part of a chain of events, and one person's screw-up in the chain makes everyone else's process fall apart.
Very curious to us YankS!
Guess I'd better type the description now! As there are 2 ways to upload an image and neither was showing a fait accompli - I hit Submit to see if it appeared - it did! (I'm never sure which system to use!!)
If you mark your needles with any type of polish or paint, remember to use alcohol to remove the rust-preventing machine oil first. Otherwise the bond is not good and the paint will wear off.
I use Crayola's air-drying Model Magic; it says dries in a day but I wait nearly a week.
Those #40 needles are all marked with yellow.
Oval shaped tops mark the Star needles, in every color. The round shape tells me that these are Tri needles, with barbs in all 3 'zones' - my word for the barb placements along the working shaft.
These start at the tip, are in the center as well as all the way up the shaft. Some are in 1 & 2 and some in only 2 & 3.
The last code tells me the supplier or manufacturer: if I like them I want to knowe where I got them and if I don't like them I want to remember whare to avoid!
 Thx Quy & Shelli for the technical help!
Lynette,
To answer your original questions:
what is the difference and why and when would you use one or the other, does it make any difference. i.e. you get a 36 S & &, and you get a 38 S & T.
Has anyone also found an easy way to identify the needles- in a way that stays put.
The width of the Tri and the Star are the same within each size. With the 4 sides on a Star and the 3 on the Tri, the individual surfaces of the 4 sided needle would necessarily be slightly narrower than those comprising just 3 sides. There is also a concave groove formed between each barbed outer 'corner' on the Star, while the Tri has a flat surface. (If you're ever in doubt about which shape you're holding, roll it between your finger; light will reflect off a Tri like you're holding a knife blade and there'll be no light reflected off a Star.)
As we always work from larger to smaller, a Tri would be used first and when penetration becomes more resistant, you move down to a Star. Whether or not you choose to use all of the styles in every size is a personal choice - it's not necessary to use more than about 3 - 4 different needles in each project. As I use many many different breeds of fiber, I find myself using 6 or so of the 9 styles I stock. They each have their own place in my work.
If you color code your needles by painting the crank end, be sure to with them with alcohol first to remove the manufacturers' rust-preventing machine oil. This keep the paint or nail polish from rubbing off. Many ppl create a ball top with an oven baked polymer clay or use Crayola's air-drying Model Magic to mark the tops and make it more comfortable to hold. You can assign a different color & shape to each size & style or they can be written right onto the tops.
Keep on Needlin'!
Hi, I’ve just found this thread and would like to input.
Nfers should know that there are literally dozens of felting needles for wholesalers and retailers to choose to carry. As the minimum order from the manufacturers is a full box of 1000 needles of each & every size they’d like to carry, this significantly reduces the styles that most will stock.
The gauge, styles and placements of the barbs is very varied, according to what the desired felting affect is expected.
For instance, this blurb from the Wizpick site:
Needle description: 36 gauge / 3x3x3 barbs / 3 inch / fast;
Use Green for early stages of felting coarse (cross-bred) wools. Green can also be used with medium wools such as Corriedale and Halfbred where the presence of pronounced puncture marks is not an issue. Green has close barb spacing for fast action.
While it’s admirable to give descriptions, Nfers must realize that this is the description of just this one needle from one manufacturer and doesn’t represent all.
1st – ‘most’ #36 needles are 3.5” long, but both lengths are available
2nd – 3x3x3 says that this is a Tri, with 3 barbs on each of the 3 sides. No explanation of what the numbers represent is given. This cloaks it in mystery and is a disservice to those wishing to become knowledgeable.
3rd – the close spacing of the barbs does not necessarily mean faster felting than other needles around this #36 size.
4th – Corriedale & cross breeds can be medium to a very fine (micron size) fiber depending on the breeder & the individual sheep; holes in the surface show up more on medium to coarse fibers.
And I could go on picking their descriptions apart. While their site appears to go into much detail on each needle and its uses/purposes, there are no hard & fast rules in Needle Felting!
It’s more important to think about what you’re trying to accomplish at each stage of your felting.
In the beginning you want to work very deeply, to completely bond fibers within the mass to each other (avoiding The Tennis Ball Syndrome) as well as deeply into the base if you’re applying the felting as a surface embellishment, as in a bear’s face or the back of a jacket. The needles that best serve this purpose have larger barbs (as in all of #36 styles as compared to the barb size of 38 and smaller needles), but begin close to the tip and continue up for most of the shaft’s working length.
After the base/core has been very firmly needled, and as you add more fiber to build your sculpture, you do not need to penetrate the mass as deeply so the barbs can be nearer to the tip and closer to each other.
Often you’ll find yourself backing up and using the larger needles again over work that has progressed down to #40 or 42 because you want to change a proportion or position of something and that’s possible only through redirecting the core.
The Green needle described above seems to be working against itself – a larger/beginning work shaft but barbs placed close to each other. Sometimes it’s in un-knowledge (a word???) that advertising like this exists and sometimes it’s through lack of experience/analysis that leads to requoting what has been previously attributed elsewhere to each needle style.
The needles I use and stock have barbs placed farther apart and throughout the working area in the larger sizes, going right down to extremely close (to the tip & to each other) placements on the 42 and the Crown – 1 barb placed adjacent to each other on each of its 3 side, resembling a Crown – for extremely shallow penetration or needing all of the fiber to be attached with one thrust, like bonding longer locks into the head for ‘hair’ and adding additional colors onto thin pieces like bunny inner ears, with no bearding of the color through the first.
And this is just the tip of the iceberg for needles!
Hi Nancy & Judi,
I'd like to say that I'm too familiar with both sides of this - I was counting our BC/BSI blessings only on account of my DH's union (electical) but that can change at any time - there are only 2 guarantees in this life!!
Our oldest son & DIL are both disabled and have only Soc Sec & Medicare. Brian is 41; became diabetic at 11. After many health problems throughout his life he rec'd a double transplant about 7 years ago, pancreas and kidney. Dialysis and diabetes were gone overnight. But continuing BP probs and kidney function and other health things follow him. And he receives just $900 a month from Soc Sec to live on. (Having that garnished for child care has not been easy..)
I don't know what they pay in health care/ins. So we live daily with waiting for the phone to ring, one more time....
did you see the article that Dateline did on the subject of insurance companies paying a different amount than the rest who are paying cash? That was VERY hard to watch.
Nutzzz - I missed that one.
Brian's wife, our DIL, became disabled from a work injury to her back 10 years ago with the PO, just about the time she was also diagnosed with MS.
The point I'm getting to is that she had back surgery to 'restack' her back 2 years ago, the very same surgery & Dr that my DH had a year ago. Because we have insurance with PPO, they 'write off' between 1/2 - 2/3 of all of our health treatments (appts, surgeries, medications, etc) and then BC/BSI pays the major portion of what remains and we are billed a small amount to finish it off.
But our DIL, w/only Medicare, had no write off through using an in-network Particpating Provider, was charged the full amount that Medicare allowed and was put on a payment budget, which is astronomical, in adittion to her monthly Medicare policy. This total surgery & rehab runs about $300,000. She will never have her debt paid off. The ppl who need it most (annually bringing in less than 12,000 on disability) pay full price and we who have ins get off almost scot-free. It just makes no sense. End of rant.
I can't speak more highly of BC/BS. Both of my major surgeries were scheduled and accomplished with 3 weeks, TAH ( Total Abdom Hyster.) and knee replacement. And that wait was only to get all of the testing for heart, blood drawn, etc finished in time for the Dr's next available surgical date.
If it were crisis care they would have been done 'alnost' immediately.
I've never had a bladder infection in my life, with the exception of the TWO that I developed, botyh times in the week prior to the surgical dates, 15 years apart. Weird.
I'm so enthused about my new knee that I've already scheduled the other for 16 Oct. (I'm a b_ _ _ _ in the summer humidity; I don't need to complicate my life!!)
What would you guess is going to visit me the week before? LOL
Bobbie
Tri vs Star shapes:
Thx, Renae for your 'prompt'!
It's correct that a Tri(angular) needle has 3 sides or bevels and the Star has 4.
Let's see if I can explain this clearly - -
Both styles have the same size (gauge) of shaft.
The barbed notches are in proportion to the size of the side angles in each size needle.
Depending in the manufacturer and the style of the needle, each of the edges can have between 1 to 4 barbs on each 'corner' edges.
The size of the formed barbs on Star needles are slightly smaller than those on the same gauge Tri, due to the shaft being formed into 4 sides rather than 3. Their width & depth is in direct relationship to the width of the side/bevel, making those on Tri needles slightly larger than on the Star, of the same gauge/size needle. This makes the formed notches (Not all manufacturers 'form' their barbs; some are 'cut' into the edges and these are inferior needles. The sharp/rough/uneven/unbeveled edges will actually cut the fiber rather than just carrying it into the fiber mass.) just slightly smaller on Stars than on Tris.
We always start with the largest gauged needles first. When the penetration becomes more resistant or difficult, you go to the next smaller size. It's not strictly necessary to use both Tri & Star in every size, but a 38 (or 38, etc...) Star is considered smaller than a 38 Tri so it would slip into the sculpture slightly easier.
The slightly smaller barbs of this example - 38 Star - push a slightly smaller amount of fiber in, likening a 38 Star closer to a 40Tri than to the 38Tri in its felting action.
The most available sizes are 36 T & S, 38 T & S, 40T & S, 42T, Pinch & Crown.
Unless you're working very softly, a 19 & 32 needle is not necessary. In Industry it's used with fibers like coconut husk, hemp & similar large fibers. In wool, if you're needling coarse fibers like Navajo/Churro fiber, this might be useful in the beginning stages but it isn't necessary.
The only one that is positively useless is the tear-drop shaped needle, with 8 barbs right next to each other along the 1 'corner' edge, This needle has a specific use in textile manufacturing, that being to carry the fiber through a woven weft & warp backing without damaging it.
Are you thoroughly confused now?? I'll add that I use 9 needle sizes & shape listed above, but depending upon the breed of fiber, not all of them give the best results - I like the widest variety to be able to choose from.
One last point: all needles come coated with machine oil to keep them from rusting in storage. I have yet to hear of a retailer that takes the time to remove the oil before dipping or painting the needle tops with enamels, nail polish, tool grip plastics., etc. That's why the color wears off so quickly - there wasn't a good bond made between the two.
Thx for your excellent explanation, Nancy! I'd like to work for/with you sometime! I'll PM..
Ditto to most of what you said. I purchase a lot of kits, online classes and retail NFed work, in an effort to see the content, presentation and expertise of the person who wrote or worked the kit or piece.
That's sort of like 'checking out the competition'; I want to make sure that my work gives the absolute most information that I can stuff into it, giving much more than was expected. In the half dozen online classes I've led, I do use yahoo - I set up a separate private list for each class so access is given to only registered students, and is further password-protected so that everyone takes their time and doesn't rush through the material in a day or 2. That creates a lot of extra work for the teacher, as the student's mistake has rarely happened when they've absorbed what they should have done first - Read!
As well as the continuing dialog I have with those participating (which benefits all students), pictures of the weekly progress is posted into the individual Albums. I put them through Photoshop and Word so that I can draw on them to show what needs to be done. After posting the changed images back into the Albums, everyone can see the suggestions I've made. These and the dialogs are helpful to those that aren't quite at that point, as they can avoid or correct things in their own work. I found this system to be very efficient.
I upload several dozen informative posts on NFing before the actual Lessons begin, There are usually 6 - 7 'chapters' or 'lessons', one per week. And the classroom stays open for several weeks afterwards, giving everyone time to print off what they'd like and extended time to complete the project.
My only problem is that I have never been able to create my own PDFs..... On another thread I posted last night: a query to anyone that can walk me through it. I signed up for the 'Free' Create-5-Documents (HA! surprise surprise - No customer support!!!) then the Cheapie version, then a year's membership. Adobe has a site either directed to the pros, or I'm too thick to learn, but I've never gotten it to work, I'd really like to pay some savvy person to walk me through it, instead of forever paying others to convert my kit documents into PDFs...... Can anyone out there fill the bill?
The many classes I've taken (mostly Crafty College & the recent one through Joggles site) have all been on Needle Felting. Barbara @ Joggles performed her job in a timely fashion for the most part; it was the class materials & interaction (& lack thereof) during and afterwards.
I never did find the 'Forum' to post questions photos during the last class I took. I also found the print material/information quite simplistic (I don't want to read 'instructions' like "That's a great start. Keep on needling.) " How can the teacher see/know what I've done? This isn't 'instruction' to me; it's cheerleading. That has it's place but it's not in the initial stages of print materials - it's for Feedback after the teacher has seen my progress and answered my questions.
I couldn't swing the fee out of the budget this spring and took one on Joggles. What a waste of pinched pennies...
I'll follow my heart not my head next time...
Most classes open in weekly sessions. I put password-protection on my classes and sent them out weekly for about 6 weeks, with a window of at least 60 days. Most of us are too, too busy or Life pops up its unexpected head. Printing out the materials for later perusal is best.
..it put them in a PDF file as usual,
If we can back up a bit --- this may be 'the usual' for lots of you but for the life of me I cannot wade through Adobe's instructions for Create A PDF.
I've had the free download, then the El Cheapo version and then paid for the expensive one. Still no go. I've had to pay someone to convert my patterns/instructions for online classes, but would love to be able to do it myself.
Is there an E Z Way that I'm missing or am I just too dense??? Can someone walk me through the process? I'll pay!!!
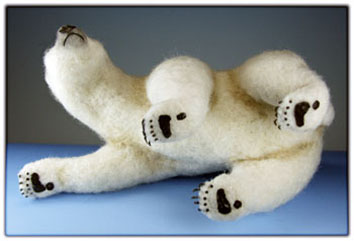
Toes and claws - I knew that to take this fiber art into the realm that it deserves, I needed to step-up-to-the-plate: no more sewn claws but realistic ones.
The claws on just those 4 bears represents 3 days of work. After spending all that time I decided that they needed to be shown, so in my auctions I began to show the 'bottom-side'.
I laugh when I see the number of auctions that use the same vantage point now...
Here's a sneak peak at the vignette I designed for the Heartland Museum in Clarion IA. They're adding just 8 new ones this year. Here are the bears - I have to decide if there's more impact w/o the 2nd cub on the right..
And the concept of the scene is going to be fabulous - "Into The Future"
The male is going to be sliced in half diagonally through its middle and mounted half on each side of a glass pane. The female and (restrained") cub will be behind the glass and in a the far background will be arctic scenery.
There is no family unit in the wild, but they'll represent forward movement - the male seeking new lands & adventures, the female thinking about the hazards, the troubles ahead, the lost connections. And the cub just wants to break away and get on with it!!
The bears are done and I need to build the slightly angled-upward, myopic scene-in-a-box.
The Male is 4.5" long, female sits 3.5" high and the squirming cub is 1.25" high x 2.5" long.
It's hours spent needling the finish coat, the choice of particular needles and several breeds of wool selected that give me no fuzzies/no clipping. Thx for the compliment!

So, if you put something hard inside a bear, do you just felt carefully around it. Reggae has rocks in his head, lapis and crystal, and it was hard for me to feel he was well made because I had to felt around the container with the rocks in it. Is that why beads are used for weight, because you can needle through them?
I don't know of any beads that you can needle through. And the position of the hole would shift anyway as you work around them. I've weighted things that stand off-balance or on 3 of their 4 legs by felting firmly all the way through and then cut open a slit in an out-of-the-way spot, slip in your weighting material, close the slit and felt some wisps of fiber over it to conceal it. This puts the exact amount of weight, exactly where it balances your piece and you don't have to figure it all out in advance. Felting 'evolves; and you may find where you placed the weight in the feet/legs/belly don't do what you want after you've had to add more fiber than you expected to need, to give you the look you want.
I'd do it afterwards.
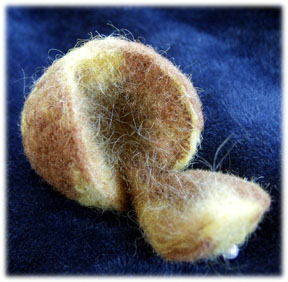
Here's one bear from a vignette I've created. One of my largest, measuring about 4" long. While he weighs only 1.2 ounces, too many of those tenths of an ounce are placed forward of the center fulcrum. Polars have such long necks & bodies!
In the 'bottom' shot, you cannot find the spot I inserted a bit of weight to:

For teaching, I start the students' base work for the project by wet felting 'balls' tied individually into panty hose legs, put through the washer & dryer. Effortless solid core, saving an hour or 2 of class needling time.
Always make sure that right from the start of your project you go all the way through your wool. You want the center to be very firm.
Thx Judi, you opened up one of my favorite subjects: the dreaded Tennis Ball Syndrome. It can happen in a ball, inside a long piece like a limb, a neck - anywhere. One must absolutely thrust completely through the mass and into the foam in the beginning stages. That's why we work on foam...
Once you're able to hold the piece in your hand to work, it's generally past the stage of inadvertently creating the problem.
Collections ~ I'm pretty sure that my family is not going to call in a dumpster to haul my treasures out to, but I'm really rather concerned about my 'Really Good Stuff" - aka Bear Business Stuff being disposed of.
Has it ever been discussed about leaving a list of bear buddies, to be contacted as soon as the death certificate is signed? Seriously!!! It's a "No Questions Asked, Come Within The Next Week or It'll All Be Out On The Curb; Trash Day Is Thursday list." I have one but it needs updating.
So, knowing there are Lace ppl here and Children's book ppl - well anyone who wants to be on my list has only to email!
I've de-stashed myself of several categories already: weeded out lace-making books for instance. Sold some for what I paid 30 years ago and gave the rest away for the price of postage.
I'm a realist; the older I get the more I think about this - I'm gonna die someday and this stuff has Value to lots of ppl!
DH wants my half of the storage space, and if he goes first, there are going to be lots of power tools 'available' and loads of aged oak & walnut.......
Thx for posting that Brenda, (I said that it was a valid opinion and should be read!!) I paraphrased your email a little - we must've been posting at the same moment!
I have a situation where one or two bidders buy almost everything I make, and although that's very flattering, I really try to puruse other avenues to build up my customer base.
And this brings me back full circle to the other eBay topic I weighed in on - using Private ID auctions. 2 deep-pocket bidders seem to purchase almost everything and I don't want to turn either of them off, but I do want to encourage others, to widen the collector base.
Thx all!
from Shelli:
Her name was "mined" from some other bear related venture which was public, as was her email access. So that was a big red flag about treading lightly where emailing people who didn't SPECIFICALLY ASK FOR email, is concerned.
But in the scenario I present, they actually made the first move/contact, by placing a bid. Yes, I certainly agree that some wouldn't want their name harvested from an unrelated source.
You've certainly received some nasties! That tiny percentage is going to be in every population, be it an amoeba colony or Corporate America.
I rec'd a several emails today, one of which included a copy of the message they're likely to send. The funny thing is I could have written it myself, as it's very close to what I've written in the past!:
"I'd like to "Thank you" for your bid on my auction. I am always flattered when someone thinks enough of my work to place a bid. I'm writing to inquire if you might be interested in being added to my "notify" list so you will know in advance when I'm about to list a new auction."
"If you are interested, please click on Reply and return an empty email. If you are not interested, please ignore this email and I won't contact you again.
Thanks for your time and Warmest Regards,"
I've been burrowed in my manuscript so I haven't looked into the careful directions you posted yesterday - I intend to!!
Edie & Lisa, how important is the wording! Remember that I don't contact everyone who places a bid, only occasionally to someone who bids but does not win. I come like a supplicant, but with dignity and a respect for my work and the bidders.
Lisa, I do like the idea of offering to design something for a frequent, no-winning bidder!
And Edie -[quote I have myself bid on bears that I knew I was not going to be able to "buy" but could just not resist putting in a bid as a way of saying "Wow! Is that ever great - especially if it is something that for some reason is not getting bids or is sitting far lower than it should be. I feel my bid will show them that someone noticed and appreciated their efforts even if I can't really afford to totally go after it. quote]
Me, too! And have sometimes unexpectedly won a wonderful item!
as without her she wouldn't be able to receive the amount of $$ she is getting for them
What a crass way to say Thank You (that their bid just made the winning bidder up their bid. I'd love to shake that person till their teeth rattled! Makes one wonder if that collector then views all of us through that attitude veil?)
To 'mine' would be 'to collect', but in this case it implies negative connotations
Whoa... this topic has certainly brought out some different directions! That was actually my intent, as I'm not an 'edgy' person and being non-confrontatiuonal, I don't usually stir-the-waters, but wanted to introduce a subject not previously addressed.
You should know that I combined several ideas in 1 post: questions concerning contact with winning bidders as well as with those that consistently bid on one's item but don't necessarily win.
No, of course I don't pursue clients/bidders. One of the emails I send only after a buyer has received their item, is to ask if they'd like to be placed on an advance notice list. Every single one has sent back an enthusiastic "Yes, Please!". After they've indicated wanting to follow my work, I then inquire if they'd mind giving me their personal preferences - about auction length, day of the week, time of day. Frankly, this has been one of the most flattering (their opinions exressed!) inquiries, to attempt to fit my auctions to their personal schedules. I try to accomadate as many of the polled results as I can.
After having seen some of the same bidders place bids but not win any items, I've written an introductory (contact) email to some of them, thanking them for having placed a bid. Many of the names are ones I've noticed on eBay for a while. I do not ask them all of the above info! - just a polite "Happy to 'meet' you and TY for your bid." As I do receive prompt replies to these emails, I think that they are appreciated, because they don't just say "You're welcome." but go on to comment on certain pieces I've had in auctions or on websites, etc. In other words, they have been following my work and liked the personal contact.
2 things:
First - from my 2 decades of exhibiting - 12 in the bear world - I never seem to remember that to some collectors we are on a higher platform and they hold us in regard; much as show attendees like to meet the designer/artist, this is that personal touch, initiated by 'the person on the platform'. I'm basically that shy nobody who is extremely honored when someone wishes to plunk down their cold hard cash for this item I created. It's me that's in awe of their spending power and honored that they've chosen to add something I created to their collection.
Second - it's Ruth Johnson's TOTMA - Top Of The Mind Awareness. Keep your name & product in sight. I put myself in their shoes and would be flattered to receive a simple Thanks from someone whose work I admire enough to pay for.
I don't send out a smothering blanket of emails to all bidders nor contact them again, but in my cases, every one of these non-winning bidders as also swiftly returned my note with an enthusiatic reply as well. Some have gone on to become email friends.... and we never talk Bears again!
Circumstances don't allow some ppl to become the winner but I think that their interest on one's work should be respected and given its due. "Mining' was too strong a word, but it brought all of my questions into 1 word. It's an aggressive word; I wanted some reactions. Thx for giving them to me.
I've been wondering about this for several years and finally feel comfortable asking this group:
do any of you contact other bidders (not counting the winning bidder?
Do you thank them for having placed a bid on your work?
Do you ask if they'd like to be on your advance notice list?
Do you ask if they prefer certain lengths (# of days) for auctions to last?
End on a particular day of the week? End at a particular time?
Basically, does anyone else 'mine' their bidders to develop a future market?
Bobbie
Otherwise, with a too-small disk, those areas of your bear's limbs will stuff "fat" and look... not quite right.
Thx Shelli - I've never heard anyone else address this before - anywhere - and it needs talking up! Nothing looks more amateurish than to have too small a set of disks used: fat and fitting onto (rather than into) the body like some kind of weird growth instead of an integrated part of the body as a whole - smooth continuous lines over the neck and limbs joints.
It takes some dexterity and experience to stuff that narrow space between disk and fabric smoothly, (like your Heavenly Pig) as well as make a nice smooth closing over them.

