Banner Sponsors


For artists and collectors sponsored by Intercal...your mohair supplier and Johnna's Mohair Store
That one does look promising. You could ask whether the backing has any stretch to it. The best faux furs have a woven backing that won't stretch, the worst have a knitted backing that stretches all over the place, and others are in between. (You could also ask her to describe the color.)
Best,
Becky
I will get you some more pics in the morning, and will show you how I sew it on. Basically I pin the pieces to the body the right way and use a ladder stitch to do the seams.
For fabric you could try fauxthrow.com and look in the remnants and sale section.
Also, beware ordering fur fabric from the US as postage prices can be astronomical asthe good quality stuff can be very heavy.
the fauxthrow.com is a uk company. :-)
 Posts: 110
I will get you some more pics in the morning, and will show you how I sew it on. Basically I pin the pieces to the body the right way and use a ladder stitch to do the seams.
For fabric you could try fauxthrow.com and look in the remnants and sale section.
I've just had a look at that site, this:
http://fauxthrow.com/faux-fur-remnants- … ux-fur.htm
Looks good, but again, I'm not sure if it would clip to a different shade?
Or this one :
http://fauxthrow.com/faux-fur-remnants- … ux-fur.htm
The fabrics on there look really nice and natural.
The first one will clip to the lighter base colour, which may add a nice effect if you want a paler face.
The second one is one colour all the way down.  I actually have some of that one, its a very nice dense fur, though maybe slightly short. However its probably the longest you'll be able to get easily.
All of thier furs are stunning and are of the highest quality. They trim and clip well and the fabric backing has very little stretch. Its designed to be like real fur and I have used it fairly successfully with real fur, it does blend well. But to me it will never feel exactly the same, but only because im so used to both real and faux and spotting the difference is second nature to me XD
the remnants section has an excellent selection of the furs, and the by the meter section is truly amazing.
 Posts: 102
Fauxthrow also sends samples, that's the best way to avoid mispurchases. 
Posts: 110I really like the coyote coloured one, it looks very real, and has longer hairs in it, which would look good for a pom coat. I don't mind the head/nose and legs being slightly different in shading, real dogs often are once the longer hair is clipped down, just as long as its not too different.
Out of interest though, would you say the polar bear one is white or cream, if you actually have that one in front of you to compare?
Elli - I am going to request a sample of each of those two I think, those furs are definitely the best I have seen so far, from what I can tell off a snippet on screen anyway :P.
the polar bear is definitely more white than cream this fur may also be suitable http://www.fauxthrow.com/faux-fur-remna … uarter.htm but it is slightly shorter. the subtle black tips would be an awesome colour though.
the coyote looks to be the closest you will get in faux fur.
I've always wondered where you can get the mohair or faux fur that is ridiculously long like in this http://www.pedigreesroyal.com/maltese.php or http://www.bigfurryfriends.com/dogs/pek … s/8592.jpg
okay, more in progress pics
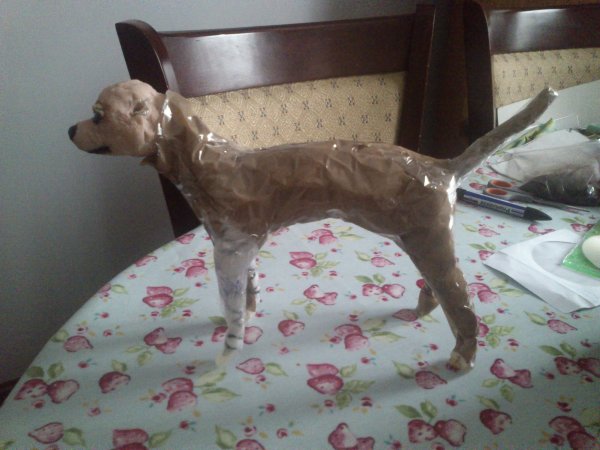
in this one you can see how i've stretched out the limbs, tail and neck so that the pattern will be at full stretch to allow for movement. i use a very similar method to the tutorial i linked, only i've used parcel tape (and a little normal tape as i ran out) as i find it sticks better.
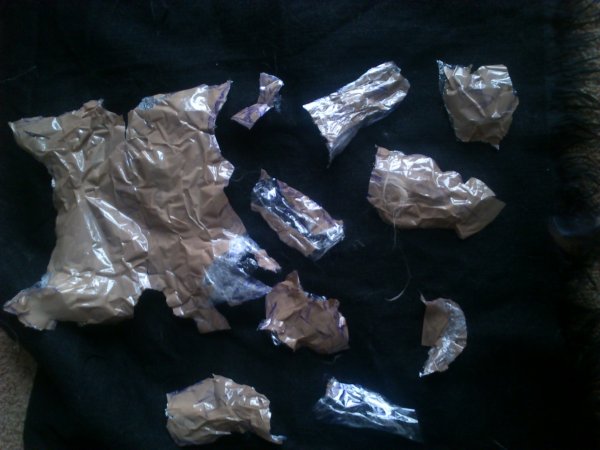
this is my pattern pieces once i'd marked the seams and then cut off the art doll. because the pattern is for a OOAK i didn't bother making paper or cardboard versions of it as in the tutorial. it just saves time when i won't need the pattern again. if i was making something that was going to be cast or make again exactly the same, i would make a more detailed pattern with thick paper from these. I haven't done the ears in this yet and, as the doll is going to be hyper realistic, i've not worked out the pattern for the male "bits" as i want to size those parts to the doll.
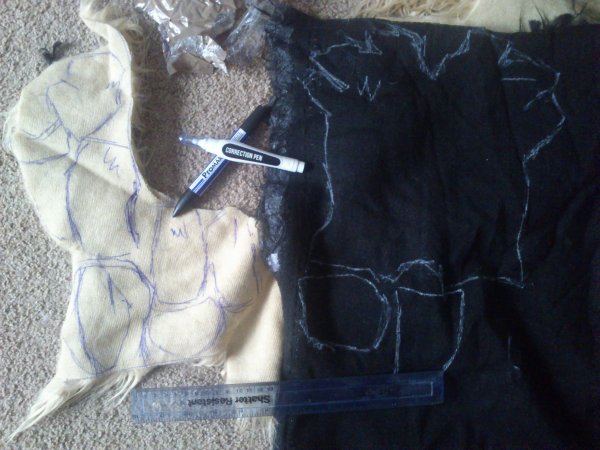
this is all of the pieces for the body and legs drawn out on the fabric. i use a correction fluid pen for the darker fabric, or tailors chalk if i haven't misplaced it again, and permanent marker for lighter fabrics. i use a craft knife to cut the pieces out so that i am only cutting the backing not the actual fibers. this fabric is not from mohairbearmakingsupplies or fauxthrow but from a US company called mendels and i had a friend in the US order it and then ship it to me. it was still very very expensive shipping it that way.
and finally
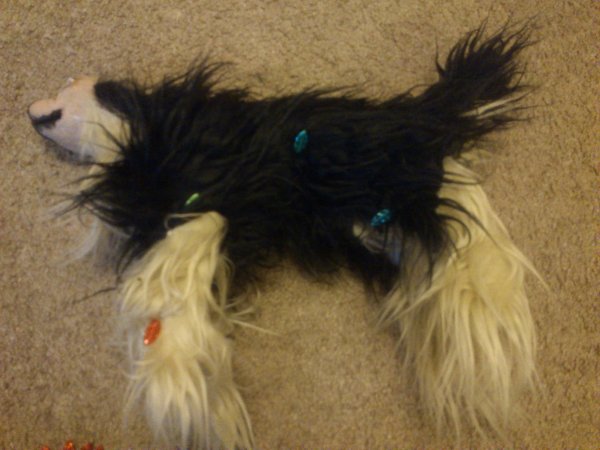
this is how i sew/attach the fur to the armature. i pin the pieces where they will go using long pins with noticeable heads, you can see them in the photo as the odd coloured dots. i then start at the tail end and use a ladder stitch to sew up the seams, basically enclosing the doll armature inside the fabric outer. i leave the legs slightly long until i've finished sewing and am ready to glue to the feet, same when it comes to the neck. i then trim the fur to how i want it.
for inserting an armature into a complete plushie you will need to leave the stuffing hole a fair bit bigger. unless you want to wrap the stuffing around the armature. in which case, if you are using the pattern you linked to, i would sew up the back completely and sew the inside leg parts to the outside leg part instead of the belly, so you basically have the complete plush without a belly, you can split the belly part into two by cutting at the chest area so you can sew the chin and neck part on before adding the armature. then you can insert the wrapped armature ton the legs and head, pin the belly piece to the belly like i do with my art dolls, and then close it up using a ladder stitch.
did this make any sense? i hope it did.
Posts: 102SilverClaw, thank you for the pics, very interesting!
When I make Plushies with an armature like your chuhuahua (paws, head and batting are already attached to the skeleton) I sew the body inside out, but leave the whole back seam and the thin parts of the legs open, so I can get the armature in.
For me that's a lot easier than sewing the whole body with ladder stich. 
This is the only picture I have, but you can't see much, too much fur.  Well, it's an unstuffed body with open leg seams (and a test head pinned on).
Posts: 110Thank you both for the pictures, they are really, really helpful to visualise the different steps :). SilverClaw, your idea of making the frame and then basically encasing it in the fur, is fab! Now I'm not sure whether to try that, or use the pattern I found, but with Elli's idea of leaving the back and legs open, as for now, I don't feel confident enough to stitch it from the outside, I'd rather turn it inside out so its mostly hidden for the time being! :P
I have ordered some swatches from fauxfur, 2 of each so that I can clip one down to see what its like against the unclipped one. Provided it looks right, I think the coyote one will be the one I use, it's the only one long enough. I've no idea where people get the really long straight fur from for dolls like that Peke and Maltese, I'm thinking that maybe they use hair extensions somehow, possibly dyed and cut to be suitable.
no problems!!
I tend to go for ladder stitching the whole way round as i find it easier to work the fabric onto the form. I also work on taxidermy so i guess that is where that has come from. XD my armatures are also quite thick as i design them to stand up to lots of reposing and i always have trouble feeding them into a body thats already sewn as i wrap and then make the pattern. admittedly, its a technique used more in art dolls that plushies
Elli, i've just been looking through your blog, your creations are so adorable!
this thread has become very interesting. its great to see how others work, and i;m also loving how helpful everyone is being. it makes a nice change from the art doll community, some of them can be very tight lipped about techniques.
PlushPuppy, i can't wait to see what you come up with you must keep us all posted and i will definitely show you my finished chi when he is done he is even getting a real collar and tag
Posts: 110Yes I'll keep you updated! You've all been extremely helpful, and I've learnt and learning new skills and techniques that I had no idea about, or even heard of! It's also rather addictive, because not only can I not wait to get started, if it works out alright, I'm already thinking of doing another :wacko:.
I've just had a thought and wondered if I could combine the two methods, make the pattern using the sew inside out method, then making up a model using the tape method, to put inside the 'skin'? As I also want an armature that will hold up to posing well. SilverClaw, it looks like you've wrapped the wire all over your chi, almost like a wire topiary frame, is that how you get it sturdy enough? Will it still be cuddly like that? And if you cover it in tape, can you hear it crunching when you hold/pose the doll? Don't want it to sound like a pop bottle in a Jiffy bag!:D
what looks like wire over the stuffing is actually black yarn that holds the stuffing in place
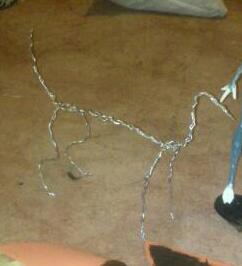
This is what the wire armature looks like without the sculpted parts or stuffing wrapped around it. its at this stage, before the stuffing is put on, that i sometimes wrap it in tape. I usually don't when i am wrapping the armature like i did here, but when i work with posable taxidermy, where i can't wrap the armature i cover it in tape to stop the wire ends poking and to help stabilize the armature. This photo was at the beginning of making the chi and after it was taken there was more wire added to it.
once the stuffing is either wrapped around it, or the tape covered armature is inside a stuffed plushie, you won't be able to feel or hear that there is tape there as the stuffing is completely covering it.
hope that clears that up a little
Posts: 110Thanks SilverClaw for explaining that, I actually thought the black stuff was the wire .
I have received my swatches from fauxfur, and unfortunately the coyote one is not suitable after all, it's nowhere near the creamish tan showed in the pic:

The back, which is two toned:
Its a shame because its lovely and long, and the cream it does have is perfect (would make a lovely cream sable pom), but it's mainly more brown than cream :(. I've just found this on their site though:
http://www.fauxthrow.com/gallery_image. … 5e0fdd.jpg
Which says its made with the coyote fur, yet it looks far more like cream than the swatch I got? It's the sort of colour I'm actually after too.
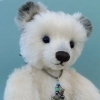
The polar bear one, is nice enough and the same all the way through:


They feel so soft and realistic!
I'm not sure whether to just use the polar bear one, even though it's not really the colour I wanted, or ask mohairbearsupplies for a sample of the 'blush' and 'tan' ones :/.
Hmmm the coyote one confuses me somewhat, as the pics on the website are usually so close the the fabric. From looking at the back of the fabric, the samplelooks to be cut from a patch with only a small amount of the cream. Often these more realistic furs are mottled like on the sample and the mottling goes in lose bands. If you look at the bottom corner you can see more cream coloured spots and I would suspect that the fur just below where the sample was is more creamy.
I would ask mohair for samples too, then you can compare them all. And although the tan one from them looks speckled on the back, it all depends on how much you trim. If you dont go too low it may not affect the colour too much.
Also, do you have a pic to the colour pom you want to make, that might make it a bit easier to help you find the perfect fabric :-)
Posts: 102Hard decision... I would ask for samples of the other two, nothing to loose.
But I guess the polar bear would be the best. If you don't want the dog to be completely white you can paint it with water-thinned acrylic colour to a more brownish shade, that's no problem.
Posts: 110I might phone them about the coyote one, it really does look different in their web pic.
I've found this one:
http://www.fabric-online.co.uk/content/ … longhaired
Which will send a sample, so I think I'll ask for one of that one too. Its expensive compared to the others, but I really would like to get the colour as I want it, otherwise I'm not going to be happy with it as it won't be 'right' :P.
This is the colour pom I'm trying to get:
http://www.pets4homes.co.uk/classifieds … haven.html
http://www.sulit.com.ph/index.php/view+ … entDetails (click the inactive advert link to bring up the picture)
Posts: 102If you have acrylic colours at home you could try painting a corner of the samples to see if the fur takes the colour well.
Even if you get a nice cream coloured fur you'll have to shade it a little to make it look realistic, the dog in the picture also has light and dark areas.
Posts: 110Well mohairbearsupplies don't supply samples, so they've just told me in an email. So I guess that means unless I pay £7 for the smallest piece, I won't be able to see what its like :(.
Out of interest, I've just had a try of clipping the coyote one, and whilst it does get rid of the darker brown bits, it makes it shorter, which is no good. If I phone them up and ask, do you think they could send me a piece with as little of the brown on as possible?
Thats a shame about mohair, what if someone buys and they are unhappy with it? Will the accept refunds as they dont offer a sample for people to see first.
As you the coyote, I would definitely give them a call about it and see what they say. They might also have a different suggestion for you.
For colouring the polar bear, I wouldn't reccommend acrylics, its just too dense a fur and will clump horribly. The best thing to use is letraset pro markers or t shirt pens. I've used both to great success on that exact fur. It holds well and once brushed doesn't affect the texture at all. And letraset pro markers come in a huge range of colours. I'd get a couple in different shades in order to add a more natural look.
Posts: 102That's strange, I've tried markers (copic and letraset) on different faux furs and most of them became a little stiff and sticky and rubbed off for a long time (became better after a few weeks), so I only use them for small accents.
But I didn't have any problems at all with acrylics, the paint just has to really thinn, so you need several layers to get the shade you want.
Hello! Sorry if I 'butt' in....I have been reading your thread with great interest!
I might be wrong, but about the fur choice, have you tried 'pro bear'? They are based in Germany, have a wonderful choice of Mohair and alpaca fur, some sinthetics and they send samples. They are very helpful and efficient. The Pomeranian I saw on the picture has the exact colour of an alpaca fur they sell there that I have. Alpaca has a straight dense and fluffy appearence that might do the trick.
This is the link:
http://www.probear.com/alpaca-2991
I saw now that you wish to have a longer fur. They have 85 mm mohair. It is quite expensive, but wonderful. I also used it to make this puppy:
http://www.bearpile.com/item/71860
They have it in different colours.
Posts: 110I might try the mohair if they allow returns, which they should seeing as you can't actually see it properly before buying it. I have now ordered a sample of the fabrics online, so we'll see what its like. If it's the biscuity cream it seems to be in the picture, which I hope it is, I'll probably get that, even if it is £30.
I don't really want to mark the fur with paint/ink, I didn't even know you could, so I'm afraid of spoiling it! As I'm a newbie at this I'd rather start with fur that is ok as it is, at least for the first time.
Francesca, your little dog is adorable, and thank you for the link :). The 85mm mohair, is it straight or wavy? And the way you pay for it, about how much would 1/4 cost?
how about Icecream https://www.mohairbearmakingsupplies.co … -70mm-pile on mohair? or beige frosted https://www.mohairbearmakingsupplies.co … -70mm-pile
mohair allow returns but you will have to pay the postage, i just checked.


