Banner Sponsors


For artists and collectors sponsored by Intercal...your mohair supplier and Johnna's Mohair Store

LV my 42 yo Husky - PLS don't speak too loudly of these disasters in its hearing as I don't ever count on purchasing another sewing machine in this lifetime!
I did buy a Featherweight from Cathy Lynn Forcino (sp?) right here on Teddy Talk, who has a business of rehabbing the vintage machines and posting about her offerings. I don't use it often but one of my many collections is antique/vintage needle work tools & accessories—and what collection would be complete w/o one?? It's very good at what it does: straight line stitching, nothing fancy. Every quilter needs one!
My Viking came with multiple cams for different fancy stitches it can produce but I rarely use those, just plain stitching and about 5 different ones (e.g., used in hemming ) in the Cam A works for everything I need.
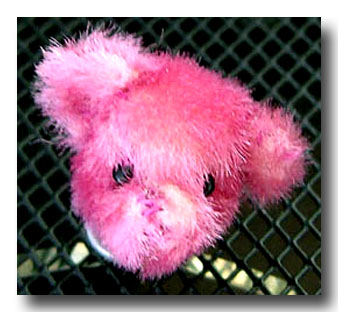
Today I located my first bear head image - it's sooo off it's ridiculous!
The first is my very first bear head - and a recent bear head - in Needle Felting, which is the medium I work in now.
The pink long pile was to represent the Flowering top of a cactus: I had NO idea what I was doing - and I was in the middle of experienced hobbyists and teddy artists.
Here's what I created to do with images when I suspect that something is slightly amiss but I can't quite put my finger on what's wrong (that subtlety certainly ISN'T the case HERE, but it'll give you an idea of what I mean.)
First I flip the image upside down - turning it over 180°.
Now errors practically jump out at you, but for fine-tuning you do need to draw straight lines, which I refer to like 'map' lines: North, South, East & West.
And from there you can use a ruler and measure in mm, cm or ⅛" or ¼" spacings apart.
Yes, in miniature, this little an amount does make a big difference, especially in the face!!!
Then adjust the head so that it's straight - a few degrees either way if it needs that, too, as in this case which you can see by the tilt of the outlined edges (sometimes you've taken the picture with the bear's head at a tilt.)
My Gusset seams (LOL - VERY obvious on that one side!!) and the nose-to-neck seam are way way off center.
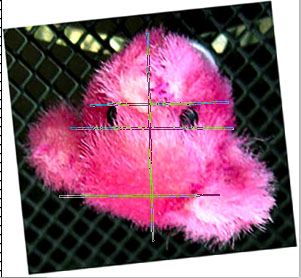
Then in my editing program (I use Photoshop CS) I begin to draw lines on the image.
The first one is always straight across the bottom of the eyes; they should both sit on top of that line. (These lines aren't perfectly straight but I'm working quickly on a thumbnail, instead of on a much larger image. You'll get the idea...)
As we tend to look first at a teddy's eyes, this is what should be first considered and be the first 'base line' considered and all other features measured from that line.
The second line is drawn straight down the center of the face equal distance between the eyes: this line also usually lines up with the seam that's stitched from the tip of the nose down to the neck (unless an unusual feature like under-chin gusset was inserted.)
So now we have North to South & East to West lines drawn: these are the 2 'base' lines that all other lines are measured from.
Another horizontal line goes across the face at the base of the ears: often we can tend to place one ear lower than the other—consistently one ear lower or higher than the other. There's one miniaturist which I watched for years on eBay® who always cupped her ears in a particular way and ALWAYS set the bears' left ears slightly lower and a bit more forward on the head than the right ear. It was amazing to me that she never noticed this. She rarely photographed the teds in a full, face-forward position so perhaps it wasn't obvious to her. It's always more obvious in photographs than in person... your eye sees what it thinks it sees rather than what's really there.
(Not seeing the Forest for the trees!) I'd even bought the auctions twice, just to be certain that I wasn't misjudging this feature.
The second ear line goes across the top of the ears—yes it's possible that they won't match, depending on the amount of cupping sewn in and the curvature of the head they're being sewn to, etc...many variables.
Other lines are drawn, 2 for North to South for the inner and outer corners of the eye beads, the width & height of the nose, the placement of the mouth... all of the features.
Except for the seams originally sewing the head together, which are simply a matter of Practice Practice Practice and more Practicing your techniques, all of the rest of the features are changeable when found to be out-of-place - from cross-checking this way.
I measure the distance how far my sewing is off from these lines and have a fair idea how much I need to work to bring the feature(s) back into balance.
These are little ways that I found over the years to help me improve my skills.
Hi Chelsea,
Heavens, No, I would NEVER have the patience to hand stitch a larger-than-3"-or-4" bear!!! And the gusset on my first bear head is Waaaay crooked! and it stays like that - to remind me just exactly how far I've come. I threw it away and my sister, who introduced me to this mini-world, rescued it. You MUST keep your first!!
in that she says there is no seam allowance for minis. Does that mean I stitch as close to the edge of the fabric as the weave allows?
On your sts ripping out: yes, most of us miniaturists do st quite close to the edge, as close as possible,. We don't even count on a regular seam allowance in measurements, like those who st regular sized bears do, If I had to give a size, I'd say most of us st between 1 - 3 mm in from the edge.
Here's how I do it and many others too I draw my pattern on the back of the fabric. Then I take a sealer, like Aleene's Stop Fraying or OK TO Wash It (I never use or recommend 'Fray Check' because of its alcohol base: it turns stiff, hardens the edges and is difficult to control the flow/amount of distance it flows into or onto the fabric)
After 'drawing' a fine line along the drawn lines with the bottle tip I press it into the fabric with a paper towel (the type used as 'kitchen roll') to drive the sealer into the back of the fabric and remove the excess sealer.
Then let it dry overnight to cure before cutting out the pattern pieces.
You'll now have body parts that you'll be able to stitch right along the edge (with the proper Back St!) and not fear pulling out. I've had the pieces go through the washer & dryer cycles in a shirt pocket and the sealer remained perfect after curing.
Emily uses a lot of the Malden Mills' white-grid-backed fabric (I myself sold her dozens of yards of her supply of MM fabrics) as well as other suitable upholstery fabrics. Many of them are said to not fray, but that's actually more in the hands of experienced stitchers- those who know the Back St, take very short, evenly spaced Back sts, and have experience using these types of fabrics.
- In sewing mini Heads together, many of us begin at the nose and stitch toward the neck.
- Then spread those two side Head pieces apart and lay the Gusset in-between them.
- Tack the very center tip of the Gusset to the very center of the spread apart seamline, so it doesn't shift during this next step - THIS is important!
- Now find the spot on the Gusset where it begins to widen out on each side (across from each other - I do see the indent on the right side of he Gusset: in the second image): this is usually meant by the designer to match the point on the Side Head pieces where the Eyes will go.
- There is usually a slight flare on the side Head pieces or a mark of some sort; they are meant to be matched to the spot just mentioned on the Gusset.
- Sometimes these two points will fit into each other perfectly, sometimes one or the other will need to be 'eased' into the other.
- This can be accomplished by placing the smaller/shorter of the two over your index finger and the other on the upper side and forming them into a curved shape while you ease them into each other.
- TACK them together at the eye placement on both sides of the Gusset!
Begin stitching from the center of the nose, toward one eye and the to the back of the head.
Do the same for the other side,, beginning at the nose again,.
Many miniaturists prefer this way, especially when beginning their career, as the napped fabrics will 'walk' - shift against each other and travel' w/o you being aware of it.
When you start at the back of the head and work toward the nose then around to the other side at the back of the head, it's possible to push the extra ease forward toward the nose on one side and backwards toward the neck on the other.
I was trying to set them back in the face and the eye tore through and went inside the head. Did I pull too hard or is that just the quality of the fabric?
After the head is rather firmly stuffed but just before closing the neck, many of us pre-sculpt eye sockets so that the eye beads don't appear to sit on the surface of the bears' face and 'bug out.'
Threaded up from the open neck, we draw a heavy upholstery thread into the spot where the bead will be placed and then back down about 1 - 2 mm away and tie the threads off tightly in the neck. It can even be stitched again twice to pull it in more tightly.
Pull both eye sockets down evenly.
Then when you sew the eyes in, they'll both look more natural, as if they're natural in the face, and there'll be no pressure n the eye bead itself. The edges of the beards, especially the back onyx beads are very sharp and can cut your thread so it's best to not have the extra pressure on them!
Also, if the bead slipped inside the head, you might have been sewing them on right on top of a seamline. We try to avoid sewing them there for exactly that reason. A bit to either side of the seam, whichever looks right to you!
Good luck with these suggestions and those of the other artists. Keep us posted on your progress and show us your next few heads - we love success stories!
So right! The Industry's Choice and the Public's Choice are TWO separate awards - I like this way rather than just saying nominated, though it amounts to the same thing. Nominated pieces now get a nifty crystal piece rather than just a ribbon as in the old days!
Congrats & BEST Wishes to all ~
Thx guys for the affirmations. I hate going out-on-a-limb and look like a rabble-rouser, but the mags have been so wishy-washy about so many of their own rules in the past decade:
- against plain backgrounds and then entries are chosen photographed outdoors in the grass...
- an entry in only one category (I did bring this one up directly with Mindy once, as a polar bear was once sent in as a single and as one of a trio just as Shane stated in that Rule: (B) Per rule 3, each teddy bear and/or ― friend can only be entered once.)
Are they so afraid of offending entrants that they'll accept anything? This really ticks a lot of us off, and it's why many of us, who had always worked so hard to make certain that our entries DID conform to every single guideline, even sacrificing some of the features we'd've liked to've included or promoted better - no longer bother.
Kicking over my soapbox now - Carry on!
Large Artist “Friends��
In a Spring Vegetable Garden – Masako Kitao
Mischief – Cindy Cherry
Dandelion – Masako Kitao
Azizi – Krista Griffiths
Yuri & Momo – Aiko Kawamoto
Artist Creation, Nontraditional Materials
Willopee – Linda Down
Grey & White Lifesize Bunny Rabbit – Stevi T.
Nixi – Krista Griffiths
Mimi – Olga Timofeevski
Three Blind Mice – Stevi T.
How can this be? I don't wish to step on any toes—I don't know the individuals who've placed twice in the same categories.
I've got to go back and re-read the Rules again. No 'sour grapes' here as I have no vested-interest in the awards, not having entered for several years; TB&Fâ„ may have changed, but for 2 decades it always was (to my understanding) one nomination per artist per category.
I would hope that the nominations would be be open to as many different artists as possible; it's unbelievable that there weren't more worthy candidates than doubling up on prospects and awarding 2 spots to one nominee.
I noticed this last year (I think it was last year or 2009) and commented on it to the staff via email but got no return follow-up. Perhaps it went to the wrong addy. It wasn't like this in the past, when there was one person in charge and contact info given for the person-in-command.
Anyone know about this off-hand?
This isn't meant to be political - you may choose whichever side you feel is right for you. But it's more important to take a stand than to be apathetic. The voting will begin in the Senate next Tuesday the 24th.
Google joined Wikipedia, who was the first to announce yesterday - their 24 hour blackout today - in protest of the bill the US Senate is considering concerning legislation for piracy of other's goods, ideas and products, mostly those reproduced overseas in Asia.
Sending in your opinion is important and is open to those outside the States as well as US citizens.
To those who would like to read more of the facts, here are some links:
PROTECT IP Act of 2011
http://news.yahoo.com/sopa-blackout-wik … -news.html
http://www.govtrack.us/congress/bill.xpd?bill=s112-968
A co-sponsor of the Bill has dropped his support:
http://news.yahoo.com/sen-marco-rubio-d … 16128.html
http://en.wikipedia.org/wiki/Main_Page
http://news.yahoo.com/sopa-blackout-wik … -news.html
https://www.google.com/landing/takeaction/
Click on the black-out label
Forms to send in:
https://www.google.com/landing/takeaction/
http://act.fightforthefuture.org/page/s … rike-modal
Oh, what Wonderful things you can accomplish with a center seam! I think that most (and I so hate to generalize... ) artists cut the seam on the straight grain and let it go at that: but when you begin to add darting for rounding out particular parts - back of the head - slots where the ears will slip into.. you really begin Design Class 101.
Here's 'Grandfather', who I used as a Logo bear for almost 8 years. He had enough slits cut along the center seam, in the bridge of his nose and forehead area to qualify him to play The Elephant Man.
Yet he turned out to be one of my favorite bears. That amount of added 'width, in tiny fanned-out & then taped-down increments, allowed for very deep set, needle-sculpted eye sockets.
And he had a straight line from top of forehead to tip of nose; it was my first lesson in Realistic Design!
It was definitely an unexpected learning experience for me, by just taking a pattern and saying "What if...?"
Ah - great! I saw that just today. Patricia Knight - zada creations - sent me the link. It looks like the creator, Elena? used a Downs breed fiber. Just curious - what did you use for yours?
Ah, Gulliver.. I should get out that book again.
Except we're having March-like weather and I feel like beginning work outdoors in the garden beds instead of curling up with a nice long story and a cup of cocoa!
Mattress, indeed! It's the ONLY way to get striped lines to match up!
Here's an 'almost' perfect one. She's even using beige worsted as I did in my sample swatches.
But she's going under only one bar on each side. In Bulky yarn I use 1 bar, in fingering/Baby I've used 2 - 3. It's best to go under 2 bars on each side in Sport Wt & Worsted for several reasons:
- the first st on the first side is under 1 st (a 'half stitch.) Then under 2 sts (bars in knitting) on the second side and continue the same until the last st, second side, when there will be 1 single st (bar) left. This has now balanced off an even amount of rows in 2 even;ly matched pieces. My samples will show 2 unevenly matched pieces and how to handle them.
- When you have stripes and try to seam them together they won't match at the seams unless you begin with the half stitch on one side. Believe me; just try it.
- Work on needlepoint canvas, rug canvas, or any evenly spaced open mesh like this if knit fabric doesn't seem enough like our bear fabric to you. It's just to get the idea of going in and out on each side, into the same holes on each side and making sts of the same length to start with. Janice most like goes right next to the same hole a hair's breadth away from that last exit hole, just to keep from stabbing into her exit thread to keep it from shredding it when they cross through each other and hopelessly entangle. Right, Janice? This used to happen to me until I learned to hold it tightly back flat with my thumb to keep it out of the way. That also kept the tension tight so the previous sts didn't loosen back up again.
-When working in fabric you have a little more leeway in where to place the sts (both in from the edge and length) because it's not as rigid as having only bars to count and the rows to st between) but if you can perfect the process on knitted swatches, or an old sweater (one from Goodwill?) you'll have developed your sense of making evenly lengthed (is that a word? It is now!) sts and you'll also make the same in fabric.
That's one of the most important features—keeping your sts the same length.
The link - copy & paste the whole thing, pls
http://video.search.yahoo.com/video/pla … ch+Seaming
Course-a-holic here, too! Last summer it was weaving a '2-Pie Basket, Viking Knitting and 2 [TWO!-The Panopticon]Franklin Habit (Knitting Courses) all in one weekend, then another weekend put on by Cloth, Paper, Scissors® (not into that one as much as I'm not into collage...but picked up some good jewelry techniques and wanted the lecture on Publishing) then one final weekend at Stitches Midwest with 7 classes in Advances Knitting - to-make-your-head-swim-they-were-to-die-for-with-all-of-the-top-designers-in-the-world-today(-with-2-more-Franklin's, though he lives right here in Chicago....!) Knitting is my first learned, could do it if I was blind, fall-back on, all-time favorite, textile format.
But your intensive day-long course sounds so good too - - why do the BEST ones always seem to be on the other side of the world???
I'll bet everyone here is enjoying seeing all of their creations again—I recognize the work from quite a few familiar-looking creative hands!—all nestled in comfortably with friends from around the globe.
You're a most thoughtful DIL!!
That size is a PUURRR-fect Kitty toy!
Sorry, couldn''t resist...
It looks like you used ¼ - ⅓ oz in that size. I don't now what that is in metric, though!
Well done teddy, Emma, too!
Nice smooth surface - what fiber (breed) did you use?
Is this felt which you've purchased from local fabric or craft shops? That's made out of man-made fibers (polyester/nylon/etc) and are very hard fibers to needle through.
All available felt used to be the traditional wool felt but that was replaced in the 70s - 80s by the cheaper-to-make stuff.
If you hold it up to the light, you'll still see the holes in it; it was still produced in the same manner, by passing fibers through commercial punch needle machines (what the industrial machines holding our felting needles are called.) You'll probably find that it doesn't even glue together as easily as the felt of the old days used to!
Now you'll have to search for real wool felt online or in specialty shops. Teddy bear suppliers carry both types so be sure of what you're ordering—you don't want Craft Felt!
As to how long needles last, a lot depends on the brand of the needle and how one uses them.
I use only Foster Needles, though I've tried several other brands. I've posted pix elsewhere to show the cut barbs of other brands, where the barb is just cut into the sides edges of the needles as opposed to being 'Formed' a Copyrighted word by Foster, with beveled edges forming the entire barb. The cut edges wear down rapidly with multiple trusts whereas the fiber slides over the beveled edges without impacting either through abrasion—itself (being cut) or wearing down the metal edge.
And I've found that if I catch the bend at the top of the width reduction early enough, which is where the needle usually starts to bend, and E v e r so G e n t l y bend it back straight again, I can keep on using it.
I'm mindful of what I may be doing that's caused it to bend, if I haven't hit anything.
-Am I tending to bring the needle out at a slight angle to the entering angle, which is putting a bit of pressure on it?
-I keep one finger near the top barb, especially in the narrow sizes, just above the top barb because I only need to thrust slightly farther in than that top barb to bring all barbs into work—have I been putting a bit of pressure on the needle tip w/o knowing it?
Some of the needles I use are at least 5 - 8 years old, so you know that they can last a long time once you have some experience in how to handle them and which ones work best at which stage. I will sometimes use almost all of the 9 needles I carry in one project - they each have their own special use! It's best to keep changing needle sizes and shapes and not to make 1 or 3 needles do the work that a few other types might be better equipped to handle....
Ev, As soon as Lisa said the word 'same' hole for the first time she went into the hole on the opposite side I said a loud 'Yes" and startled my DH sitting near me at his own computer!!
And she said the fabric 'knits' itself together several times, which is where I first learned the st, in Knitting teaching certification. You virtually cannot find seams when done correctly in knit work.
I'm going to look through all of my albums of images (I couldn't find them in our library, though I'm certain they're here under some thread or another...) and post them again in a day or two. It's easier for miniaturists to try this out because we have the white grid backing on the fabric to work on.
I did have a few issues with some of her work (e.g., there is too much of the dark thread showing in the center section - done during the time off-camera - which has only occurred when one waits too long before pulling the sts up snugly and then not keeping them pulled up snugly while working the next set... None of the contrast-colored stitching thread will show...) but basically she's got the right idea!!!
And I have learned to close at the top of a limb or at any other curved section for several reasons. You noticed how she stuck her first knuckle with one of the first sts? And that was on a convex st, with the curves running away from her. Straight seams or concave, like the dog's back, would be impossible w/o her curved needle, much practice, experience & patience! So it's easier to just learn to close on a curve.
The other reason to close at the top is - that most of us like to stuff very firmly. It's virtually impossible to stuff firmly enough when you need to keep the stuffing up into booth ends as well as in the center, all the while that you also need to leave room for your fingers to get inside there while manipulating a needle and thread.
How much easier is it to view this piece as a tube, like tamping one down inside from the top with earth, or concrete, until you reach the top? You can stuff right up to the very top and not have to try to snake more in and get it smooth-not-lumpy with the long forceps, while still holding the open sts together snugly....
Lisa mentioned learning to manipulate a curved needle; I always found that very difficult as it continually twisted over in my fingers. It was much easier for me (and this will be in my drawing) because when you close on a curve with a straight needle, such as at the top of a limb, your needle always goes in and comes out into free, clear space. It goes in and out in such short little sts, easily tucking the small amount of seam allowance inside to either side where they belong and then making your short sts into either side. Your limb can be held in your grasp with one hand with your thumb curved right up over the top to hold the last sts made while you work the next few; this is what I found to be the easiest.
When I was teaching both knitting in a shop since the 70s and then miniature fabric teds since the 90s, I always took pieces of latch hook rug canvas and the satiny, rat-tail cording on bodkin needles or heavy-duty shoelaces for students to learn this technique. The holes were large, the mesh was stiff and evenly spaced and they could see exactly what they were doing and what was happening as they drew the 2 edges together. It's the best way to learn this if you can't 'picture' it.
But even our mohair backing threads are also evenly woven and if you can practice on two pieces of scrap fabric with a sparse or shaved-off nap you'll also see this work out. It's much better to begin with than felt because you can count the actual threads.
We also don't think in metric here so I'd say her sts were about ⅛" long for miniatures and ¼" long for standard sized bears. If they're much longer than that you'll get puckers no matter what type of st you use. And it'll be worse with an H-shaped st than with a Z-shaped st. I know that a ladder is shaped like an H but - - -
All mohair is different; some are single strand warp & weft weavings and some double so if you go by # of threads in a given length of st and then stick to that same number of threads you will come out even. . (Well, you do start with half the number on the first side of sts and end up with the other half on the last, opposing side; but that has more to do with matching-stripes, etc...) those are technicalities, when stitching entire lengths, like garment seams.. You can also gradually ease in a LOT of extra fabric on one side over a short distance with NO puckering using this technique correctly.
Until later - - Happy Mattressing!! (is that inappropriate?? :redface: )
Hi Vicky (and Janice)
My apologies Janice - I'd never disagree with you in public, as you're about one of the kindest, sweetest , caringest artists I know! But the way that this lady shows the Ladder St tend to give the results that are sowing exactly on her little pillow - they tend to pucker...
For the first time I've actually seen someone else advocating the way that the Ladder St has always been taught in industry: for Knitting and other commercial textile enterprises, like - - - closing Mattresses!!! i.e., the Henson or 'Puppet' St!
So watch that You Tube following that one next and you'll get the idea, then I'll post my sketches which you can print off.
I know that I've put drawings in one of the threads here before but cannot find it now... the trick is to not just cross over to the other side with the needle, as in an 'H' direction but to make it more like a 'Z'; to go back across to the other side and enter the same hole you exited on the other side every time.
I know that he said go into a spot very very close.. but he also was taking uneven lengthed (sp?) sts which wiggled all over and not in the straight lines we stitch seams (or it could've been that incredibly stretchy fleece!) but the thread certainly did show. He was just trying to keep from catching his previously stitched thread with the needle, so it didn't split the thread or stop the stitching.
Tomorrow I'll locate my images in the post which shows the bright thread disappearing into knit fabrics: using this technique with sewing bears is guaranteed to have unpuckered seams which close easily and securely.
She did have a good tip about the ending knot, I did like that advice!!
AS Randy said, click on the Apple icon in to top left corner>then > About This Mac.
A box opens up in the middle of the monitor telling you which version of the O(perating) S(ystem) is running.
He may be able to give you more info based on that.
Has this tech support in the past been over the phone? I know that we've not had as much luck with the support there, but any time I have had an issue, (and it's ALWAYS me and my computer...) actually taking the tower into the store—and sometimes having to leave it overnight or for a day while they restore data or programs-software—has been 100% successful for almost 10 years and it's never cost us a penny in the tech services they provide.
That's one thing I could never have said about our PCs, and they suffered from the Blue Screens of Death constantly.
We're fortunate to live 2 miles from a very popular store, and we just slide the tower into a suitcase and roll it into the store in the mall...
Toddling off to bed now.
Brenda, why wouldn't View > Customize Toolbar > work?
(Just above that in my version says 'Hide Toolbar'; does your fly-out menu under View have Show/Hide Toolbar anywhere in there???)
When I selected any of the 'Customize' icons, I was able to drag any of them onto the top grayed area - do you mean that your entire gray bar area is missing and all you have are the Red, Yellow and Green dots in the left corner, plus the name of this site you're on?
Thx to both of you for jumping in so quickly! I thought I'd have to live w/o quick access to my bookmarks (or a way to store new ones) and that thought still makes me shudder in horror!
Chelsea, I'm very well aware of what some F keys do - as I've often hit them by mistake (as it's right above the often-used hyphen & em dash key) in my rapid one-fingered typing: F12 raises the audio volume to its maximum!
F10 & 11 are Low and Medium volume settings.
While I don't listen to anything when I work on the computer, I have had it 'set' by that mistake and when opening a link or a YouTube someone sends, I've been blasted like a dynamite percussion when I put in the ear buds. So bad!
We were typing at the same time Randy. If nothing else, you've taught me to be observant!
No, the command you gave just made the empty line/space disappear completely (where the url window used to be.)
BUT - what was happening every time I activated your 3 keys was that the VIEW word at the top lit up.
So I figured it was in there somewhere.
By process of elimination, I settled on - Customize Toolbar - and there it was (though I still don't know what I hit, at least I'll know how to fix it again!)
Drag 'n' drop & I'm back in business. Thank you, Sir!!!:

Thx Chelsea, my heart quickened-but it was not to be....
None of the F keys brought it back. Or affected anything up there: I have Firefox & Safari but rarely use anything but Safari.
I have OS X, 10.5.8 but am just used to Safari and continue to use it because I literally have thousands of sites saved in dozens and dozens of Bookmarks there; not an easy thing to switch.
What did change when I goofed was that the current url began to appear in an inverted Tab, like they do in Firefox.
All things being equal (like the price) I might suggest that for a beginning session, an easier fiber to begin to needle with might be the second kit available: everything else in the kits are the same except the fibers.
Merino has one of the finest-gauged microns (thickness - for lack of a better, more standard, easily understood word) and for that reason alone it takes many many more thrusts to get the fibers to begin to bond to each other. There are so many more sheep breeds which needle together faster and give just as nice end result.
The second kit lists Natural Wool Rovings: this indicates both a fiber type and put-up, roving meaning the fiber will come in a rope-like appearance as opposed to the batt form.
But while the natural-wool is indefinite as to sheep breed (and probably a mix of a few breeds) it will be a little more toward the medium grade micron fiber and so will needle together faster due to the structure and the characteristics of the individual (breeds') fibers.
BTW, your 'Panda' is not in the least bit wonky!! I'd never have known it was your first if you hadn't said!! You even got the eyes nicely sunken into the eye sockets (And isn't that easier than with fabric minis!!??!) Here's my only thought - if you're open to a suggestion....
You might try finer/thinner thread to sew the nose with, as you've probably already discovered on your own - that the 'background' moves with the slightest bit of pressure, unlike fabric bears, and it's a bit more difficult to get all of the sts to come out in an even line across the top. A thinner thread (like regular sewing thread or a single strand of embroidery floss instead of perle cotton) in a thin needle will fit the sts closer together and be easier to keep the tension smooth with. (That was a very grammatically convoluted sentence!!)
And your DH is a Keeper!!
I did stuff it.....looked horrid! ha ha!!And all is still not lost: Collect them! These are the ted heads which you practice scissor sculpting and shading or airbrushing, needle felting and a myriad of other techniques on before putting them on the heads which DO turn out right!!!

