Banner Sponsors


For artists and collectors sponsored by Intercal...your mohair supplier and Johnna's Mohair Store
 California
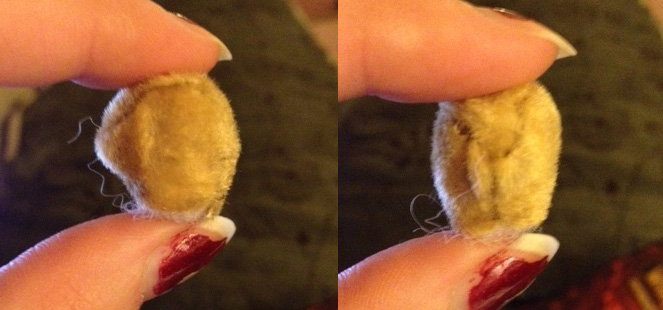 So, I started on my Tinker Kitty's head yesterday. This was my very first time ever sewing anything, and I got off to a bit of a rough start. Some of the mistakes are obvious even to me despite my lack of sewing knowledge, but I would really love some input from the trained eyes out there.
Obviously the stitching is a mess. On minis like this, how much seam allowance should I use? I think next time I'm going to actually mark my seam allowances since I had trouble keeping them consistent.
I had a LOT of trouble with the gusset. I feel like I don't entirely understand how it's supposed to attach to the other two head pieces at the nose. The end of the gusset piece was rounded, but the top of the jaw piece seemed to come to a point when sewn together so it didn't seem to match up properly. Did I do something wrong there? Where should I start connecting the gusset to the head, and was I correct in connecting the two head pieces together from neck to jaw before attaching the gusset?
The muzzle shape doesn't look right at all to me. This is what it's supposed to look like: http://emilyfarmer.com/images/Cat_Kits.html but my muzzle isn't rounded and there's no indent where it meets the rest of the face, it's just kind of...a pointy slope. Is that a mistake in the sewing or the stuffing or both?
Lastly, what is the best way to tie off thread and end stitches? I was having trouble with both.
I'd appreciate any help anyone can provide! This is so new to me...yesterday I was literally starting at square one, looking up how to tie off thread and how to do a back stitch. Any visuals that you can provide would really help. I'm a very visual learner and just reading about how stuff should be done has made it difficult for me to understand without pictures.
You're a brave one, Chelsea, starting with such a tiny project! It does look as if you had some trouble sewing in the head gusset, and I can relate 100% - it takes some practice. (One thing you mentioned was the side-head pieces coming to a point where the nose goes, and it does look that way until you get the gusset in. Then the side-head pieces follow the shape of the gusset.)
My best advice is to try a somewhat larger pattern at first, and to do some reading on how different people install the head gusset. You can start with the library here, and maybe find a good bear-making book or two. (On the other hand, I don't make minis, so my best advice certainly isn't the best there is.  )
)
Don't give up! It does take some time.
Becky
Hi Chelsea, honestly that's excellent work for a first go! For the gusset, I'm not entirely sure what you mean, by the top of the jaw piece coming to a point? Do you mean the top straight edge of the snout on the head side pieces coming to a point at the chin seam? Because that's ok, just stitch the head gusset in place, starting at the centre front/chin seam, and the stuffing will round it out.
Seam allowance, that will usually be stated on the pattern, and sometimes depending on the fabric you may need to take more. The most important thing is that you are consistent with it and take the same amount on every seam.
The head shape, when you're stuffing it's important to remember you're not just filling the head, youre also sculpting it as you fill. It looks like your kitty could do with a little more stuffing in the snout, making it more round, and the same with the head when you look at it from the front. Push your stuffing tool into the middle of the head and push the stuffing outwards, this will make the head rounder, and you then fill in the centre where you pushed outwards. For the snout slide stuffing into the side of the snout, this will round it out more.
The indent-or lack of- can be because of your stuffing. Again with the sculpt as you stuff idea, don't push stuffing up into that area if you can. the indent can also be emphasised with needle sculpting- I think there's a section on that in the Library section.
What are you using to stuff with? Hemostats, tweezers or something? Because with minis you really need something that you can move the stuffing to the right spot, takes away a lot of the frustration.
I hope that doesn't come across as critical, because you've done a wonderful job! And you've done very well to pick up on the areas you need to work on, excellent first try! Just a bit of tweaking with your stuffing is all that you need 
oh oh .... to start with such a tiny little thing is frustrating !
i would also sugest, put it to side, and start off with something a little bit bigger.
the gusset to the sideparts .... usually you do sew the neck to nosetip seam first, i did try on smaller one, to do it after fixing the gusset, it doesnt make it easier.
i usually make a tiny stitch at the center seam to to center of the gusset to hold it in place and also attach it with a tiny stitch at the curve where the eyes will be.
then i sew from the back of the neck all around to the other back of the neck.
the intention at the eye part of the gusset, ... uff ... i usually do it with needle sculpting, but with such tiny babys its going to be hard. here the tiny makers need to jump in
CaliforniaThanks for all the feedback guys! It's very helpful.
Hi Chelsea, honestly that's excellent work for a first go! For the gusset, I'm not entirely sure what you mean, by the top of the jaw piece coming to a point? Do you mean the top straight edge of the snout on the head side pieces coming to a point at the chin seam? Because that's ok, just stitch the head gusset in place, starting at the centre front/chin seam, and the stuffing will round it out.
Ahh that makes more sense now. So the snout point just bends around the round piece of the gusset? I was just having a hard time seeing how all the pieces fit together before. Ironically, it's very easy for me to translate 3D into 2D, but apparently I am just terrible at doing it the other way around. 
Seam allowance, that will usually be stated on the pattern, and sometimes depending on the fabric you may need to take more.
This pattern didn't actually state the seam allowance but I have Making Enchanted Miniature Teddy Bears and in that she says there is no seam allowance for minis. Does that mean I stitch as close to the edge of the fabric as the weave allows?
What are you using to stuff with? Hemostats, tweezers or something? Because with minis you really need something that you can move the stuffing to the right spot, takes away a lot of the frustration.
I hope that doesn't come across as critical, because you've done a wonderful job! And you've done very well to pick up on the areas you need to work on, excellent first try! Just a bit of tweaking with your stuffing is all that you need :)
I'm using tweezers with bent tips. They seem to work pretty decently, I just wasn't actually paying attention to the method in which I stuffed (just filling the space). I'll try being more deliberate about it and see if that helps! And nope, not too critical at all! All of the advice everyone is giving is really helpful so far. I welcome any criticism so I can learn where and how to improve.
For those recommending stitching the gusset in place at the nose, is there any particular stitch I should use? And any special way I should tie that off? I don't think I'm tying things off right as I had some stitches come loose at the base of the neck where I thought I knotted. I'm sure the fact that this is not only my first mini bear but also my first time even using a sewing needle isn't helping. I probably should have started with something bigger, or just practiced stitches first...I was a little too eager to get started I guess.
uh :)
i dont know if i am the right one to explain stitching, as my english isnt very good for such detailed stuff.
you do know the backstitch ?
first, dont start sewing at the point where you start to sew, the knot doesnt make things easier.
start a few millimeter away at the sewing line, and sew back to the point where the actuall beginning is.
then the back stitch ... you stitch in with your knotted off thread, on the back you go about 2 mm forwards on the seamline stick your needle in and come out on the front.
now go 1 mm back on the seam line, come out on the back, and go forward again 2 mm, come out on the front, and go back 1 mm .... this you repeat till you at the end of the seam
and there you dont knot off, but sew back again a few stitches, 2 or 3 ... and there you knot off.
i knot off this way, stick the needle from the front to the back and dont pull the whole loop through but leave about 3 cm on the top.
come from the back to the front and pull the needle through the loop.
pull tight
and now again, needle to the back, leave a little loop, needle from back to front, and pull needle to the loop.
then when you want to make it really secure, go with your needle to the sewn stitches, just run it under the thread of a few stitches backward on the seam.
maybe try it on a little piece of fabric first
CaliforniaWhen you say "come from the back to the front and pull the needle through the loop" do you mean come from the back through the fabric to the front?
Thanks for the tips! I'm still trying on this little guy since I figure if I put it aside now, I'll never come back to it because of all the mistakes. Better to mess up and learn on one than start another and mess that one up too. I think I'm getting the hang of keeping my seam allowance more consistent.
I did have a problem when turning and stuffing the body where the stitches ripped out of the fabric! Oops! I had a similar issue when putting on the eyes. I was trying to set them back in the face and the eye tore through and went inside the head. Did I pull too hard or is that just the quality of the fabric? It's the fabric that came with the kit so I'm not exactly sure what kind it is.
Oh my, those tiny ones take a lot of patience...much more difficult than a bigger one. I would suggest something 10 + inches to start with and learn the process before you try a tiny like that!
Hi Chelsea, at least as far as the stuffing/head shape is concerned, I think you hit the nail on the head- you really do need to think about where the stuffing is going. A good thing about tinies is it won't take you long to restuff it 
You need to backstitch the seams, keep your stitches nice and firm. Have you tried looking on YouTube for demonstrations of the stitches? There seems to be everything else on there lol..
As for seam allowance, in general yes you need to stay close to the edge for most mini fabrics. One of the important things about mini fabrics is that they don't fray, and Emily puts good suitable fabrics in her kits, so I'd say you're just fine in that part. Do you have any scraps of the fabric? If you do you might Like to practice a bit and see just how close to the edge it's safe to stitch. Your eye pulling through could have been you pulling too hard, but without seeing it, it's hard to know, it could have been you went a bit close to the edge just there, or it could have been one of those things that happens now and then
Slow and steady, you'll get there.
Oh my, those tiny ones take a lot of patience...much more difficult than a bigger one. I would suggest something 10 + inches to start with and learn the process before you try a tiny like that!
Hehe funny Lenora, a big 10" bear would try my patience way more than a mini... So funny how we are all different
CaliforniaYoutube has been enourmously helpful when it comes to learning stitches. A few things are still confusing to me but hopefully I will get the hang of it. I've ordered a few more reference books that will hopefully help!
And yeah I feel like a large bear would try my patience as well. I have small hands and don't mind working with little things (I used to do a lot of sculpting) but I think maybe this one was a wee bit too small (under 3 inches!) for my first attempt.
I'm glad you're finding some good resources, Chelsea! Hang in there - It gets pretty fun. :dance:
Becky
 Creative Design Studio (RKR4CDS)
Hi Chelsea,
Heavens, No, I would NEVER have the patience to hand stitch a larger-than-3"-or-4" bear!!! And the gusset on my first bear head is Waaaay crooked! and it stays like that - to remind me just exactly how far I've come. I threw it away and my sister, who introduced me to this mini-world, rescued it. You MUST keep your first!!
in that she says there is no seam allowance for minis. Does that mean I stitch as close to the edge of the fabric as the weave allows?
On your sts ripping out: yes, most of us miniaturists do st quite close to the edge, as close as possible,. We don't even count on a regular seam allowance in measurements, like those who st regular sized bears do, If I had to give a size, I'd say most of us st between 1 - 3 mm in from the edge.
Here's how I do it and many others too I draw my pattern on the back of the fabric. Then I take a sealer, like Aleene's Stop Fraying or OK TO Wash It (I never use or recommend 'Fray Check' because of its alcohol base: it turns stiff, hardens the edges and is difficult to control the flow/amount of distance it flows into or onto the fabric)
After 'drawing' a fine line along the drawn lines with the bottle tip I press it into the fabric with a paper towel (the type used as 'kitchen roll') to drive the sealer into the back of the fabric and remove the excess sealer.
Then let it dry overnight to cure before cutting out the pattern pieces.
You'll now have body parts that you'll be able to stitch right along the edge (with the proper Back St!) and not fear pulling out. I've had the pieces go through the washer & dryer cycles in a shirt pocket and the sealer remained perfect after curing.
Emily uses a lot of the Malden Mills' white-grid-backed fabric (I myself sold her dozens of yards of her supply of MM fabrics) as well as other suitable upholstery fabrics. Many of them are said to not fray, but that's actually more in the hands of experienced stitchers- those who know the Back St, take very short, evenly spaced Back sts, and have experience using these types of fabrics.
- In sewing mini Heads together, many of us begin at the nose and stitch toward the neck.
- Then spread those two side Head pieces apart and lay the Gusset in-between them.
- Tack the very center tip of the Gusset to the very center of the spread apart seamline, so it doesn't shift during this next step - THIS is important!
- Now find the spot on the Gusset where it begins to widen out on each side (across from each other - I do see the indent on the right side of he Gusset: in the second image): this is usually meant by the designer to match the point on the Side Head pieces where the Eyes will go.
- There is usually a slight flare on the side Head pieces or a mark of some sort; they are meant to be matched to the spot just mentioned on the Gusset.
- Sometimes these two points will fit into each other perfectly, sometimes one or the other will need to be 'eased' into the other.
- This can be accomplished by placing the smaller/shorter of the two over your index finger and the other on the upper side and forming them into a curved shape while you ease them into each other.
- TACK them together at the eye placement on both sides of the Gusset!
Begin stitching from the center of the nose, toward one eye and the to the back of the head.
Do the same for the other side,, beginning at the nose again,.
Many miniaturists prefer this way, especially when beginning their career, as the napped fabrics will 'walk' - shift against each other and travel' w/o you being aware of it.
When you start at the back of the head and work toward the nose then around to the other side at the back of the head, it's possible to push the extra ease forward toward the nose on one side and backwards toward the neck on the other.
I was trying to set them back in the face and the eye tore through and went inside the head. Did I pull too hard or is that just the quality of the fabric?
After the head is rather firmly stuffed but just before closing the neck, many of us pre-sculpt eye sockets so that the eye beads don't appear to sit on the surface of the bears' face and 'bug out.'
Threaded up from the open neck, we draw a heavy upholstery thread into the spot where the bead will be placed and then back down about 1 - 2 mm away and tie the threads off tightly in the neck. It can even be stitched again twice to pull it in more tightly.
Pull both eye sockets down evenly.
Then when you sew the eyes in, they'll both look more natural, as if they're natural in the face, and there'll be no pressure n the eye bead itself. The edges of the beards, especially the back onyx beads are very sharp and can cut your thread so it's best to not have the extra pressure on them!
Also, if the bead slipped inside the head, you might have been sewing them on right on top of a seamline. We try to avoid sewing them there for exactly that reason. A bit to either side of the seam, whichever looks right to you!
Good luck with these suggestions and those of the other artists. Keep us posted on your progress and show us your next few heads - we love success stories!
bobbie, that was great explaining !
i might try an other mini again with this infront of my nose :D
thank you
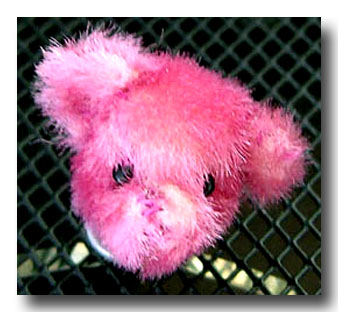
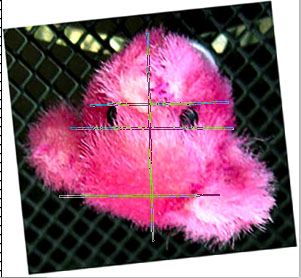
Creative Design Studio (RKR4CDS)Today I located my first bear head image - it's sooo off it's ridiculous!
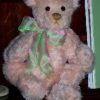
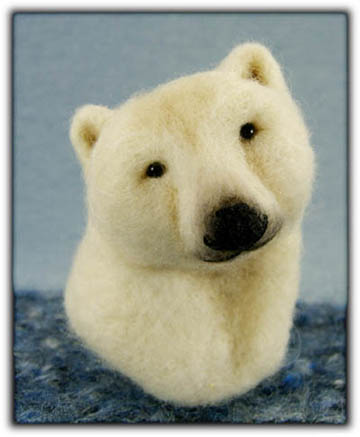
The first is my very first bear head - and a recent bear head - in Needle Felting, which is the medium I work in now.
The pink long pile was to represent the Flowering top of a cactus: I had NO idea what I was doing - and I was in the middle of experienced hobbyists and teddy artists.
Here's what I created to do with images when I suspect that something is slightly amiss but I can't quite put my finger on what's wrong (that subtlety certainly ISN'T the case HERE, but it'll give you an idea of what I mean.)
First I flip the image upside down - turning it over 180°.
Now errors practically jump out at you, but for fine-tuning you do need to draw straight lines, which I refer to like 'map' lines: North, South, East & West.
And from there you can use a ruler and measure in mm, cm or ⅛" or ¼" spacings apart.
Yes, in miniature, this little an amount does make a big difference, especially in the face!!!
Then adjust the head so that it's straight - a few degrees either way if it needs that, too, as in this case which you can see by the tilt of the outlined edges (sometimes you've taken the picture with the bear's head at a tilt.)
My Gusset seams (LOL - VERY obvious on that one side!!) and the nose-to-neck seam are way way off center.
Then in my editing program (I use Photoshop CS) I begin to draw lines on the image.
The first one is always straight across the bottom of the eyes; they should both sit on top of that line. (These lines aren't perfectly straight but I'm working quickly on a thumbnail, instead of on a much larger image. You'll get the idea...)
As we tend to look first at a teddy's eyes, this is what should be first considered and be the first 'base line' considered and all other features measured from that line.
The second line is drawn straight down the center of the face equal distance between the eyes: this line also usually lines up with the seam that's stitched from the tip of the nose down to the neck (unless an unusual feature like under-chin gusset was inserted.)
So now we have North to South & East to West lines drawn: these are the 2 'base' lines that all other lines are measured from.
Another horizontal line goes across the face at the base of the ears: often we can tend to place one ear lower than the other—consistently one ear lower or higher than the other. There's one miniaturist which I watched for years on eBay® who always cupped her ears in a particular way and ALWAYS set the bears' left ears slightly lower and a bit more forward on the head than the right ear. It was amazing to me that she never noticed this. She rarely photographed the teds in a full, face-forward position so perhaps it wasn't obvious to her. It's always more obvious in photographs than in person... your eye sees what it thinks it sees rather than what's really there.
(Not seeing the Forest for the trees!) I'd even bought the auctions twice, just to be certain that I wasn't misjudging this feature.
The second ear line goes across the top of the ears—yes it's possible that they won't match, depending on the amount of cupping sewn in and the curvature of the head they're being sewn to, etc...many variables.
Other lines are drawn, 2 for North to South for the inner and outer corners of the eye beads, the width & height of the nose, the placement of the mouth... all of the features.
Except for the seams originally sewing the head together, which are simply a matter of Practice Practice Practice and more Practicing your techniques, all of the rest of the features are changeable when found to be out-of-place - from cross-checking this way.
I measure the distance how far my sewing is off from these lines and have a fair idea how much I need to work to bring the feature(s) back into balance.
These are little ways that I found over the years to help me improve my skills.