Banner Sponsors


For artists and collectors sponsored by Intercal...your mohair supplier and Johnna's Mohair Store
 Mountain Dreamer Bears
To get right to the point, my main question is this: What type of lights (and how many) do you use for your bear pics? I've tried a variety, but still get the best (but not great) results with indirect sunlight. Still, I would like to take pictures anytime with out waiting for the atmospheric conditions to cooperate!
To elaborate further ... I've been trying to improve my photography skills. I've read every post I could find here on photography at least twice. I have a light tent -homemade but serviceable- I have what I think is a decent 4.0mp camera and have read the manual from cover to cover. I know how to work the darn thing but I still can't get what I would call a high quality picture.
Even after setting the white balance I still have to color correct in photoshop. I've tried every exposure setting on my camera and still can't get the detail I want. Is it me? Is it my computer monitor? Is it me? Is it my camera? Is it the lights I'm using? Is it me? ~sigh~
Maybe I am being too particular, but as I look through the galleries here I see wonderful, detail rich photos that I can't seem to acheive. How do you do it?
Hi Bonnie..I use fluorescent daylight bulbs which are designed for photography..I have 3 but need another one as an accent light. The more the merrier!!
If you can't get pin sharp pictures it just might be your lens...what lens are you using and at what aperture are you shooting? Any less than about f8 might be making the depth of field very shallow (that is the distance into the picture that your cameras lens focuses ...ie the eyes may be in focus while the nose it out of focus or vice versa) so get a tripod and try to select a bigger number on the aperture selector...f8 and above if possible. In low light this may mean you will get a very slow shutter speed to compensate for the smaller aperture but if you're using a tripod that won't matter.
I use an SLR camera but if you can't change lenses on your camera, try manually focussing if you are shooting close to your bear as below 3 feet very few cameras will work acurately on autofocus..also try altering the focussing area if you can so it's more specific to your subject...
That's a start anyway!! Email me if you need any other help..I'll try!!
 Creative Design Studio (RKR4CDS)
Can you post one of your images so we can see what you're seeing?
Drabbed out tones - not crisp & bright like Jodi & Judi's or softly nostalgic sepia-toned on purpose?
Blurry images? Uneven lighting - washed out contrast and too-dark areas in same image? What specifiically are you finding objectionable?
We're quite close to each other (sub Chi.) geographically and so are experiencing the same atmospheric lighting. But my work being miniature & micro is always done indoors.
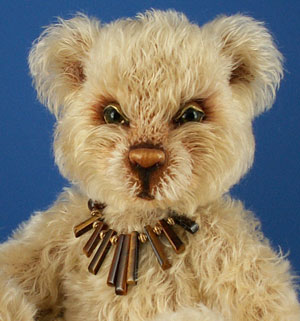
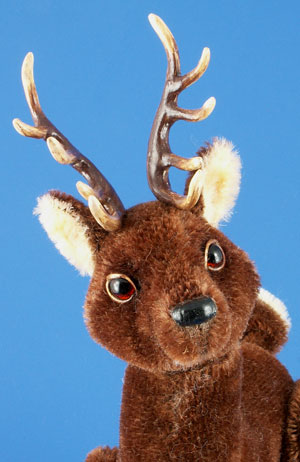
Mountain Dreamer BearsThanks for the replies! I've added some photos so you can see what I'm talking about.
Jenny,
I have an SLR but prefer using my digital for web photos. I may have to switch if I can't work this out. On the digital camera I have, f8 is the largest f-stop (smallest aperture) it has. I usually take all my bear photos at f8 and varying shutter speeds with bracketing. (I've learned that what looks good on my camera's little screen usually looks completely different on the computer.)
I do use a tripod and auto focus. I will try manual focus as you suggest.
Bobbie,
Uneven lighting - washed out contrast and too-dark areas in same image
Yes, I have this problem in a lot of photos taken without some natural light.
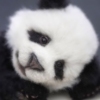
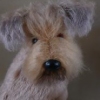
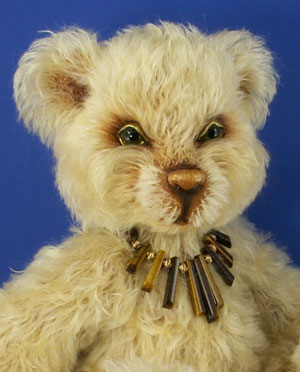
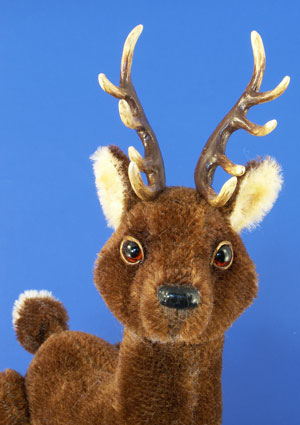
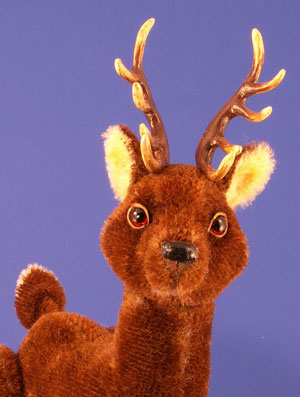
Here are the pics. The first two are taken with indirect sunlight and 5 fluorescent bulbs. The rest are taken with arificial light, same f-stop, different shutter speeds to compensate for less light of course... and I do set the white balance manually before each shooting session.
The color in these two photos is pretty accurate on my monitor. Now how do I get similar results with artificial light?
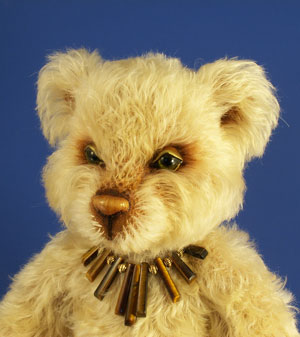
These were taken with fluorescent lights.
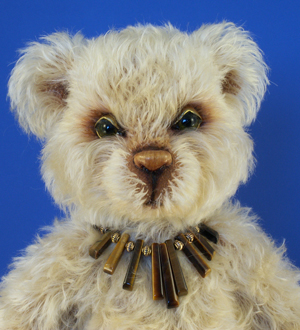
This one was taken with halogen lights.
In spite of white balancing, these pics taken with artificial light still have a distinct color cast. Also I think they look brassy with washed-out highlights and lost detail in the fur. Is it just that I need MORE light? Maybe daylight bulbs? I think they are the only type I haven't tried.
Thanks for you help!
Hi Bonnie
I have an ez-cube light tent and I use two 500 watt each photographers bulbs in tripods that photographers also use I also mount my digital camera on a tripod to lessen the chance of moving the camera The bulbs I have are hot but I know you can purchase the cool type in the US. They are not available in Canada
Hugs
Gail
The lights you are using are yellow and if you were using a film camera you would use a blue filter to compensate. Can you bracket your white balance..try different variations?
I'd say that the blue background might mislead your camera a bit so perhaps you could manually set the white balance using a white card.
Just another thought....are you shooting in Jpeg or RAW format. If you are shooting in RAW format you would have to alter the image afterwards...you should be able to get the correct colour that way.
I use an EZcube light box and daylight bulbs..they are the correct colour temperature for most subjects.
At f8 you should get decent detail and depth of field....
Creative Design Studio (RKR4CDS)Several replies have used the words hot, cool and temperature. Unless you're 'into' photography, you might not put the right meaning to these words.
A year ago I wrote about these considerations.
I'm not sure how many characters are allowed in a post but I'll attempt to cut 'n paste or put into several posts.
Gizmos & Gadgets - February 2005 - Lamps and Light to Work by
Hello All! Welcome to our new adventures together! My name is Roberta (Bobbie) Ripperger, your Tool Gal. If it’s one thing I have always done, it’s to collect at least one of every single tool, implement & accessory for every new handcraft that’s caught my fancy. This month we’re addressing good lighting. Unless you’re blessed with a cozy warm greenhouse or a conservatory to work in, good lighting will be essential to your comfort and your enjoyment in the work you do.
Lumens, flux and photopic curve, illumination, lux and PAR, PAReff, PUR, CRI & CIE. Very techie and very confusing.
But to rate lighting is to consider all aspects of the available bulbs, including Halogen, Incandescent, Fluorescent, Full Spectrum, Daylight, SADD, True Color and Natural Daylight. Then there are the multitudinous common and name brands available: Ott. Verilux, Ultralux, GE, - the lists go on and on.
What we’d like to identify is functional, well-made and affordable light, which may or may not need to be used in a specialty lamp rather than the one next to your favorite chair. As most manufacturers and distributors maintain an online presence, it is my job to research and collate a large amount of this data, to arm you with options when you start shopping. I have my personal favorites, which I’ll present at the end.
Breaking this down into 2 categories, there are dedicated (single purpose) fixtures – Lamps - and the larger arena of Light ‘Bulbs’. Natural daylight would seem to be the most desirable lighting, yet there are times that a ‘warmer’ or ‘cooler’ color temperature is preferable. This warmth and coolness doesn’t equate to heat from the bulb itself: in that respect Fluorescent is coolest (to be next to), Incandescent is hot and Halogen instantly becomes very intense.
Incandescent: traditional choice with a ‘warm’ (color temperature) effect.
Halogen: a brighter, whiter light for the same or lower wattages. They have a much longer life than incandescent but produce a very high heat.
Fluorescent: The traditional ‘laboratory look’ is still available but they’re now produced in the greatest variety of color temperatures simulating incandescent, while using less energy, producing less heat, are less sensitive to handling, vibration or shock and lasting much longer. Using the bulbs in confined places (enclosed light fixtures), closets and similar spaces make these very safe. Compact fluorescent usually costs more than incandescents but these above advantages outweigh that one point, which is, in fact, offset by needing to change the bulb less often. They also have the common screw-in type bases to fit most fixtures.
A few basic definitions are in order: beginning with Benjamin Franklin’s kite experiments, electrical principles became gradually understood, from the charged carbon of the first arc lighting through the enclosed, oxygen-less glass light bulb of the late 1800s, bringing incandescent electric lighting into our homes. As photography developed in the early 20th century, it became necessary to define how bright something was (amount of emitted light). Several first world countries adopted "the international candle" as the amount of light something generated: how many candles it took to generate a set amount of light. Unfortunately, in the 1940s, someone figured out that different candles produce different amounts of light. The scientific definitions of Lux and Lumen (the Brightness factors) overtook the practical, in being unit measurements of light flow from 1 standardized international candle, as seen within or from a distance of 1 square meter.
Lux versus lumen: The difference between the lux and the lumen is that the lux takes into account the area over which the luminous flux is spread. 1000 lumens, concentrated into an area of one square meter, lights up that square meter with a luminance of 1000 lux. The same 1000 lumens, spread out over ten square meters, produce a dimmer luminance of only 100 lux.
Achieving a luminance of 500 lux might be possible in a home kitchen with a single fluorescent light fixture with an output of 12000 lumens. To light a factory floor with dozens of times the area of the kitchen would require dozens of such fixtures. Thus, lighting a larger area with the same number of lux requires a larger number of lumens.
Natural daylight – the truest color balance – can be expressed in these values:
Direct sunlight - 100,000 Lux
Overcast day - 1,000 Lux
Deep Twilight – 1 Lux
Quarter Moon - .01 Lux
Overcast, Moonless night - .00001 Lux
Artificial light supplies this amount of light:
Average Parking Lot at night – 10 Lux
Factory Assembly Lines – 200 to 3,000Lux
Bank: Lobby 200, Tellers 500 Lux
Offices: General 300, Accounting – 500 Lux
Hospital Operating Room – 18, 000 Lux
Given these statistics, it’s easy to see why our eyes strain to see in low light situations.
Ott, Verilux, Ultralux and GE are large companies that produce specialty lighting, from operating room lighting through indoor gardening lights and automobile interior lighting to deep space exploration lighting needs. Our cozy workroom fits right in there about mid-center. How true the color of our projects will look under different types of light hinges upon 2 more aspects: Color Temperature and Color Rendering Index. Color Temperature is how cool or warm the light source appears and is expressed in Kelvin (K) degrees. Bulbs with lower K color temperatures look red; bulbs with higher K color temperatures look blue. This makes sense if you imagine an iron bar being heated. First it gets ‘red hot’, then, as the temperature increases, it becomes ‘white hot’ and finally, ‘blue white’ hot.
Color Rendering Index (CRI) is a relative measure of the shift in surface color of an object when lit by a particular type of bulb, compared with how the object would appear under a reference light source of similar color temperature. CRI is a numerical system that rates the ‘color rendering’ ability of a source light in comparison with natural daylight, which has a CRI of 100. This means that a bulb with a CRI of 91 shows colors more naturally than a bulb with a CRI of 62. Commonly used as references are incandescent lamps (warm light sources) and natural daylight (a cool light source). Incandescent lamps and daylight have a CRI of 100, the highest possible CRI. The higher the CRI of the light source, the ‘truer’ it renders color. In Kelvin (K) terms, ‘warm white’ is 2700K, more ‘neutral white’ averages 4100K and ‘blue white’ (photo bulbs) are above 6000K.
Enough Science; here’s the nitty-gritty: using an online search engine (e.g., Google) for the above mentioned companies will exhibit most of the bulbs available to retail consumers and/or give distributor sources. These seem to be the most commonly available bulbs. The prices range runs from a dollar or so U.S. to $150+ for some of the specialty bulbs in the higher wattages (larger bulb = more light) that most closely replicate natural daylight.:
http://www.ottlite.com
http://www.verilux.net/truecolors
http://www.google.com/search?hl=en&lr=& … tnG=Search
I do macro photography and need bulbs closest to natural daylight. The best bulbs for me have been those in the blue-white, or high K range. Some that I’ve purchased are touted as natural daylight but were anything but; they turned my digital images yellow or red/purple. My camera has White Balance settings, by which I can internally change how the camera ‘reads’ the warmth value of the light source and neutralizes it, but I also spent good money on experimenting with every bulb I could locate that promised ‘Natural’ and ‘Daylight’. GE’s Reveal bulbs are one type that I’ve since donated away. They looked pinkish in the fixture and red in photography. Others have highly recommended them. A little experimenting is needed for photography but for task lighting during your work or relaxation times, a pink or yellow tone is comfortable to be in.
All of that Science background stated above is there to help the techies among us at this point: in reading the package wrapping on the bulb choices before investing. Not all of these factors will be given but enough should be there to tell you if it’s a warm, neutral or blue white. It’s impossible to tell what color temperature will come from an unlit bulb, so what I also do now is take my hand-held fluorescent fixture into the store with me to try the bulbs in my own equipment. And hope that the bulb is not encased in the sealed plastic package or I’ll have to buy at least one! There are plenty of spare outlets in the areas for lamp sales and I plug in to test my choices. The hand held fixture, (with its 15 foot cord) is a rectangle that I hold in different positions to highlight different places on the work I’m photographing. I want 1 bulb that does 2 jobs and if the bulb will work there in the store, I know that it will also give the same blue-white type of light that I prefer for every day use and as well as in photography, rather than a warmer value of yellow. Carrying this info with you and reading the information stated on the package will help you determine if the bulb will suit your purposes.
I’ve found a screw-in bulb with the same blue-white color temperature at Home Depot. In photography it gives a neutral, true color image and I don’t have to reset the camera’s white balance. The model is #772-429, compact florescent spiral bulb, 120 volt, 19 watt, 6500(K), 1100 Lumens (Light output), Use/Life – 10,000 hours. These 19 watts are the equivalent of a 75-watt incandescent bulb and suitable for enclosed spaces.
Commercial Electric Co.
2455 Paces Ferry Road NW
Atlanta GA
800.378.6998
In a phone call to Commercial Electric to find a local distributor I was advised to check my nearest Home Depot. This contact information is given for those outside the USA.
I often had at least one of the 3 regular photo bulbs used during a session go out (and always when up against a deadline) and I’ve learned this lesson: I will admit to buying 10 of these bulbs. Cheap insurance. I’m also a klutz who breaks bulbs.
Let’s see…. 10 bulbs x 10,000 hours each …… I guess I’m adequately covered….
Here at the computer and in the studio, I use a goose-necked Ott lamp. The benefit of the model that I chose is that it effortlessly converts from a table mount to a floor mount, saving me the price of purchasing 2 separate lamps. The bulbs are the push-in rather than screw-in type, but after 3 or 4 years, I have yet to replace a bulb, and they’re in use 8 – 10 hours a day. Many of their models include an attached, moveable magnifying lens.
We’ve barely skimmed the surface of this subject; in a later issue I’ll cover lighting more thoroughly, including the use of studio lighting for Photography. By reading the future editorial feature for Gizmos & Gadgets, you will see the month-by-month listing of topics. I invite you all to give me your product choices, recommendations and opinions, especially those not available in the States that I’ll not have access to. Please email all information to bbbinquiries@comcast.net
Cool temperature ‘white’ daylight bulbs are best for working in.
Warm white is preferred in living spaces, Cool white for task areas.
Online searches identify brands, prices, locations and sales outlets.
If price is a determining factor, purchase multiples of a lower wattage fluorescent bulb.
You’ll still save money over similar watt count incandescent bulbs.
The higher the Kelvin rating the bluer the white light will be.
Higher Lumen counts will give more light per area illuminated.
Higher CRI numbers render light the most similar to daylight.
Lower watts in fluorescent bulbs will duplicate higher incandescent wattage for less cost in use.
Mountain Dreamer BearsThank you Gail, Jenny and Bobbie for the great information! I'm sure it will help a lot of people here besides just me. I truly appreciate you all taking the time to reply.
Jenny, I use a white piece of paper to white balance, holding it right in front of the bear, but I've noticed I get varying results. I'm pretty sure it's the operator and not the camera so I need to be a bit more careful when doing this. Probably a piece of matte white cardstock would be better.
Bobbie that is a great informative article and wonderfuly clear explanation of lux, lumens and color temperature. Thank you so much for posting it. I have printed it to keep for reference.
I said:
Maybe daylight bulbs? I think they are the only type I haven't tried.
Jenny said
...daylight bulbs..they are the correct colour temperature for most subjects.
Bobbie said:
I do macro photography and need bulbs closest to natural daylight. The best bulbs for me have been those in the blue-white, or high K range.
As I read these posts I had one of those 'Well duh, I feel pretty dumb now' moments. :doh: Obviously, if real daylight gives the best results, bulbs that most closely mimic daylight are the ones to choose. Yet I haven't tried them. Just because I really don't light the blue white light they give for my household light so I guess I unconsiously let that prejudice steer me away from them for photography? How dumb is that? Obviously I wasn't using my brain. I hate it when I do that. 

I don't have a source for true photo bulbs nearby so I'm off to find some high K, high CRI, cool white daylight bulbs. I'll take some new pics and post the results.
Thanks again ladies for all the helpful information. You are gems!
Bonnie... try a neutral grey card too...you never know.
 Jare Hares & Bears
Does your camera have pre-set white blances? That is what I use on mine and I usually get great results.
Mine is set up for incandesant lights.
I would also suggest using a plain white background rather than blue. It might be a trick of the human eye, but I usually find that the colouring is better off a plain white background.
I use 4 lights. Two light the background and Two to light the subject. One subject light is usually 2x further away from the subject than the other one. Doing this softens the shadows and produces a clean photo. Adjust the light positions until you get a clean shot. Remember to move your lights back from your subject or you will end up with harsh looking photos and heavy shadows.
I do have a sofa light with 4 bulbs that I use on ocassion for overhead lighting when I need it but most of the time I don't.
Mountain Dreamer BearsJenny, Great idea with the grey card. I use one sometimes with my film camera but my digital doesn't like it.
Jared, Thanks for the additional tips. You brought up some very good points. My camera does have preset white balance settings but I always used the custom setting because I read somewhere else that was the best thing to do. However, your pictures always look great so you are definitely doing it right. I will experiment with the other settings. As for the background, I tried several with this bear and blue seemed to give the best results. With the white background, its ears practically disappeared! I do like white for darker subjects though.
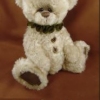
Anyway, I finally found some time last night to take some pics with my new lights. I'm very pleased with the results. The color is spot on although the exposure on the deer is a bit off. (my fault)
In case anyone is interested, here is the lowdown on the lights I used:
GE 'energy saver' COOL DAYLIGHT bulbs. These are those new spiral fluorescent bulbs that you can screw into a regular light socket
6500K
1600 lumens
26 watts used with 100 watt output
8000 hour life
Purchased at Walmart, $6.44 for two bulbs. This may sound expensive but compared to regular GE 100 watt bulbs they use 1/4 the energy and last nearly 5 times as long.
I used 6 with my light tent. Overkill maybe, but it worked.
BIG thanks again to everyone who replied. I appreciate your help!  :hug:
:hug:
Creative Design Studio (RKR4CDS)Great new shots! I thought you were re-posting the originals as they still had the blue background!
Mountain Dreamer BearsI thought you were re-posting the originals as they still had the blue background!
LOL!
Nope, new pics! These are actually better than the originals colorwise. If you look closely you can see that the originals have a bit of a yellow cast to them. I'm sure its from the combination of the fluorescents with the daylight.
I've been dissatisfied with my digital pictures quite a while but now I'm doing the happy dance!
:dance: :dance: :dance: :dance: :dance: :dance: :dance:
 Back Road Bears
I just saw these on eBay:
http://cgi.ebay.com/Tabletopstudio-SHOR … dZViewItem
Are these the bulbs you used Bonnie?
I need the stands and everything too as this auction has.
Anyone able to tell me if this is a rip off? I have yet to research the price of stands else where!
Creative Design Studio (RKR4CDS)Daphne, these are a good price/pkg. In fact, I think I'll bid on one of the sets myself. Having similar equipment from different sources, put together piecemeal, I think I spent at least this much. And Free shipping!
I use one light overhead and two adjustable table-top sidelights, with tulip shaped reflectors; sometimes I've wished for wider bowl-shaped ones.
These will be a nice addition - I'm glad you posted it. There may be better deals that come down the pike but sometimes you just have to jump in and start Somewhere! It's all nice to deal in theory but nothing like getting the experience of using items like these.
I'm off to bid now..
Creative Design Studio (RKR4CDS)I didn't answer the question - yes, the cool bulbs shaped like these are similar to mine. A delight to work with after the hot HOT photobulbs of the past.
I have 3 different collapsible 'light boxes' - plastic & nylon - that I'm going to let go of, because I gfind using this set-up adequate for spreading the light and not needing the materials as buffers.
I also noted the bracket holding the reflector to the rod.
I'll be curious to see if it's the same aluminum material that some of the reflector shades (as seen in Home Depot) have on theirs (and were in my firast purchase 12 years ago. They're the same curved matching-set brackets.
It's a soft metal that will take continual tightening; mine evntually flattened/straightened out, but slipping a washer over the wing nut on each side gave the right tension again.
 Posts: 8,574
Awww honey, You have my empathy.
I struggle so with golly faces and light colored clothing....I use a ton of lights and sometimes the contrast between face and clothing is too great....tomarrow morning we are tying something new....`something the hubs came up with as he is tired of my whining.....
Now back up to read everything Bobbie wrote.
gollyhugs
dilu
Back Road BearsThanks, Bobbie!
Think I'll go buy 'em too!
Right now I'm dragging every moveable lamp, floor and tabletop, into my room to take pictures and it's still not enough! :doh:
Creative Design Studio (RKR4CDS)Oh no! your set-up is what mine used to be... Now I put it all on the dining room table, put my minis up on boxes at eye level for neck problem-alleviation, drape fabric over the box and up over a cardboard backdrop support, camera on tripod (I use both floor model & table top models) swithch on the lights and I'm ready to shoot.
I like that he gave the K(elvin) temps and the CRI - Color Rendering Index - important info! That's an informed seller. I'll bet he's got a regular supply business.
Mountain Dreamer BearsHi Daphne, I see Bobbie has already answered your question which is good since she so much is more knowledgeable about this than I. Those lights are very similar to what I bought but I think those you found are better. Those stands are awesome! I have clip on reflectores which work well enough for now but those stands would be so handy.
Right now I'm dragging every moveable lamp, floor and tabletop, into my room to take pictures and it's still not enough!
Exactly what I was doing too! So frustrating! I predict you will be sooo happy with the results you get with the new lights.
Dilu, I think you do a great job with the gollies! I know how hard a color black is to photgraph well with any detail. I have a black dog and in photos she usually turns into just a sillouette or an unrecognizable black blob. The contrast of bright clothing on your gollies just adds to the challenge, but like I said I think you do an awesome job. Good luck with the "something new" you're trying! :hug: