Banner Sponsors


For artists and collectors sponsored by Intercal...your mohair supplier and Johnna's Mohair Store
 Posts: 27
I'm working on a mini cat from a kit. (Pussycat by Emily Farmer, that I got from Sassy. Cute!!) And I'm really happy with how easy it's been so far. But my footpads came out a little funky.
What's the proper way to sew it where the 2 leg pieces meet up with it? (I hope that makes sense.) This spot came out different on front and back, and different still on both feet. It's not terrible, so I probably won't redo it, but it'd be good to know for next time.
Thanks!
- Heather
 Jare Hares & Bears
I have made a few of those kits...
Can you post the directions on here?
 Sunnie Bears
I mark the center front of the pad and the center back of the pad and pad and pin those two points in first. Then I ease the rest and pin in place all the way around before sewing
 Back Road Bears
I mark the center front of the pad and the center back of the pad and pad and pin those two points in first. Then I ease the rest and pin in place all the way around before sewing
Me too. Then I baste them in place by hand before putting them through the sewing machine.
Posts: 27The instructions are at home; I'll have to copy them later. She recommends whip stitching the entire thing right sides out, but I opted not to. The pieces are teeny tiny, so I didn't even fiddle with pins except in the largest pieces. I tried using one stitch through the footpad and both leg pieces; sounded like a good idea at the time but it came out a little goofy.
Jare Hares & BearsThat can be the problem with minis, because they are small it can be hard to pin and place things. I would sew most everything by hand when I made minis.
 Waggle Bears
Heather, have you thought of purchasing applique pins. They're really small and fine. Applique thread gets easily caught in regular pins. The applique pins are so small the thread doesn't catch. I've used them on smaller paw pads.
A mini teacher (sorry I can't remember which one) showed us how she uses copper alligator clips (from Radio shack). They are easy to use on tiny pieces, easy to remove, and don't mark the fur. You can remove them as you approach them in your sewing. I always use them for handsewing little things now. 
 Baird'sBears
 Heather,
I`ve never sewn teeny tiny footpads, so I`m not sure, but . . .
Maybe the problem is the direction of the seam allowances at the points where the pawpad meets the foot seams. If one pair of seam allowances is pressed left, one right, and another open, you`ll have three different-looking feet, especially on a tiny critter.
I tack all seam allowances open on the feet.
 Matilda Huggington-beare
She recommends whip stitching the entire thing right sides out, but I opted not to.
:crackup: The instructions are there for you to follow :crackup:
You are so funny Heather :crackup: :hug:
Wendy
Posts: 27Instead of whip stitching it right sides out, I sewed it wrong sides out and turned it. That's a valid technique, right?  Only place I really had problems was the tail, where I ended up cheating a little bit, but overall I'm very happy with how it's turned out so far.
I don't think my foot problems were with the seams (but there's always the possibility I'm wrong!). I think it was trying to do one stitch that went through all 3 pieces (both feet and the footpad). Upon further inspection (and a wonderful tutorial I was sent), I think I need smaller, more precisly placed stitches, so they don't show or distort the piece next time.
 MadebyAnna
to sew on footpads..I fold the footpad in half...(toes up ..heel down ) I then make a tiny mark on the center of the top of the footpad and one on the bottom. Then using ONE stitch I sew the top mark into place ..knot off. . then I line up the bottom of the footpad and stitch into place..I then begin sewing in the footpad. Hope that helps :doh: :clap:
Posts: 27I bet it would help to tack it in place. It was slithering around on me a little bit, and I thought it was too little to use pins. Thanks Anna!
 Creative Design Studio (RKR4CDS)
I am a bit prickly tonight due to some bear problems so don't mind me if I sound a little cynical.
I'll try to put this delicately.
EF has been designing bears since the 80s. Many times the bear makers of the beginning days, don't keep up on the newest techniques, nor incorporate them into their designing. Sewing micro bears used to be considered darn near impossible, until bear makers just started doing it, and doing it brilliantly. Smaller than an inch and a half seemed so implausible that sewing-on-the-outside was the accepted way. Look at Lisa Lloyd's early work, though it does take a special talent to stitch it evenly and smoothly in Ultrasuede® as she did. Many times the nap was intended to be brushed over the seam to hide it.
I have several EF kits which I bought to read the decription of how she assembled the materials. I never cut out or sewed up the kits. The 'pattern' was originally stamped onto the fabric rather than have a drawn copy in the kit itself.
I hope you will take into account that you would do well to stitch well inside of the stamped pattern lines. The pre-stamped material in my EF kits have continued to bleed into the fabric and if they had ever been sewn up, all of the seams would now look blackened. Even me sealing the cutting lines with OK To Wash It or Stop Fraying (not Fray Stop!) didn't help. Several other European friends that gave me bears also used markers that bled into the backing - the seams are unattractively dark.
I prefer to draw (and seal) my own lines when I design & sew so that the lines stay where they should be.
Off to grump at my DH now ..... poor guy.....
 Posts: 3,540
:hug: Sending you some virtual chocolate Bobbie  No calories that way, and all the lovely chocolate benefits
  :hug:
:hug:
Really interesting point you make about the lines bleeding into the fabric Bobbie. I'm curious to know the different types of markers/pens people use and whether this is a problem particularly with mini bears, or whether it should be considered an issue for makers of bigger bears too? Also, is it a specific problem when using certain types of bear making fabric?
I've always used a biro to mark out my patterns because I'm not keen on marker pens for drawing out. As I make big bears, I have the luxury of wider seam allowances than smaller bear markers would be able to use, so haven't come across this problem before.
I was also wondering why 'fray check' is a problem ... once again, I don't use it because my bears don't need it, but it would be interesting to know what the pitfalls are should I ever feel the urge to make smaller bears!
Any pointers would be very welcome ... thanks!
With regard to the original question about sewing in footpads this is my technique, but please bear in mind my smallest bear is 15", so I'm not sure if it applies to makers of tiddly wee bears!
First, I fold the footpad in half to find the centre top and bottom points. I make a tiny mark or insert pins on the back of the pad fabric to keep these points true. With the leg seam(s) pre-stitched and the leg inside out, with the wrong side of the pad facing out towards me, I match the centre top mark to the toe and pin directly through the centre of the leg seam, then I repeat this with the bottom point of the pad and the heel seam. I like to use big coloured head pins to pin the rest of the footpad evenly into place. Once this is done, I take a small needle and thread and baste (whipstitch) the footpad into place by hand with small neat stitches, removing the pins as I go. Finally, I machine sew inside the basting stitches along a previously drawn sewing line (marked out on my footpad when I have originally drawn out the pattern), to give a neat rounded toe and heel. Et voila, nice neat tootisies!
 Bears by Edie
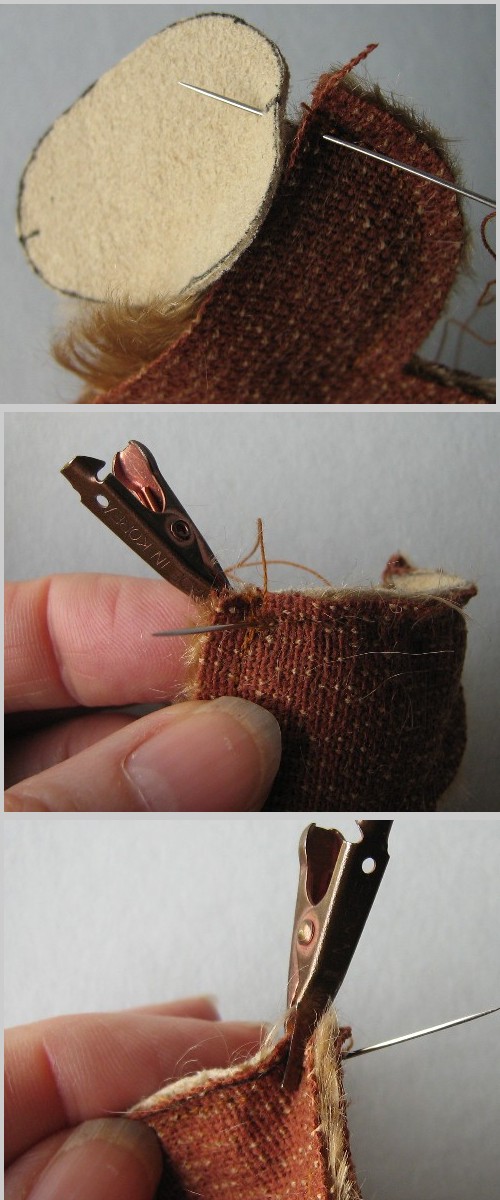 Lots of good advice here Heather but not all of it is applicable to minis. I don't think you can successfully pin foot pads in on a mini - use the alligator clips that Ellen mentioned - they are just so great, I would be lost without them - in fact I even use them now on larger footpads instead of pins as they are just so much easier and don't leave holes!!
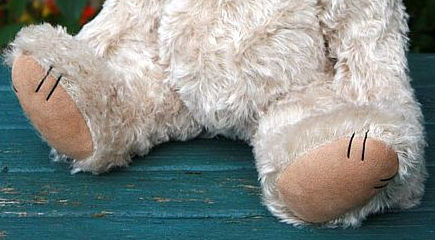
I mark the center line of my foot pads when I am tracing them. I start sewing at the toe and match the marked center line up with the front seam and insert my needle (with knotted thread) fron the bear leg side right at the seam line (going in on the seam line with my needle between the sewn seam allowance and the main part of the leg and then through into the foot pad at the marked center spot, and then start sewing to the left with the leg side facing me and the foot pad away. After a stitch or two (I sew in back stitches just about 1/16" from the edge) I then place the alligator clip to hold the foot pad at the back seam with center mark matching. On a mini foot pad you won't need (or have room!) for any more clips in between - it should just follow in nicely. When I get to the back leg seam I sew right up to the seam but only through the one leg thickness - I ignore the seam allowance and don't sew through it - just to the stitching line and then bring my thread up from the foot pad side to the other side of the seam and again continue sewing just through the leg fabric and the foot pad fabric so the seam allowance parts are not caught in at all - this is so easy to do but sure is hard to explain!!! Anyway then you don't have all that bulk right in the seam at the toe or heel when you turn the pieces.
I'll add a couple of photos - maybe that'll make it easier to see what I mean. The leg in the photos is actually a bit bigger than a mini as I thought that would make it easier to see too.