Banner Sponsors


For artists and collectors sponsored by Intercal...your mohair supplier and Johnna's Mohair Store
 Yorkshire
Hello ladies and gents, I have come to a stand still with my fifth little bear - I thought it would be a challenge to do a polar bear on all fours (haha) and as I seem to be getting to grips with the basic bear making  , I want to try something new. I LOVE the paws that are furry with suede inlays e.g. a large circle for the ball of the foot and 4/5 oval or small circles above with stitches coming off as claws (does this make sense????). I noticed that Shelley from Kooter Boo and Jodi from Story time bears have used this style on their polars.
The thing is I have already sewn the furry pads on but have not stuffed the leg as yet - is it too late to add pads? Also the bear is only 5" and I'm not a nimble sewer - yet!!!! Any advice would be very much welcomed (if not an alternative paw idea would be appreciated). My poor bear has been in bits for nearly a week now and I desparately want to finish him.
Many thanks, Ali x
 Bumpkin Bears
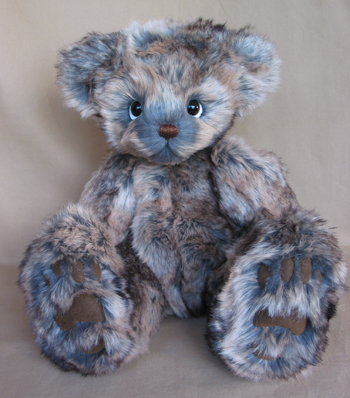
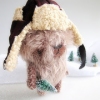
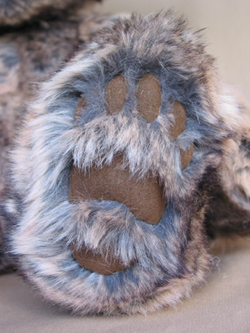 Hi Ali, I have hand sewn on padded toes to some of my bears feet. It is time consuming, but you can do it like this, cut out the fabric for ball of the foot and the individual toes. I then sew each one on individually with a ladder stich so it can not be seen. Just before you complete each part leave a bit open and you can put in a bit of polyfill stuffing to give them a nice rounded look. You can trim the fur a bit away from between toes when finished if you want to. I hope this makes sense, just take your time and I'm sure your bear will turn out really sweet. I'll try and attach a photo of the latest bear I did this foot technique on
Beary Hugs
Catherine
Hi Ali
Try needle felting them on the paws after you have stuffed the bear
Hugs
Gail
 Back Road Bears
Trapunto is another technique if you want puffy pads. You'd be hard pressed to do it now with the paw pads already sewn in. But for another time or if you want to remove the paw pads here is a great and easy way to do trapunto as described by our own Shelli Heinemann:
-- Make a two-layer footpad, with the outer layer being felt and the under layer being your mohair; baste together at edges by hand.
-- Stitch the shapes you want (four oval toes, a footpad shape) for the "puffy parts" using your machine, or by hand.
-- Cut slits in the mohair (underneath)layer where the toes and footpad have been sewn; then stuff them, using tweezers or hemostate, from the back (mohair) side of the double-layer pad, so they get as puffy as you want them to be.
-- Close the slits with hand stitching.
-- Turn the two-layer footpad to the front (felt) side. Trim away the part of the felt layer that's NOT puffy and discard. This would, I'd imagine, leave you with a tiny seam allowance of felt, just past the stitching line, but the mohair which now "appears" from the back (under) layer of the footpad should brush up to disguise that.
-- Attach finished footpad to leg bottom opening like usual; pin; stitch; turn.
And here is a method that Jody (Bear Paws by Jody) shared with us:
I use a technique for sculpted paw pads that I learned in one of Jennifer Laing's class in which you cut two pieces of ultrasuede material, or any other material that does not fray at the edges. One piece is cut in the shape of the top four toes and the other is a larger piece for the bottom portion of the paw. You can cut the ultrasuede in any shape that you desire to change the appearance of the paws. You hand stitch the ultrasuede on the top of the mohair paws leaving a small opening. Stuff the pads with polyfil and hand stitch closed. Then you needle sculpt the toes using upholstery thread and then shade the edges.
YorkshireThank you so much ladies this has given me plenty of paws for thought :crackup:
Catherine thats exactly the look I wanted, I thought about doing it your way, but I'm not sure if I might be a bit too clumsy for it (being such a wee bear) - oh hell I will give it a go after all I'm not selling my bears yet as I'm still learning (their all mine  )
)
As you said, I'll take it slow!!!!. p.s. I Love the bear you posted - I can't stop looking at its fur - where do you get your supplies from? (is there such a thing as a fur addict - I think I need help! - I have three large boxes of fur now!) Hasn't stopped me looking & shopping for more thou!
Daphne, I like the sound of tapunto, but it does sound difficult :doh: When you start off, (sorry may be a silly question), am I right that the fur of the mohair should be touching the felt before basting? Will try this technique in future!
Needle felting sounds so exciting - I love the bears that have needle felted muzzles too - will look into this further thanks Gail.
Big higs Ali x
 q.D.paToOtieS
Thanks for sharing the Trapunto techniques with us Daphne. I've always wondered how that is done. The Trapunto Paw Pads you've done on your bears in the past have just been awesome. Again, thanks for sharing!!! Great topic!!!
Back Road BearsTrapunto does seem dificult but it really isn't. You just have to jump right in and do it! Then you'll wonder why you haven't done it all along.
To elaborate on Shelli's directions a bit:
--Cut paw pad from mohair, lay on table face up (furry side on top).
--Trace paw pad template onto right side of ultrasuede, Cut outer paw pad shape, lay on top of mohair paw pad also face up (right side up).
--Baste together around outer edge.
--Machine (or hand) sew along lines for inner paw pad shape.
--Undo basting, then, using embroidery or similar scissors trim away excess ultrasuede about an 1/8 inch from seam.
--Sew pawpad into opening in leg.
-- Cut slits in the mohair (underneath)layer where the toes and footpad have been sewn; then stuff them, using tweezers or hemostat, from the back (mohair) side of the double-layer pad, so they get as puffy as you want them to be.
-- Close the slits with hand stitching.
--Turn leg right side out. Stuff. Carefully remove trapped fur from around pads last.
Pictures to follow! 
 Chaska, Minnesota
Wow wonderful ideas about paw pads...What a fun and interesting thread....I love all your tips....
 VallierBears
Daphne,
I have read and re-read that section about 20 times! I just can't get the hang of what you're saying. :crackup:
I hate being a Visual learner. Do you have any step by step photos of how to do it? Or does anyone else?
I THINK I know what you mean.
When you have finished, Do you end up with pads like Bumpkin bears?
Do you, Attach the fur on the bottom, Suede ontop. Sew your shape ontop of the suede, Then cut around it, Close to the stitched edge and trim, Being carfull not to cut the fur as you trim away the Suede? I prosume you would be left with a tiny seam allowence and stitching shown on the suede parts of the bear?
Confusing and a Pain arn't I?
Richy~
Back Road BearsPictures are coming Richy.... I've got a couple things to get finished up first then I can do some step by step photos! I'll start a new post!
YorkshireDaphne your an absolute star! I too have read it a few times and I think I've got the gist of it - but pictures would be the icing on the cake 
Ali x
Back Road BearsHere's a link to the new thread I started with a photo tutorial on trapunto toes:
http://www.teddy-talk.com/viewtopic.php … 19#p239819
I hope it help!
:hug: