Banner Sponsors


For artists and collectors sponsored by Intercal...your mohair supplier and Johnna's Mohair Store
 Bearz by Ellen
Hello,
I am considering purchasing some mini-mohair to make my teddies with and I have a few questions...
My bears are typically about 2 1/2-3 1/2" tall and usually have fairly thin limbs...should I enlarge my patterns when using mohair?
Also what kind of mohair should I purchase? I am looking at the mohair from Sassy Bears and Fabrics ( http://www.king-cart.com/cgi-bin/cart.c … atch=exact )
has anyone else used this mohair? If you have a pic that would be great 
Finally, when working a mohair, what precautions do I need to take? I realize that it will fray, but I am wondering if since is a natural fiber do I need be aware of pests (bugs and such) when using it?
Oops a few more,
Does mohair aggravate allergies?
Are there synthetic substitutes that look like mohair on a finished bear?
Thanks for you time!
Sorry about all the questions 
~Ellen
Hi Ellen
I have used mohair on a bear as small as 2 inches. I haven't used the Sassy mohair - mainly as from memory it's fairly dense and I prefer the sparser look.
You will need to invest in some fray stop. Personally, I use Aleenes Stop Fraying - I like it because it stays pliable and has a relatively benign smell. You can also use pva glue (not sure what the US name is for it - it's white glue) that has been diluted with water. I do not like using the other brands of fray stopper - the clear glue like ones - they give me migraines and they dry to a hard edge finish which is hard to disguise when your arm is less than a half inch wide.
Use a good quality polyester thread like metrosene or molynlycke and match it as closely as possible - I usually match it to the backing. Keep your tension even but not too tight. I do use the superlon thread from sassys on my bigger 3 inch bears but haven't tried it on anything that small.
Yes, people can be allergic to mohair, but it's not that common.
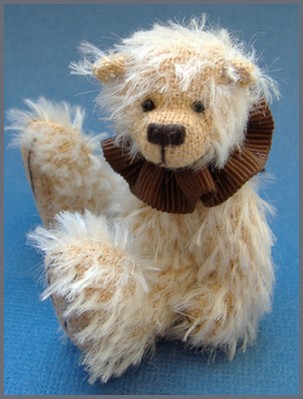
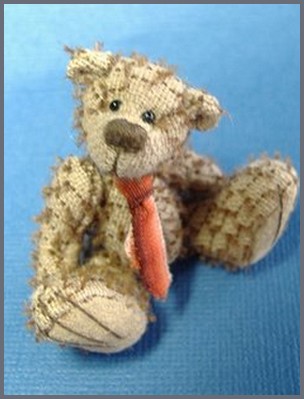
Now...the bears below are about 2 1/4 inches and 2 inches. I think that both mohairs are Schulte. I don't buy my mohair in the US so can't tell you just who would have it but I believe that Intercal has some mohair fairly similar in finish to the the longer stuff. Of course - it's actually pretty short. I'll try and find the code for you
Have fun - pm me if you have any questions. I think there are a few people on here more experienced at mini mohair bears than me - so they'll have some good help for you too.
I think that this is pretty much the same quality as the mohair I used on the lighter bear.
 Blondheart
I am sure you've heard the stories about bears being infested with bugs, but these bears were old bears and usually the bugs were more interested in the excelsior stuffing. Or the bear had been wet at some point and molded. Unless you live in an incredibly humid climate I wouldn't worry at all about pests. If you do live in a climate that is prone to moths or silverfish, keep some mothballs around and you will be fine.
 Ruby Mountain Bears
My current avatar bear is made from a vintage piece of Dense short mohair, also my previous avatar was a mohair bear and still my favorite, sparse mohair ratinee![]() both of them are under three inches. I have used dense mohair on other smaller bears, the only problems encounter is it is more difficult to turn limbs ears etc with the mohair, but well worth it and always use fray check.
both of them are under three inches. I have used dense mohair on other smaller bears, the only problems encounter is it is more difficult to turn limbs ears etc with the mohair, but well worth it and always use fray check.
I have to third the fray check.... find a good one that doesnt make the backing of the fabric stiff tho...
always leave good size openings for turning
don't use a really dense pile at fist, try a sparse or matted fur- dense fur is harder to turn and the short dense piles are trickier to sew and get nice tight seams
choose a mohair with a good tight weave to make fraying less likely
I would also suggest doing something a bit larger than your regular size for starters, maybe 4", and maybe add a teeny bit of chub to your limbs if they are slim to start with;)
I checked out the mohair on Sassys site and I think I have used some similar, actually looks identical and was also upholstery mohair, honestly I would not recommend that for your first try, it's not the easiest to turn, the backing is slightly thicker than regular mohair and frays a little more than most. I'd try this only once you are a bit more experienced with mohair.
My favourite mohair for Minis is Intercals 300S/CM -while the pile length sounds long, because its curly, it is still a great pile for minis. It's not too dense but the curl give the illusion of lots of fur when you brush it out.
600S is very similar to Melissa's first pic, and that's a nice one to work with too. If you go to Intercals Small Cuts page, theres lots of colours in both of these to choose from 
I shall try and insert a pic of the 300S/CM.... last time I tried to insert a pic it didn't work so I am not too hopeful hehe.....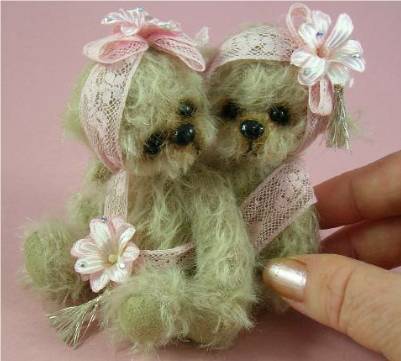
Bearz by EllenWow, thank you everyone!
All the info is really helpful...I think I'll try a few small pieces of the sparse mohair from Intercal, it sounds great and the colors are wonderful! 
By the way, all your bears are adorable!!! Thank you so much for posting their pictures!
~Ellen
Ellen catching up on this post.
I normally make 8-14" bears and from time to time play around with the smaller ones. I purchase the Sassy and Smokey fabrics from Sassy Bears. These are not mohairs and this type of fabric is normally used for upholstery.
Often with these upholstery fabrics you will have a backing and then the fibres are "shot" into the material giving you the fluffy bits on the surface.
I am not an expert mini bear maker but I am an expert unpicker.So I have found that working with fabric that frays is going to be a pain to work with unless you take the right measures to prevent it from fraying. Here I tend to use a good fray check as some tend to harden when dry and then stitching the nose becomes very difficult.
Sewing the bears I manage 100% - it can be the turning when you first start that tends to be a problem. Some artists recommend you use haemostats, I find that I grip the fabric to tightly and promptly pull it all out creating a nice hole. Other suggest if this happens you cut some fibres and glue then over the hole if it is very small.
I use a pair of tweezers then as it starts to turn I use a needle to push it then use the two together till it is finally turned. Having too small an opening will also make turning difficult. I have also tried rubbing bees wax on the wrong side to see if that would make it turn better.
Short pile mohairs also make great small bears and suppliers have been mentioned in some of the posts here. The paw pad fabric should also be a nice soft material and again Sassy bears has a wide selection available.
Some people are allergic to mohair - my Dr. being such a person, yet she has found that gradually she has been able to work with some types of mohair.
I am presently working with a 10mm Japanese silk , it does not fray and makes lovely soft cuddly bears. This is on a woven backing so no fraying and stretching.
The 1mm, 3mm and 5mm pile is woven onto a material backing making it nice to work with however I recommend you use a good fray check with this.( I import and sell the Japanese silks) I made 3 heads for one bear as I kept pushing the stuffing stick thru the head causing the fabric to fray. The 3rd head had a special backing of Magic fix from Sassy Bears, and fray check. After all this work and frustration my dog Samantha decided it looked like a nice teething object !!! the dungarees this bear was wearing - well I am not sure if they landed up in Sam's tummy as they were no where to be found.
I wish happy bear making hours,
Lynette
Bearz by EllenLynette,
Thank you for your help!
Tweezers will probably be a good idea, the bears I've managed to turn without using them were all made with non-fraying fabric. 
Also the Japanese silk sounds interesting, I'll have to look into that.
Thanks again!!!
~Ellen
 Our Blue Iguana
hi guys.. i just cant help asking but how do u compare the mohair of each of the suppliers? I mean intercaltg may have some fabrics which are the same as lets say edinburg.. but how do u compare because they use different codes  . It does help to canvas and compare prices if they are the same quality right?
well i hope lynette will be bringing some of those japanese cloth she is saying since you will be in the taiwan teddy bear show.. hope to meet ur acquantance..
...... I mean intercaltg may have some fabrics which are the same as lets say edinburg.. but how do u compare because they use different codes
Although both Intercal and Edinburgh (and others too) may offer "same" fabrics... like say "3/8" sparse mohair" - they will each have their own feel and look - and differences when you work with them.
I always think it's best to try some for yourself to see how YOU like working with it! I have a close artist friend and it is SO funny... we both love each other's bears and both have each other's bears. We've tried swapping some of the materials we work with (not the mohair, but other stuff like stuffing) and she can't stand working with "my" stuffing and I can't stand working with "her" stuffing - although we both like each other's results! :crackup:
That said... you will also want to place small orders till you find if you working with it or not!
Hugz,
Laura
Different suppliers use mohair from different sources - for example Edinburgh fabric is mainly from the Schulte company and Intercal mainly from the Helmbold company, so while their fabrics may appear similar they are not exactly the same.
And even within the same manufacturer one bolt of a particular type of fabric can be different to the next bolt produced of the "same" fabric.
By experimenting with a few fabrics, you'll learn what works for you and your bears.
btw Laura Lynn - that sounds just like me and my friend. We both make mini bears but the means and methods by which we get to the end results couldn't be more different. If I tried making bears her way they would look like little monsters!
Our Blue Iguanathanks melissa and laura for your insight.. maybe i will take a try also at intercalg fabrics and other supplier to see what works best . but i heared helmbold products fray alot, is that true? 
:hug: Ming
 Hvalsø
I'm a bit of a newbie, but I hope I can help with one of the questions. My boyfriend is allergic to almost everything, but he deals with the mohair just fine So if people are allergic to it, I'd think it's quite rare.
Ming I'd have to say that for me, the Hemboldt frays more than the Schulte, but I don't find that it "frays a lot". I think the Schulte has more sizing on the backing.
I use both Schulte & Hemboldt and love them each for their different qualities (kinda like my dogs LOL!)
I use Aleene's No Fray on the seam openings of ALL my bears. I think it adds some strength to where I'm closing the seam.
When I draw out a bear on a fabric that looks like it might fray more than usual, I use the Dritz Fray Check all around the drawn pieces before I cut out.
 Creative Design Studio (RKR4CDS)
No one responded to your first question - designing the thickness (width) of your limbs. It all depends on the 'look' you're going for. The same pattern template that is done in a thicker-napped fabric will be great proportion for a bear: the same template used on a sparse mohair will look like a concentration camp victim, because now the outline/profile of the backing is seen as the 'edge' of the limb, where longer/more thickly-napped fibers were seen as the profile before.
I'd recommend trying any body part heading for sparse mohair or seriosly distressed fabric in inexpensive muslin first, because if you've been using the template for any 'regular' napped fabric, you'll be surprised at how all of the body parts will change when they're done in sparse!
And if you end up adding a bit of width to the arms & legs templates, you may have just solved your turning situation.
I use Aleene's No Fray on the seam openings of ALL my bears. I think it adds some strength to where I'm closing the seam.
When I draw out a bear on a fabric that looks like it might fray more than usual, I use the Dritz Fray Check all around the drawn pieces before I cut out.
And:
I do not like using the other brands of fray stopper - the clear glue like ones - they give me migraines and they dry to a hard edge finish which is hard to disguise when your arm is less than a half inch wide.
I'm with you Laura & Melissa: Aleene's 'Stop Fraying' or the 'OK To Wash It'. '
PPl often blend the 2 brand names into one - Fray Check is an entirely different product, more like a clear nail polish. The last time I checked, it had an applicator like nmail polish has, and goes on like nail polish.... ( too wide an applicator/not enough control, it does have a strong acetate smell, it dries stiff and bleeds into the fabric from the edge instead of staying in just the bead you lay down with white glues. This can also take the color of your drawing implement with it, showing up on the outsde after sewing, depending on how closely you stitch to the edge.)
Aleene's 'Stop Fraying' or the 'OK To Wash It' are like a thinned white glue -and dry clear.
I draw a thin bead around all of my cutting lines, blot w/paper towels which absorbs the extra and drives it into the backing.
The hardest part is waiting for it to dry completely before I can cut & start to sew!!!
I came across my copy of an old post just yesterday that I'd written years ago about turning narrow linmbs or any long narrow piece.
___________________
The comment that prompted this post was the "sewing was OK but not the turning".
I went back to some of the kits in my 1st kit line:
as I was a teen in the late 50s, spaghetti straps on gowns were very popular. In order to sew those narrow little 1/8" strips, we did this:
Fold the strip in half. Being cut on-the-bias helps as it has more give but straight grain works too.
Cut a strong cord or thread a bit longer than your strip (limb). With practice you don't need it this long.
Knot one end with a substatial knot, one that won't slip through your sts.
Lay it inside your strip with the knot hanging out the end.
Sew (by hand or machine) across the short end keeping the knot on the outside of this short seam. Match the edges carefully on this top edge & down the long side. It's OK to sew through the cord/thread as you'll cut it off later. It actually achors the knotted cord better.
As soon as you've turned the corner and sewn an inch or so down the long side seam, roll the knotted end of the fabric well between tyour fingers to break up any sizing and to soften the part to be inverted.
Hold the sewn end of the 'tube' in a rounded shape between your fingers to encourage it to take on a round shape, which opens up the center of the tube.
Pull firmly on the other end of the cord until the sewn/knotted end slips inside the tube. Don't pull that end past the inch or so that you've sewn the long side seam.
Tuck the cord back up against the fold so you don't catch it with your needle. If sewing by machine, a zipper foot is the best to use to keep the cord away from the stitching line and the seam allowances together.
Continue to sew and pull every inch or two - this will depend on how flexible the fabric is. If it has pile on the outside, you'll need to have trimmed that away from the sewing lines and the seam allowances. Tuck the rest of the nap/pile inside as you go.
As you reach the end of the strip/tube, your far end is already right there, ready to pull completely right-side out!
And no holes are made in the end and no nap is pinched off!!
Easy Peazy Lemon Squeezy, as my grandies say.
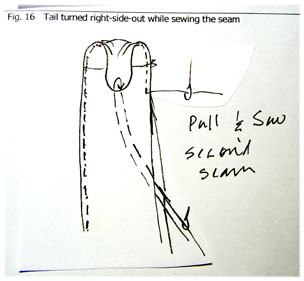
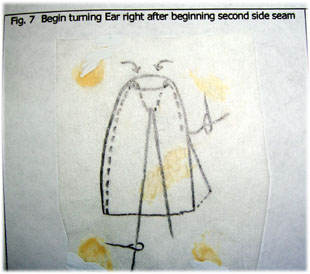
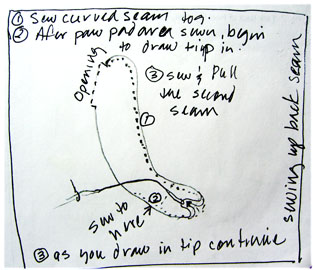
OK, this 'tube' is exactly what you've created with a limb. Sew down one side seam to the tip of the paw area, lay a knotted cord (doubled upholstery thread?) across the seam at the end of the paw & start up the other side seam.
Roll the materials to soften them and begin to pull the paw to the inside. If you must use tweezers or hemostats, the paw end is in full view because the second side seam hasn't yet been sewn.
Ease it on up as you sew and it's at the top when you finish the 2nd seam, ready to be pulled out.
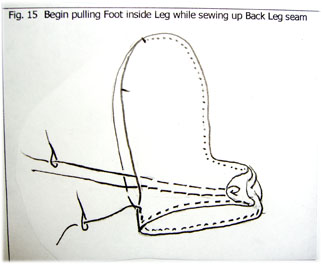
The same works for a leg: insert the Foot pad.
Sew down the back of the leg.
Begin to sew up the top of the toe seam, after laying the knotted cord into the first few sts. as you reach the ankle area of the second seam, roll the fabric to soften, ease the toe inside and begin to draw it up the leg. Continue pulling and sewing and it to will be at the top/opening when the seams are done.
Don't catch the drawing threads as you sew!
Clip off the thread and leave the knot inside.
Creative Design Studio (RKR4CDS)Ah HA! Found some of the drawings I use to use in my first pattern line. These drawing are from them - it was predigital and we didn't have the ability to easily convert images...
This is what I tried to describe in sewing down one side of a skinny 'tube' - a 'limb/arm/leg/bunny ear' - to make turning easy because the only 'tool' inside there is a doubled thread!
No tweezers, hemostats, no pulling fur of the tip, poking a hole, not knowing if you also grabbed some fur from the side alongh with the tip......
Sew the long side (usually the inward curved area of a limb) and get just past the end (the tip of the ear, the paw pad ot back-of-the-leg seam above any foot pad. Catch the tip with a doubled strand of upholstery thread and hold onto both thread end outside of the piece. Make sure you haven't sewn through the other half of the thread!
Roll the end in your fingers to break up the sizing and soften the fabric.
Holding the end in a rounded shape, gently pull the tip inside of your pc.
As you sew a few sts farther, pull the threads a bit to advance the tip up.
By the time you get to the top opening, the tip will be ready to pull through that opening and you're done!