Banner Sponsors


For artists and collectors sponsored by Intercal...your mohair supplier and Johnna's Mohair Store
 SUE GORRIE FOLKART
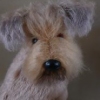
HI everyone. I am in need of a rescue here. I have been working on this rabbit for weeks now with PATHETIC results.
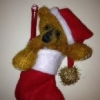
It's my first stab at pattern draping. I am going basically on what I have read here online and some uneducated guesses. I first sculpted the head with high quality PLASTALINA. I drew on where I thought the pattern lines would go. I then took paper towel and tried "molding" the towels against the clay, then drew on the towels where the lines were. Then I cut out the paper towel shapes that became the pattern. Then transferred those towel shapes to paper.
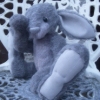
To see if the pattern shapes worked, I taped the paper together as if the pattern pieces were sewn together. It seemed to look pretty good.
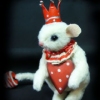
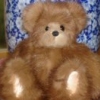
HOWEVER, when I tried my first prototype (muslin), it looked like my bunny was stung by a bee. It was 2X as wide as it should have been. My mom said it looked like a snake. So .... not successful that time. Perhaps it was over stuffed, but I was trying to do some needle sculpting as well on it and was having trouble getting the stuffing (high quality heavy polyfil) firm enough. So I thought perhaps the material was too stretchy and tried some cheapo dense plush. Still no success!
Why does this look good in paper and not when its stuffed? Anyone else have a problem where things look good in paper and not in material.
The biggest problem area seems to be beside the nose and below the eye where there is a little indentation. (Circled in pink).
Do any of you have some suggestions as to how I can accomplish what I need? From the photos can you tell what I am doing wrong? Problems in the pattern etc. 
Please help anyone!!!
Sue
I was also wondering if those of you who do alot of pattern draping stuff with excelsior or polyfill? And also do you do alot of sculpting with your pattern draping technique.
P.S. How come no one else is up thinking of these things but me at 3:30am??? :doh:
 DENBY BEARS
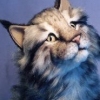
 Take a look at Finny by the Rabit Maker, it seems the cheeks are suppose to look tha way in a rabbit. I really don't know the answer, perhaps she can help you.
 Chaska, Minnesota
I don't know the answer but your bunny looks fabulous with the paper pieces!!! Where did you learn that techique. I have been wondering how that worked. Is there a process written down in bear books anywhere?
One of the courses to be offered at E-Bearz University will be pattern draping and I also believe Nancy has some information on it in her book 101 Bears
Her classes are offered online at www.kranbearys.com
Hugs
Gail
getting the stuffing (high quality heavy polyfil) firm enough
When I do a Rabbit or my Phooka, or a cat I leave open a smal part of the muzzle seam.
So I can needlesculpting and stuffing at the same time. Hope this help, it is difficult to explain for me in english,but hope you understand the way.
hugs
Manuela
Chaska, MinnesotaGail wrote: One of the courses to be offered at E-Bearz University will be pattern draping and I also believe Nancy has some information on it in her book 101 Bears
Her classes are offered online at www.kranbearys.com
Thank you Gail for the information on classes.
Hello!
Look carefully at your paper pattern. Notice where the head curves go in/negative space? These areas will ALways be pushed out when the piece is stuffed. I think that is what is happening with the rabbit. You see the spot where you are having trouble is flat or slightly concave in you paper pattern. The solution is needle sculpting. By going back and forth with stitches across the nose you can accomplish the negative shape. I use this technique for my cats.
Karen
KJ Lyons Design
First use a calico or tightly woven cotton fabric to do your draping and make sure you place the fabric with the grain of the fabric in line with, say, the centre line down the head. If you are using a paper towel it has no grain line and therefore when you transfer it to the fabric you don't know where the grain lines are. This is important as depending on where you cut your pieces the shape of the pattern will change. If you cut a piece on the diagonal then it will stretch and therefore you will fit in more stuffing, maybe where you don't want it.
Secondly I would use the same fabric to make your pattern pieces as I think muslin is too fine and therefore will distort your pattern shapes when stuffed. Make sure you lay the pieces you have draped on exactly the same grain lines when cutting the pattern piece . You will have to mark this on your paper pattern
I myself have struggled with the rabbit head but keep going just be patient and I'm sure you'll get there.
Hope this helps
Shelly.
 VallierBears
Hi!
First of all, Great pattern draping! I agree with what both Karen and Shelly said.
As Karen has said about the concaves around the eye areas, Try stuffing the paper head more. I can see a crease on the second picture behind the eye where the paper is pushed in. Stuff the paper pattern more and note where you will need to needle sculpt. I would say your head high will shorten and get a little fatter at the sides. You will probably need to needle sculpt the eye area, along the "nose" ,the cheeks and whisker pads to get the achieved look of the paper pattern.
I agree with Shelly and a tighter woven fabric. I use calico or cotton fabric that I have to hand. I find muslin just too thin and stretchy to nickel drape and make up in. Grain lines are also a big factor as Shelly said is you place somthing on the bias (diagonal) it will stuff forever and go out of shape.
I would make it up in Calico or Cotton and keep the paper head close by, needle sculpt were you think needs it and push in your eyes like the paper head. Don't forget when you add "fur" to it it will be bigger and if its long you'll need to scissor sculpt too!
Take some more pics of a fabric head if you get stuck !
I love pattern draping, shame I REALLY SUCK at using clay :crackup:
Richy~
SUE GORRIE FOLKART
Thanks to everyone for your replies!!! Your input and suggestions are truly appreciated. I find this board to be a plethora of information and am thankful such a place exists to find answers to bear making questions.
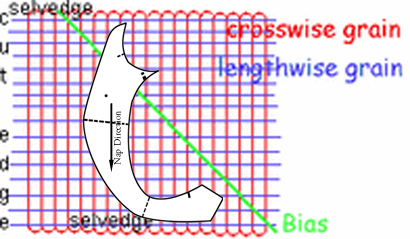
One question for Shelly... If I am understanding you correctly... the GRAIN of the fabric is UP and DOWN. The BIAS is diagonal. The NAP of the mohair runs DOWN. When you have an ODD shaped pattern that you want the nap to travel down, how should you place it on the fabric? Is this pic below correct? IF it is not correct I imagine I could cut differently and retrain the nap of the mohair.
I had a feeling most of the issues were related to needle sculpting.
I did see that EBearz is going to have a pattern draping class very soon. Any clue who is teaching it?
Thanks again to one and all!!! :clap:
Sue
Hi
When you have a 'nap', or in this case the direction of the fur pile, you probably have found that the fur doesn't always run in the same direction (very annoying especially on furs with a slight bend to the fur).
I would cut in line with the grain as much as possible, but when it if neccessary to have the fur lying in a particular place then I would cut to fur direction. This means you could be 'on' the bias or even 'off' the bias and, 'off' the grain.
If you have to do this the only thing you can really do is line (back) the pattern piece first with the same shape, which has been cut 'on' the straight grain (warp or weft) in a cotton fabric, something that doesn't stretch. This will then hold the fur piece, cut 'off' the grain , in it's shape when stuffed.
I am sure there are clever people who can cut patterns to compensate for the stretch you would get , but if you are using lots of different furs then all your patterns would react differently to different fabrics. So I would just line (back) the pieces you have to cut 'off the 'straight of grain'.
If the pattern piece on your diagram is a side piece then I think it looks right, if thats where you want the fur to be. Just watch the left hand edge, that looks like the top of the cheek? It's slightly 'on' the bias so make sure you don't stretch it as you sew it.
Either put in a row of 'stay stitching' before you sew it to the other piece, and put in some marks, 'notches', to match it to the other piece you are sewing it to.
Hope this makes sense !