Banner Sponsors


For artists and collectors sponsored by Intercal...your mohair supplier and Johnna's Mohair Store
Very nice! It's all a process; this learning stuff. Don't feel you have to rush it. In fact, I don't think you can rush it, without going sans sleep, and getting a massive migraine, and just totally frying out. There's too much new stuff to tackle to do it all at once.
Come back any time with questions; I'll help out as best I can. I'm not nearly expert. Just ask someone who is.

 UK
UK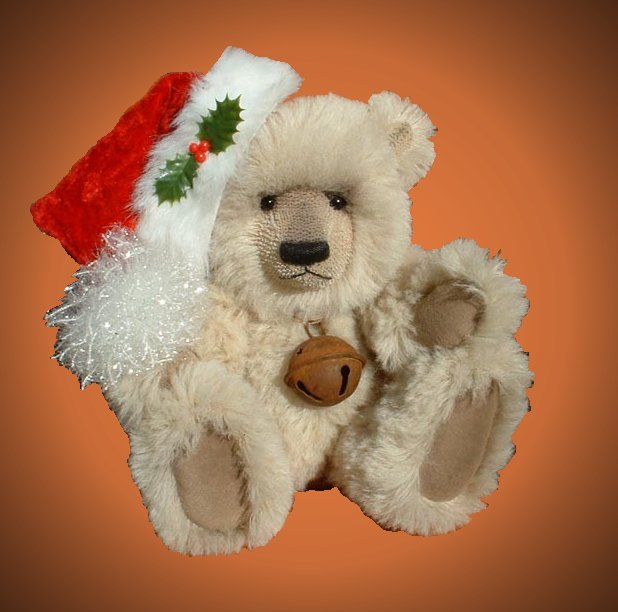 Susan. what paint programme are you using? I used paint shop pro and this is what i came up with on your photo (hope you dont mind me editing it just for the purpose to show you. i can try and explain how i did it using PSP if you like it was pretty simple. only about 4-5 steps lemime know and i will try explain
Pipa, what a hero you are. Thanks for jumping in to help. 
 Beary Lovely ... Bears by Susan
I don't mind at all! I have a trial version of Adobe Photoshop. Wanted to try it out first before I spent alot of money on it....
Paint shop pro... will have to try it too! I would love to know how you did it. I appreciate your and Shelli's help. I really want to learn how to have great pictures. I know it makes all the difference in the world when selling on the internet. Thanks! :hug: to both of you!
Susan
UKno problem Shelli. im not the worlds best teacher but it's worth a shot.
i will just write up the instructions on what i did in wordpad then i will paste them here. give me a few minutes
Susan... my PhotoShop was a gift but if I had to buy for myself I would go with PhotoShop Elements. It's much less expensive and I think it does anything and everything that I've used my full version for, to date. Give it a thought, before you fork over multi-hundreds for way more program than you (or I) actually need.
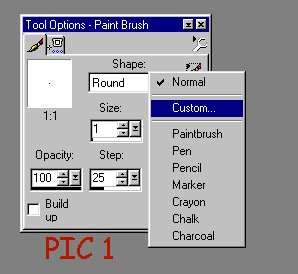
UKOnce you have the photograph opened in your paint programme. this is what i did.. ! (the tools might be a bit different because im using Paint Shop Pro not Photoshop but im sure they both have the same tools more or less :)
Now in photoshop do you have a layers option ?? where you can add a new layer to the photograph ??
If so, add a new layer to your photograph...(i dont know how to do this in photoshop but in PSP you select the LAYERS and select Add New raster Layer.. have a look see if there is an option to add a layer...
Now you need to draw around the edge of your bear (on the new layer).. it's alot easier if you zoom in on the photograph and work your way around. you need to draw the outline as close as you can to the outline of the bear making sure not to get too much of the background in with it... now i just used my paintbrush in any colour so you can see the outline.. go all the way around your bear making sure the outline is completely joined. if there are holes in the outline you wont be able to remove the bear !
okay once you have the outline done.. you need to use your magic wand and press anywhere on the image OUTSIDE of the bear outline...
Then you need to select the actual photograph layer.. and just press CUT.. it should cut out the background and leave the bear ! and you just delete the outline layer which removes the outline of the bear
try this and let me know how you get on, it sounds ocmplicated but it takes less than 5 minutes ( the longest part is drawing the outline)
there will always be a few of the background pixels left over, so when you want to add a new background colour select a colour from the pixels on your photograph and the left over outline wont stand out (unless you zoom right in and erase each tiny pixel by hand but i wouldnt recommend that. it is a long slow process LOL
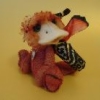
UK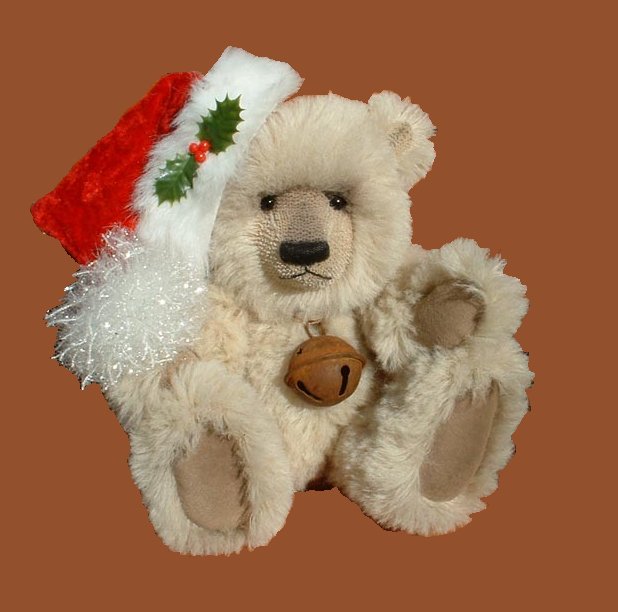 and if that all fails Susan. here's the photograph with the background removed already for you to add or tweak etc just grab it off the screen LOL !!!!
Beary Lovely ... Bears by Susan ok, still working with it, I think I am getting somewhere. I will look into the Photoshop elements and Paint shop pro, I don't want to spend an awful lot of money as I will never have the time to spend that I would like, at least not until I graduate!
Anyway, here is the latest...
By the way, where did you get the snowflakes from Shelli?
Thanks to you both, and Pipa, PSP does seem to be pretty close as far as your directions go....
Susan
oops, forgot to resize it.....
Beary Lovely ... Bears by Susansince this was an experiment on a bear pic that was already taken, i do know from now on to use a PLAIN background if I want to edit it like this... I am thinking white!!!! :lol:
I am off to study now, yuck..... thanks ladies for your help, I will keep you posted!!!
Susan
 Kiprie Bears
Hi Shelli, thanks so much !! :rose:
I really need to lean this now, I want the "PhotoShop Elements".  I thought I had
photo shop in my PC but it was
something else and not working good..... 
wow, everybody leaning so quick ! clever clever ! :hug:
Hugs/Marie
By the way, where did you get the snowflakes from Shelli?
The snowflakes are actually a BRUSH. That sounds silly, but in PhotoShop, a "brush" is anything that you can use, to create a certain stroke or impression or image, over and over again, by "stamping," or "painting" with it.
It's not the same thing as a PENCIL, which creates an even, straight line.
Both tools can be found in the left toolbox in PhotoShop.
My snowflake was an installed brush when I got my program. You can find free brushes for PhotoShop all over the internet. Just Google PhotoShop brush.
By playing around with the "dynamics" of the brush -- size, opacity, scatter (how far the snowflakes are strewn across the page; at what distance; etc.) -- you can get various results from your brush.
The brush itself looks like a single snowflake, when you look at it in the brush palette or menu. To use the brush you just click and hold while sweeping across the page. The motion is something like tossing flower petals, or rice, at a wedding.
This may be getting a little complicated for you at this point.
You can also just search for a snowflake graphic online, especially at one of the many scrapbooking websites (Scrapbook Bytes.com, etc.) Many of these elements -- that's what they're called, "elements" -- are free.
If you manage to find a .png or .gif file (I think it's .gif, anyway... hmmm... but I know for sure, .png), it will come on a transparent background. Meaning that, when you open the snowflake element in your editing program, you can just select it, then drag and drop onto your bear photo/background. You will have to do this for every single snowflake -- a different process than the one using a PhotoShop brush -- but it will look basically the same in the final outcome.
You can resize any photo or element by going to the "move" or "select" option and then grabbing one of the corner squares -- I forget what that's called; a button? box? -- anyone, grab a CORNER one and, holding down SHIFT, pull at a diagonal to make larger or smaller.
Gotta run... back much later tonight. Have fun!
 Ruby Mountain Bears
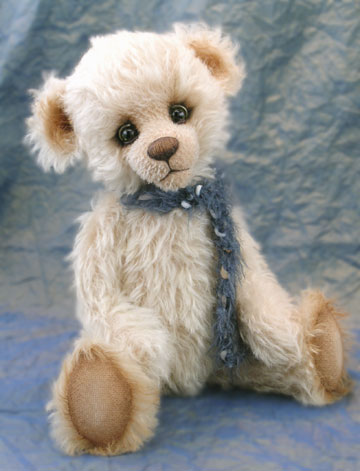
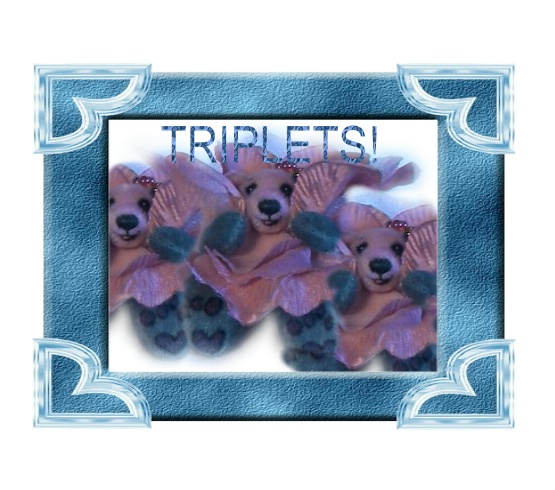 okay just going to see if I can load this one? I cut this bear out and used the clone tool made triplets, framed it with the same color, used the same color text. Too much Fun.
Thanks Shelli,
Kathy
 Back Road Bears
Pipa,
Thanks for the lesson. I use PSP too and haven't tried the lasoo thing. I always spend an hour 'erasing the background'...... I'll try your technique next time I'm photo editing. And where did you get the snowflakes? I'm still trying to figure out the difference between a raster layer and a vectorlayer. As you can tell, I have a lot to learn with PSP still.
Daphne
 Jare Hares & Bears
WOW.
I have used several different programs. My dream some day is to own the Adobe CS, with all the bells and whistles, but I don't have $1200 to spend.
Right now I have Corel DRAW12 graphics suite, which works quite well for me, it was about $350.
The main reason I got it was I wanted a better way to draw my patterns into the computer. Plus I wanted to be able to overlay pattern pieces if I had too in order to get them all on a page.
It comes with Corel Photo-Paint. Any you can do many of the same things with it that you can in Photoshop. I don't have enough time to tweak all of my photos. So I went hunting on the boards over at eBay for photo tips. And I found a ton pf tips and tricks. There is one guy that has tons of good information on taking pictures, his user id is camerajim. Here's a link to his aboutme page. http://cgi3.ebay.com/ws/eBayISAPI.dll?V … =camerajim When you get a moment check out some of his photo taking tips.
Before I found his pages I didn't understand white balance. It is amazing the difference when you have the correct white balance selected.
And it is amazing what a difference using a piece of white poster board can do. Posterboard can reflect a ton of light. I aimed at taking better pictures, partly beacuse I didn't have the time to figure out how to correct them. And mostly I wanted the camera to be set so that when mom needed to take pictures she wouldn't need to spend a ton of time editing photos. The old addage,"Better input equals better output".
But don't misunderstand me.
Shelli and others - you all have given some great information. And I love the fact that different ones took Susan's picture and "played" with it to get a better end picture.
The other thing I did was to buy a colour correction program for my monitor. It cost about $150, but it cut down on the reprints that I needed to do. You can buy programs that will calibrate your printer, but that takes a ton of time and is too much hassle for most people. I say spend the money on the colour calibration software for your monitor.
I need to correct the monitor again it is drifting toward the blue side of things.
 Matilda Huggington-beare
WOW that was brilliant. Thankyou for letting me sit on the side lines. Am eagerly waiting for the next in stallment.
I absolutely love playing with the editing of my pics. I get bored with it because I dont have enough to play with. Now listening in to all your advice my choice in what to get is getting smaller. Thankyou :clap: Matilda
UK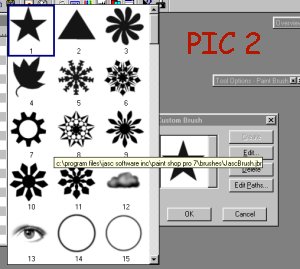
 Daphne - the snowflake is a preset shape already installed with your paintbrush (might depend on what version you have, i paid approx £80 for PSP7..
anyways the snowflake..if you select your paintbrush, you should get a pop up box like in the picture labelled PIC1 above, if you select the little paintbrush in that box in the top right corner there, you can pull down a new menu from there you select CUSTOM... and then a new box will appear (See PIC2 above) and from there you can pick lots of shapes already for you to use
Pipa,
Thanks for the lesson. I use PSP too and haven't tried the lasoo thing. I always spend an hour 'erasing the background'...... I'll try your technique next time I'm photo editing. And where did you get the snowflakes? I'm still trying to figure out the difference between a raster layer and a vectorlayer. As you can tell, I have a lot to learn with PSP still.
Daphne
UKas for raster layers and vector layers. i never use vector layers. they restrict what you can do unless you really know the programme or need to use it specifically for node editing (i know how to use PSP quite well as i've been using it for drawing graphics for many years now but i would avoid vector layers and go for raster layers)
at the end of the day when altering images my motto is you can never have too many layers, it gives you more freedom and makes life alot easier when editing images if you add everything to new raster layers!! i drew a graphic once and it had over 100 layers in it hehehe
UKoops Daphne i forgot to mention. i didnt use the lasso i tried but if you let go of your left mouse button while drawing you lose the outline ..you would have to go the whole way around the bear without letting go of your left mouse button, thats why i used the paintbrush on a new layer to draw the outline then selected it and cut etc etc!
 Baird'sBears
 Belated thanks, Shelli
I've just downloaded a free 30-day trial of Photoshop, and can't wait to try it. I tried PSPX, but didn't care for the color-adjusting function results--my Lexmark Photo Editor does a much better job. Or maybe I should say that I do a much better job with the Lexmark?
Eileen
Jare Hares & BearsTons of tools and tons of information.
Pipa, I found like you did it is better to add layers and edit those layers rather than adjusting the background picture.
UKit certainly makes life alot easier Jared if you use layers when changing things on images
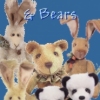
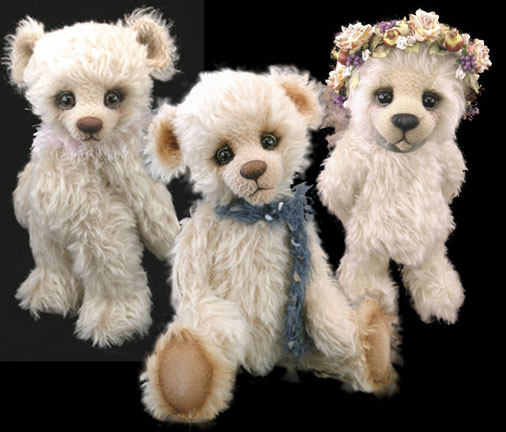 Just another example of what you can do with a photo editing program, and an investment of your time, to learn it...
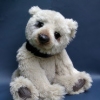
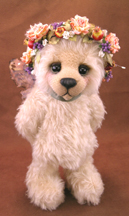
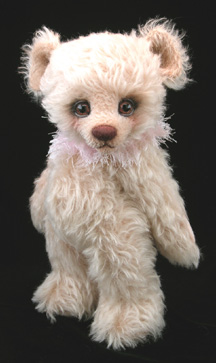
The top photo, of three bears, is a compilation of three separate photos. There's no retouching to the bears themselves -- I like to let my work stand on its own -- in terms of "fixing" hairs, making things more even, etc. But I did do some color adjusting so the bears -- all made from the same mohair -- would look more exactly the same.
I extracted all three bears from their original photos (shown here) and placed them together, in three layers at first, in a new document. Then I filled the background -- a fourth layer -- with solid black, and when finished, flattened the image, to reduce file size.
Fun!
 Kim-Bee Bears
That is what I want to learn to do, like on your website... a collage...
UKShelli that looks incredible !!!!