Banner Sponsors


For artists and collectors sponsored by Intercal...your mohair supplier and Johnna's Mohair Store
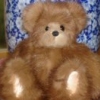
 Woo Bears
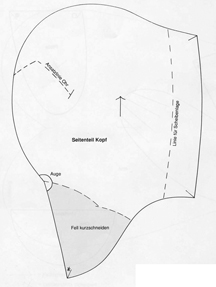
 Hello!
I'm really new to making my own bears, and I appreciate all of your help and patience! :)
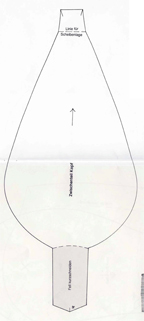
I have a pattern of a Bing Bear. It shows the end of the nose in a hard line triangle/point on the gusset pattern - the actual mohair cloth, there are not any curves to it.
I haven't sewn this sort of nose/mussle yet, and before I start into stitching the mohair, I need to ask:
- do I literally sew the end bits of each side of the head/nose TO these angled lines on each side of the point of the tip to the gusset, or
- do I sew the neck to nose seam right up to the top and then when sewing the gusset, add the nose to the top edge of the 2 head pieces where they join at the nose/mussle?
Aside from this pattern, how do you get a nice squared off nose (old Farnell style)?
Cheers and thanks!
Brenda
It's the second way, if I understand the question correctly.
Start by sewing the two side-head pieces from neck to nose tip. Then center the head gusset exactly where the two side-head pieces meet and sew it on.
Let me know how it looks! (I've never tried to achieve a squared-off nose.)
Becky
 Faux Paw Bears
Brenda,
I've never sewn that angle shaped gusset before, however, just thinking about the mechanics of it, handling the material in hand, it seems easier to do it backwards from the way we are taught...that is not to sew the side pieces together first as is the norm...but instead to sew them to the gusset first and then stitch the center chin piece down from the center point last.
It looks from her corner slash marks in the pattern that that is the intent. Good question.
Pat
 Emo Bears
Like Becky I usually sew the two sides together first - although I sew from the nose down the neck, Then I put little stitches to match up the middle nose, the point by where the eyes would be and the bottoms of the gusset.
No idea if that is the best way though.
Woo BearsHi!
Thanks so much - the reason I ask is:
(a) the pattern instructions are in German only
and
(b) if I start with the gusset and sew each head side piece on to it, then part of the depth of the muzzle (the chin) will be eaten up by the seam allowance for the triangular nose tip. Can't tell/not sure if the pattern has compensated for that, from the look of the pattern. I've even cut this all out on plain cotton to try it out but am stumped on this one thing!
I appreciate your patience - I know I didn't word it very well :)
SO - do the little slasshes at the corner of the pattern indicate that is the place to start sewing first? Gosh! Is there a list of sewing pattern symbols (like editorial symbols for mark-up)? That would be great!
Believe it or not, I can actually sew, just can't really read a pattern to save my life!!
Cheers and thanks
Brenda
 The Littlest Thistle
It looks like on the pattern the diagonal lines are where the pieces should meet. So the tip of the nose would meet the top of the side part of the head at the end of the muzzle. The side pieces would meet at the tip of the nose and the bottom of the chin, and the back of the head would meet the end of the gusset. The arrows are the direction of the nap of the fabric. I tried enlarging it to read what was by the dotted line, but it's been too compressed, so I couldn't, but it could be the line where the joint should be and the fur gathered beneath.
It doesn't really matter whether you sew the sides first, or the gusset onto the sides, the seam allowance will be the same regardless
I sell my own patterns and I used to do a squared off gusset muzzle- I found that people were so used to rounded gusset snouts that they were puzzled, just like you.
On my patterns at least, you just sew it up the way you would sew a bear with a curved nose gusset- it's just straight instead of curved, that's all. This pattern doesn't look like you need to do much different to usual, in my opinion 
The 'slashes' I think are just places to match your pieces together- the 'slash' on the head side at the snout matches with the centre of the gusset 'slash'. I would just mark them, dont actually slash the fabric as that would make the seam a bit prone to fraying I think.
Good luck with your bear, I am sure he will turn out wonderfully:)
Emo BearsI agree that the slashes are probably where you can pin to line up the pieces. I have a few Japanese pattern books and it is common to see those lines, sometimes with a circle on the end, which is what you often see on clothes patterns as the place to pin.
Good luck! 
 Chaska, Minnesota
One tip is that you hand sew the nose area so that you can get the lines streight. It looks like an interesting pattern. Post pictures so we can see what your bear looks like.
I had a pattern that looked just like that only in English...the instructions said not to sew the angles but to sew it in a curve? So, why put the angles in if you are going to sew a curve? Strange...I would very much like to see your finished bear!
 aRTy Bears
Lovenshire has just made me put 2+2 together and I think I may have your answer with the angles.
This is a technique Ted Menten uses in his book. You use angles on the nose points to make it easy to line up and sew the gusset. So you can pin the angles BUT then as Lovenshire says don't actually stitch to the angles, curve it round to give you the rounded nose of a more generic pattern.
Hope that makes some sense.
I would do as everyone else seems to say sew the profile pieces as normal (nose to neck), then line up the gusset as above. Stitch gusset in to place and wallah! One heard.
Richard
x
Woo BearsHi everyone!
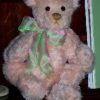
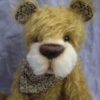
Success: I spent hours sewing (picking out stitches that weren't perfect and resewing) the whole head by hand, and its worked out perfectly. This is for a big bear - 18"+, so the head is much bigger than what I've done before.
With Babelfish I was able to translate a few basics - start at the nose first, it stressed, for the neck/chin seam. I took the angles literally on the nose, however, sewing each side at the same time and found that it has given me a perfect nose!
Stuffed the head with excelsior today, and its great. Can't post it yet as the rest of the bear has to be done and the mohair I have used is a wonderful long, dense, wavy antique blue - the backing looks exactly like denim, so imagine a smoky version of that! - and so the nose will have to be seriously clipped and plucked, when ready.
I noticed in the photos of the original Bing bear that the arms seemed shorter than I expected, so I blew up the arm pattern pieces by 15% and the proportions are more suitable.
I really appreciate everyone's help and the time you've taken to help a newbie out! 
Cheers and thanks
Brenda
teddyretirementhome
Richard, you are exactly right...that is what it said to do. I don't know if it would help me or not but I don't intend to do that pattern anyway. I get a pattern and look at it and think boy, if this were this way and that were that way and this was changed to this...oh well, I might as well make my own pattern!
Posts: 2Hi ladies
Has anyone ever tried making a polymer clay face Bear with the rest of the body all fur and sewn?
Thanks
Dawn
Has anyone ever tried making a polymer clay face Bear
Welcome to TT, Dawn Marie!
I know that Jo Nevill (Jo Bears) makes bears with sculpted porcelain faces: http://www.bearpile.com/detail.cgi?id=1132&item=38275, and she's a member here on TT.
Becky
Posts: 2Thanks Becky
I really enjoyed her website! Now I guess I have to get my clay out and start! hahah :crackup: