Banner Sponsors


For artists and collectors sponsored by Intercal...your mohair supplier and Johnna's Mohair Store
 Sophie Z'Ours
Here I come with questions concerning heads made with more than the usual three parts.
I already tried once centre seamed one (which makes 4 parts) and also inserted muzzle. So I already know about these even if I have not fully explored possibilities.
I am not after open-mouth bears, at least not yet.
Have some of you experimented with more pieces, to really have more control on its shape?
And if so, what kind of alterations did you find interesting to make? What kind of results did you obtain?
Hopefully your experience on it might give me some start point to experiment for my special pattern...
Many thanks,
Beary hugs,
Sophie.
 Oh my, I am still trying to get the gussed perfect! I always wonder about the bears with a different color muzzle...is that a separate piece? My, oh my I have a lot to learn about bear making. I just want to cuddle my bears!
 Posts: 61
I'm making my 4-piece head with 1 piece for the back of the head, with two darts, and then two side pieces and the gusset for the front. I do this because it allows me to shape the head's "sides".
 The Littlest Thistle
I always wonder about the bears with a different color muzzle...is that a separate piece?
Yes. What you do is design the head pieces - side and gusset as if they were whole, then decide where you want the colour change to be and split the pattern there, then add a seam allowance and you're done. Well that's what I do anyway 
 Fulrfun Bears
I have also made a bear using 4 pieces being 2 x sides, one front muzzle and the back of the head - the trick is to shape the back piece well or it can look a bit flat at the back of the head.
The ONLY time I ever use more than 3 or 4 pieces for a head is if I am creating a panda, inset muzzle or very elaborate open mouth. Even with a regular open mouth, you only add once piece for the inside of the mouth. I don't see any reason to create more pieces. You can alter the shape of the head by simply adding darts and needle sculpting. Darts at the bottom of the side head piece will give you a fuller cheek. Darts at the top of the side head will round out the top of the head. You can also add darts to the gusset to round out the head. On my latest bunny pattern with an inset muzzle, I added darts to the muzzle piece where it sews to the side head to add a bit more cheek. I would experiment more with dart placement before I started added a bunch of pieces. Darts are less work and will allow you to change the head shape in infinite ways.
Have fun!
Alison
i use darts in my head peices too,i find it easir to shape this way than using lots of head peices,you can change the shape quite a bit with darts
sandra
 Creative Design Studio (RKR4CDS)
I so agree: Darts are much easier to deal with than full seams running throughout the head!
With darts, you can control which way the nap of the fabric will lay - this direction will change the direction that the nap faces and this is MOST important in a head that is less than 1" across.
Even in larger heads, the seam allowances of the gusset are sometimes allowed to both lay together behind one side of the fabric rather than being spread apart, which causes all of the nap on some mohairs (especially that of the short-bristly types) to bend over to one side and leave bare spots showing along the high side of the seams.
This isn't the same as a bare spot of wear & tear, just a bare spot of a designer not paying attention to details (when stuffing). But with darts, one can lay the whole thing over where you'd like it and hold it in place with the stuffing. It's much less work while stuffing to hold one smooth dart than it is to hold 2 very narrow curving seam allowances apart1
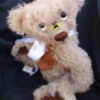
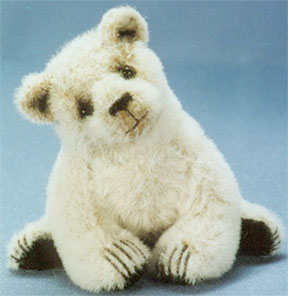
At least this is the input from a miniaturist... I have a patt for a seated polar bear called Cubblet, (Body just 4 main pcs) in order for his tiny rump to form properly filled cheeks 'cheeks' between his out-pointing paws ) - about 2" apart - there are 3 darts one each side of the one main seam on the 2 Back pieces and 2 more on the each side of the Front main piece. This is a lot of darts (all approx 3/8" long) within 1" of the two main seams, but it's the only way to get cupping and roundness of a tush' and incurving of a lower belly into such a tiny Ted.
Here is Cubblet, just under 2" tall and wide, sorry I don't have a side shot to show his profile curves -
 Benson Bears
Bobby I bought your cubblet kit at a show when I needed something to while away the idle hours on the second day. I was amazed at how all those darts created this cute little backside! Very impressed! 
The Littlest ThistleThe more I hear about them, the more of a fan of darts I'm becoming, I've already been amazed by what happens with the top of the head darts, now what to try next...
Sophie Z'OursThanks to all of you for your advices and explaining your choices.
I have to confess I never tried darts (except for these sitting bears with no jointed limbs), as I have always felt shy about it.
The fact is I will have to make more than three pieces for the head as the "scalp of the bear" needs to be in another fabric.
So I think I will try two possibilities :
- First, I will cut my pieces without altering shapes and see where darts would be helpful.
- Second I will take profit of having to cut more pieces to alter shapes and add more roundness and see if it gives interesting result.
For these experiments, I will not use furs so it will help me see what I do.
I will get back to you to give you the results and conclusions.
Beary hugs,
Sophie.
Creative Design Studio (RKR4CDS)THX Linda - I'll bet that was from Adele? She carried my fabric kits years ago in Australia. I actually had the devil's own time pulling the back feet through the narrow ankles; my Cubblet up there has one more dart on each quarter piece and measures a bit shorter than 2", so I eliminated one dart on each side and enlarged him a bit for the kits.
I'm glad you told me this, because you are a true artist and I'm most flattered that you'd pick my kit - I'd love to see your rendition of him!
But I'm writing to comment on your statement Sophie about using regular (broadcloth) fabric first, when trying out a new technique. That's an excellent idea! The nap will always add its own features to the outcome but when you really want to see what is happening to the foundation, it helps to eliminate all of the extraneous materials like the 'hairy bits' and just see if the darts are adding the fullness or roundness exactly where you want it. Good thinking, Girl!!
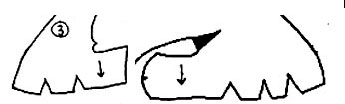
Creative Design Studio (RKR4CDS)As it happens I found that I had turned this one fabric pattern, out of my 6+ dozen patts in the fabric line, into a PDF and have only this one on my computer. I think I used it for a Challenge in a group since 2000 for some reason...
There are 4 tiny darts here - the blackened area between the 2 legs and the 3 all-differently-shaped darts (which I sew as curved-line-darts instead of straight-line-darts) along the bottom seam. Those, along with its curving back spine line do make a nicely rounded 'bottom'.
Benson BearsBobby, I went on to make a couple out of the kit and then another in some other fabric, I think I have them all here so I'll take a photo for show and tell I know I gave one to my daughter so it may be packed away in her "stuff", I don't think she took it to England with her. :/
Yes I got the kit from Adele
Creative Design Studio (RKR4CDS)Oh I'd be so pleased to see that!
My favorite story is of an artist who purchased one over a decade ago after seeing Cubblet at a show. She wanted to make a harness/necklace and wear him at shows. (I was retailing them at the same time I was selling the kits) She really didn't want to sew the kit as she made nothing smaller than about 15" - 18". I couldn't talk her into saving all of that money and purchasing the kit (I was really pretty tired of spending time sewing a well-selling ted when there was no time fr new ideas. We can all relate to that: take the money or take a chance and satisfy our artistic souls!)
But she was fully prepared to pay retail price for it, no matter how long she had to wait. So about 2 years later I finally sent it to her, just about the time I stopped traveling.
Well, you cannot imaging my surprise, when I accompanied my friend, Berta from Holland, to a show here in Ohio, in Aug 08, and the artist was not only exhibiting at this show - - she was wearing my CUBBLET! And he is the most woebegone, careworn, worn-out, loved little bear you'd ever want to see!
And it is with deep relief I saw that the integrity of my hand-sewing and seam-sealing (unless the artist will state here that she's done massive repair work!!) has held up beautifully and he looks like he will go another decade or two. His nap has worn off perfectly, in all the right spots, consecutive with constant and consistent wear, showing that he has indeed traveled many many miles with her. That she even still even wears this 'dear little one' is such an honor to me, as he certainly does look like something out of the furthest reaches of the attic, alongside her fancy show clothes!
I took many many pix of him, but there were many unexpected upheavals that happened the week after I returned from that trip and it will take me a bit of digging to find them.
I've only just remembered that I even had them, when you mentioned having some packed away, Linda. I'll add one when I find them.
 florida
 Hi everyone! I was just reading this topic and still being a newbie I have to confess I have no idea what a "dart" is... can anyone please explain this term? Thanks!!!! 
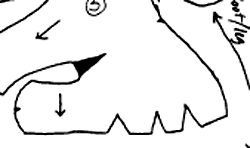
Creative Design Studio (RKR4CDS)These little triangular cut-outs along the bottom edge of the sewing lines of this sewing pattern for legs (these are the pattern parts for the little Cubblet I mentioned in my post just above here 18 months ago) create 'Darts' when the pieces get sewn together, to become Cubblet's back legs.
This makes Cubblet's little 'bottom' round out nicely. It was the only way I could get fullness there, because he's less than 2 Inches tall.
They create fullness without puckering on the surface.
This is a front view, but Cubblet is leaning forward, balancing on his front paws so you can imagine how his 'bottom' pooches' out in back!
florida Oh wow ! That is really neat, I had no idea you could do that but that makes sense now!
florida Where do people usually put darts? Just the legs ?
Creative Design Studio (RKR4CDS)I'd say that a more common place you'll see them is to put them is on the head - the area of the gusset around the ear area to create fullness or in the side pieces there.
- Or around the neck edge.
- Sometimes around the bottom of the neck.
- Along the back edge of the seam in the middle arm or leg in the area of the elbow/knee to create the bend.
- In the body almost anywhere to create fullness.
Darts can be short and wide as I used (in multiple count) to create a lot of fullness FAST or narrow and long to put in just a gentle small amount of curve.
And I put in straight-sided darts: darts can also have curved seamlines. They are a very helpful tool for a teddy bear artist!!
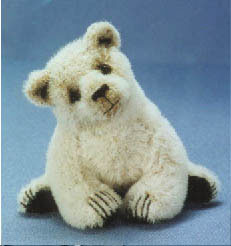
I just realized that the polar bear in my avatar (although this one is needle felted) is a side view similar to Cubblet's pose. Imagine him leaning a little more forward and you can see how his 'bottom' would round out in a similar fashion.
The only way I thought I could get that the easiest in a miniature was to make a number of small darts along the bottom seamline.
--------
LOL - later editing - as usual I have at least 3 windows open and the radio on.... I just scrolled up through the heading of this thread and see that I'd already posted these pix previously... Well, if my comments helped you at all, Heidi, I'm glad to have contributed... again.
As was stated earlier, take any of your pattern pieces and cut it out in muslin with a dart to see how it will 'move' the body part in a new position. Besides adding fullness, it can also be used for this: why a dart can be added - to imply a directional movement.
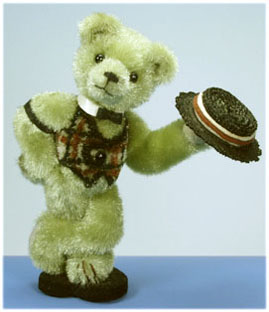
Here's another sewn ted of mine from my sewing days - Mr. Lucky, 3" tall. He has quite a few darts and gathered fabric areas in him, even both combined in many areas, to get all of this 'implied movement'.
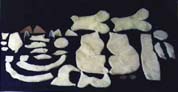 Whoa Boy! My cat heads have 8 pieces not counting the ears. I also use darts, and needle sculpting. I think cats are a special case. Cat faces have a lot of negative spaces (where there is a curve into the head). With darts you can create curves and cheeks curving out but it's difficult to create a more cut/sculptured face without adding more pieces. Also I find that I can be more accurate with cut pieces. Small darts, for me, tend to be wider or narrower or slightly off from side to side. I find them harder to control than actual cut pieces.
Karen
The left side, smaller pieces, are the cat head pattern pieces.
KAREN, NO WONDER YOUR CATS HAVE SO MUCH EXPRESSION....
florida For the cut pieces do you just sew them on and stuff them? Or how does that work? Sorry for all the questions, this is all so new to me!
For the cut pieces do you just sew them on and stuff them?
Do you mean the separate cut-out pieces (as in Karen's cat heads) or the pieces with triangular darts-to-be cut out of them?
For the former, you sew the pieces together until you have a head to stuff (just as you would with a regular 3-piece head). For the latter, you sew the darts closed first - right sides together - and then use that piece to make a body part (i.e. if it's a two-piece bear body, you sew the darts first, then you sew the two pieces together to make the bears body - then stuff)
Does that make sense?
Becky
florida yes thank you very much for clarifying that for me! Does anyone ever make a regular head and then sew the pieces on top?