For artists and collectors sponsored by Intercal...your mohair supplier and Johnna's Mohair Store
looking good!
actual nose size would be great. sorry i've been a little quiet recently, work has me doing so much overtime and i'm prepping some art doll kits and also writing a book on the making of art dolls. i'll get your nose done asap when you send me the dimensions. i'll be working with silicone next monday so i will be able to cast it then 
as for stuffing, i tend to use literally the stuffing found in pillows and duvets for my art dolls as it works well for wrapping the armature. https://www.mohairbearmakingsupplies.co … fibre-fill this will probably work best for what you want.
as for wire, i use wire from homebase rather than armature wire  I'm pretty sure this is the one http://www.homebase.co.uk/en/homebaseuk … 20m-158696 although the label on what i have on hand at the moment says "galvanised light duty garden wire" i use at least three strands for each part i need and twist them together to produce a much stronger armature. the more strands, the stronger it is.
Karen, he's beautiful!! if only i hadn't spent my paycheck, i would snap him up.  although, depending on whether he is still available when i next get paid, i might do then XD
I always use a craft knife to cut my fur. The trick is to make sure that it is nice and sharp, i've even been known to use a knife steel to sharpen mine, and then not to use too much pressure to cut only the backing of the fur fabric. Use an even pressure and try to use one long cut for each line. Going arround round edges can be a little tricky but it just takes practice. I'd use the sample to have a go first, so you can get used to using it first.
Fur fabric shouldn't fray if you leave it, I often do as i'm working on several things at once, and pre cut kits would never work if the fabric fell apart 
try what elli said about cutting up the pattern and see if you can fit it all on before you cut it out, it might save you buying another piece of fur.
jenny wrote:Probear supplies the armature in small sizes..
Thank you Jenny I have ordered some. Sorry for high jacking your post Silver claw :rose:
michelle
 not a problem
  I was just about to suggest probear to you too.
and jenny, i will have to look into landscape dyes, i've never heard of them before. what sort of price range do they fall under?
thank you for all of your help guys!
I'm glad dylon works as i found some packs last week that i hadn't used so it will be perfect.
good to know that i can joint with cotterpins and still use the loc line stuff.
and Joanne, i just wanted to thank you for your very insightful blog, i along with some friends, ordered in bulk form jeton for the first time recently and your blog was so helpful in that. I love your bears, and also the way you use the armature for them. I have to say though, i'm super jealous of your studio space XD god i wish i had the room for a set up like that . XD
PayPal is fine for me, but I really don't mind, whichever is easiest for you
. If you let me know the total I'll get it sent to you straight away
.
I didn't realise the steel shot was that small, I was imagining something like mini marbles :D. I've just ordered the quarter of fur needed, so as soon as it turns up I can finally get properly started. I'm a bit unsure of what thread to use though:
http://www.ebay.co.uk/itm/Coats-Nylbond … 2c7481144e
Is this going to be strong enough, or is there some special thread used for bear/doll making?
I've sent you a PM about the paypal address 
and yeah, steel shot is surprisingly small.
I stitch my art dolls with normal thread, but doubled up, but i do have some nylbond that i use too. it should be fine for your plush. whenever i sew by hand like this (rather than the ladder stitch i use for my art dolls) i like to use a back stitch as it is stronger than just a running stitch and can be pulled nice and tight. i also like to use a slightly different colour to my fabric so i can see exactly where i have stitched, but thats just me.
SilverClaw that would be amazing if you could do that, thank you so so much for the offer :). A black silicone nose would be perfect, and I could pay you by PayPal if you want? Obviously I'm a while off from needing it, but I will pay you upfront if you wish? Etsy is fine by me, if you can explain to me how to use it as I've never actually done so (I'm assuming its a bit like eBay?).
Steel shot is a great choice as its nice and heavy, but will there be space to fit it , especially in the paws by the time the wire and wadding is also in place?
We can do it directly through PayPal if you want to :-) let me know and i'll pm you my PayPal address.
steelshot will fit in nicely, if I remember correctly you can get it in either 2mm or 1mm so it is very small.
If it helps, I could make you one at the correct size, either in polymer clay or silicone. A clay one would be £3 and a silicone one would be £5 plus postage. I've got an etsy store that I could do a custom listing for you or I do have ebay, but I perfer etsy.
Both silicone and clay would have I high amount of detail and would be sculpted to match the pom breed exactly.
let me know if this is something you'll like.
As for weighting, I use steelshot from mohairbearmakingsupplies. They add lots of weight at a relatively small amount. I would say you would only need the smallest amount they sell.
So i have a couple of project on the go right now, including a Pekingese inspired Fu Dog art doll, that i will be using some teddy bear techniques on.
Firstly, i live in the UK and i was wondering what i could use to dye some mohair? i'm looking to get more natural than bright colours and need to be able to both dip dye and paint the dye on. I can get both rit and dylon, but was wondering would the dylon work? its a bit cheaper that the rit and i have worked with it before, even managing to get it to dye synthetic fur.
when doing the dip dying, is it similar to dying other fabrics?
secondly, for this fu dog, i will be armaturing it similar to how teddy bears are done, with a central spine., jointed legs and then more armature attached at the joint running down the leg. my question is, i'm much more comfortable with cotterpin joints, i like the swing they have, but i was wondering if they could be used for adding an armature to. I will be using the plastic "loc-line" stuff.
This is a rough sketch of how the armature would be.
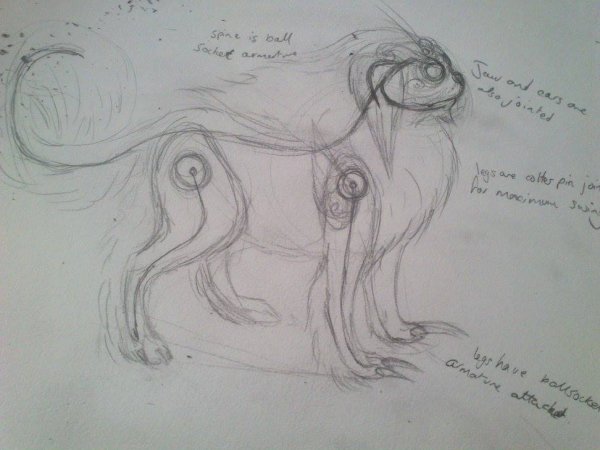
thanks in advance.
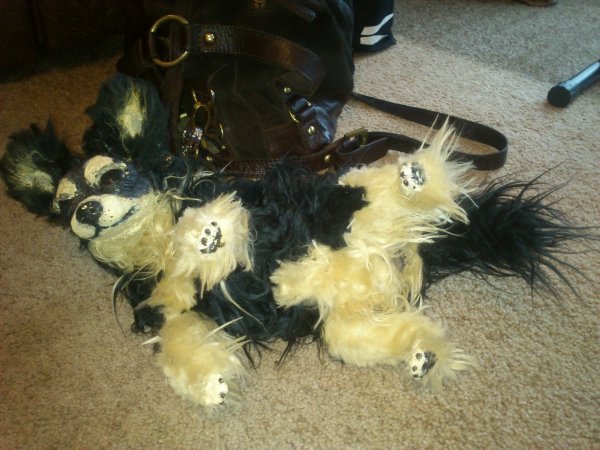
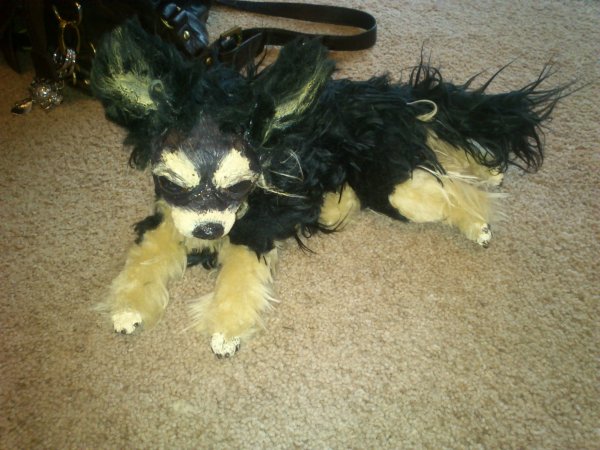
SilverClaw your chihuahua is amazing!! It's fab the way you can bend him so realistically to lie down and roll over! I love his tiny paws, did you paint them or glue them on? And where did you get his nose? I've found here that make noses:
Thank you so much. His paws are resin casts from my original sculpt (easier than sculpting each individual one) and the wire armature is directly embedded into them. they were then hand painted to match his fur.
his nose is also my original sculpt, as is the whole head  its sculpted in super sculpey onto the armature and then hand painted with gloss varnish added to the eyes and nose. the eye lids are done like teddy bears with open/close eye lids.
that fur looks pretty good. do you have a link the to the ebay shop?
and thats probably going to be the best way for the legs.
as a tip, i like to under stuff a little, that way the fabric will move more freely in posing. and it also helps the tighter bends to hold better.
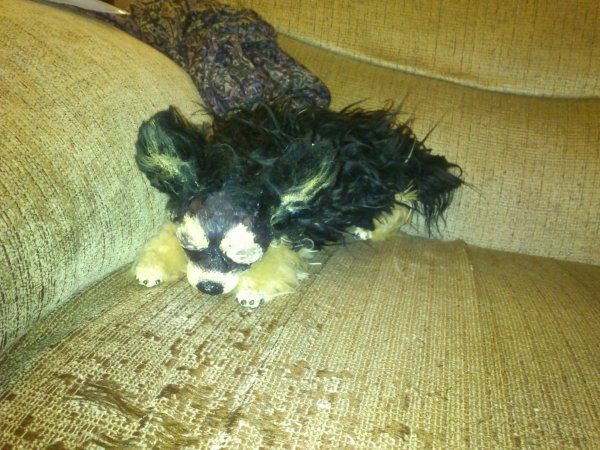
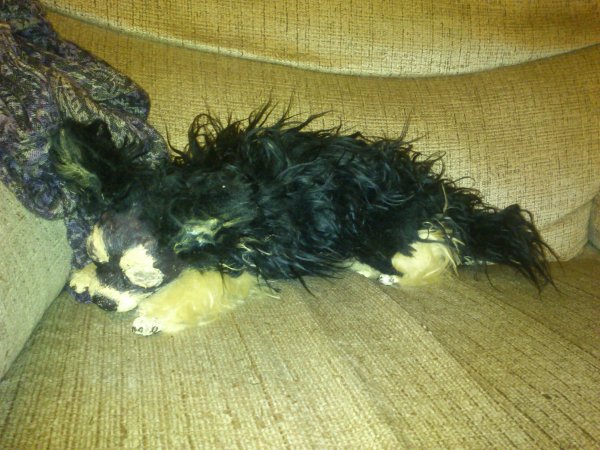
As promised, here are some photos of my finished Chihuahua. he is completely posable, even his ears are flexible and his eye lids open and close.
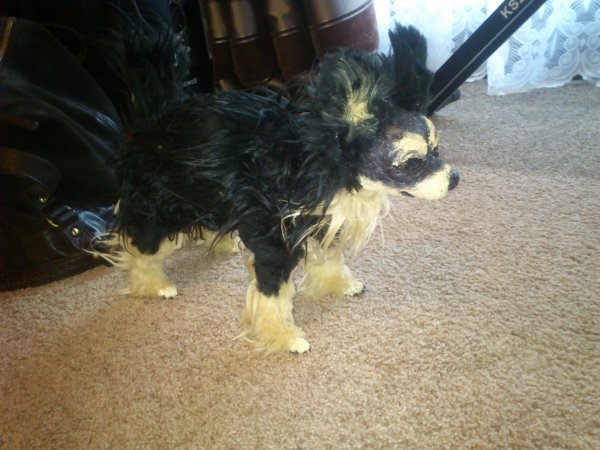
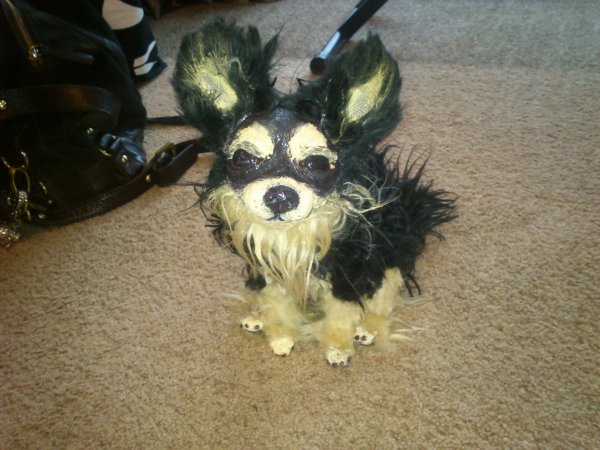
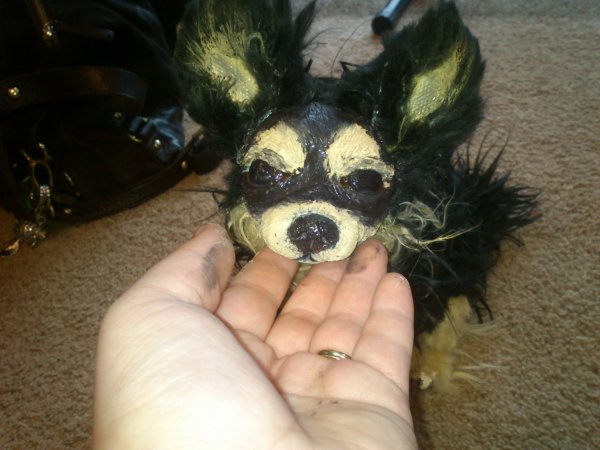
legs look good, but be aware they may be hard to turn after they have been sewn if you are sewing all of the seams before you turn them rightside out.
Elli, thank you so much for that link. its solved a huge problem for me. 
also, PlushPuppy, thank you for that link too. and yes that would be the way to measure the wire. just think of it like adding the bones.
that fabric looks good. do you have a link to where you got it from? i'm always on the look out for uk suppliers of good fur.
as for lockline, you will need this http://www.crscraft.com/products/vProdu … chOffset=x rather than actual lockline. probably need 3/16". lockline come up rather large as the measurement is the inside diameter. it can be a little expensive to the to the UK (shipping is quite high) but it is also cheaper than lockline.
how about this? its a mohair but it is 52mm in length
http://www.christiebears.com/acatalog/M … lanc2.html it comes out at £32 for 1/4 meter which would be plenty. again, it is slightly lighter than you are looking for but you can dye mohair a lot easier than faux fur.
have a browse on the library for dying tips.
how about Icecream https://www.mohairbearmakingsupplies.co … -70mm-pile on mohair? or beige frosted https://www.mohairbearmakingsupplies.co … -70mm-pile
mohair allow returns but you will have to pay the postage, i just checked.
Thats a shame about mohair, what if someone buys and they are unhappy with it? Will the accept refunds as they dont offer a sample for people to see first.
As you the coyote, I would definitely give them a call about it and see what they say. They might also have a different suggestion for you.
For colouring the polar bear, I wouldn't reccommend acrylics, its just too dense a fur and will clump horribly. The best thing to use is letraset pro markers or t shirt pens. I've used both to great success on that exact fur. It holds well and once brushed doesn't affect the texture at all. And letraset pro markers come in a huge range of colours. I'd get a couple in different shades in order to add a more natural look.
Hmmm the coyote one confuses me somewhat, as the pics on the website are usually so close the the fabric. From looking at the back of the fabric, the samplelooks to be cut from a patch with only a small amount of the cream. Often these more realistic furs are mottled like on the sample and the mottling goes in lose bands. If you look at the bottom corner you can see more cream coloured spots and I would suspect that the fur just below where the sample was is more creamy.
I would ask mohair for samples too, then you can compare them all. And although the tan one from them looks speckled on the back, it all depends on how much you trim. If you dont go too low it may not affect the colour too much.
Also, do you have a pic to the colour pom you want to make, that might make it a bit easier to help you find the perfect fabric :-)
what looks like wire over the stuffing is actually black yarn that holds the stuffing in place 
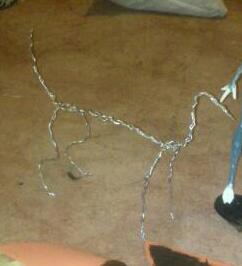
This is what the wire armature looks like without the sculpted parts or stuffing wrapped around it. its at this stage, before the stuffing is put on, that i sometimes wrap it in tape. I usually don't when i am wrapping the armature like i did here, but when i work with posable taxidermy, where i can't wrap the armature i cover it in tape to stop the wire ends poking and to help stabilize the armature. This photo was at the beginning of making the chi and after it was taken there was more wire added to it.
once the stuffing is either wrapped around it, or the tape covered armature is inside a stuffed plushie, you won't be able to feel or hear that there is tape there as the stuffing is completely covering it. 
hope that clears that up a little 
no problems!!
I tend to go for ladder stitching the whole way round as i find it easier to work the fabric onto the form. I also work on taxidermy so i guess that is where that has come from. XD my armatures are also quite thick as i design them to stand up to lots of reposing and i always have trouble feeding them into a body thats already sewn as i wrap and then make the pattern. admittedly, its a technique used more in art dolls that plushies 
Elli, i've just been looking through your blog, your creations are so adorable!
this thread has become very interesting. its great to see how others work, and i;m also loving how helpful everyone is being. it makes a nice change from the art doll community, some of them can be very tight lipped about techniques.
PlushPuppy, i can't wait to see what you come up with  you must keep us all posted and i will definitely show you my finished chi when he is done
  he is even getting a real collar and tag
the polar bear is definitely more white than cream  this fur may also be suitable http://www.fauxthrow.com/faux-fur-remna … uarter.htm but it is slightly shorter. the subtle black tips would be an awesome colour though.
the coyote looks to be the closest you will get in faux fur.
I've always wondered where you can get the mohair or faux fur that is ridiculously long like in this http://www.pedigreesroyal.com/maltese.php or http://www.bigfurryfriends.com/dogs/pek … s/8592.jpg
okay, more in progress pics 
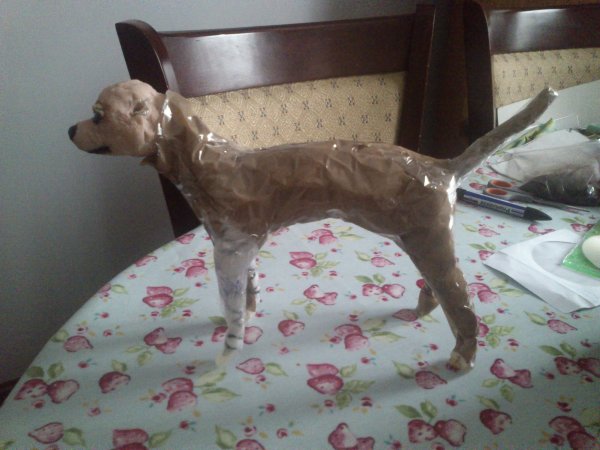
in this one you can see how i've stretched out the limbs, tail and neck so that the pattern will be at full stretch to allow for movement. i use a very similar method to the tutorial i linked, only i've used parcel tape (and a little normal tape as i ran out) as i find it sticks better.
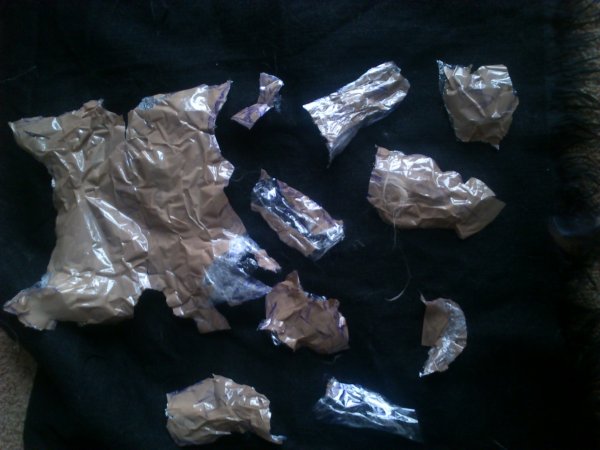
this is my pattern pieces once i'd marked the seams and then cut off the art doll. because the pattern is for a OOAK i didn't bother making paper or cardboard versions of it as in the tutorial. it just saves time when i won't need the pattern again. if i was making something that was going to be cast or make again exactly the same, i would make a more detailed pattern with thick paper from these. I haven't done the ears in this yet and, as the doll is going to be hyper realistic, i've not worked out the pattern for the male "bits" as i want to size those parts to the doll.
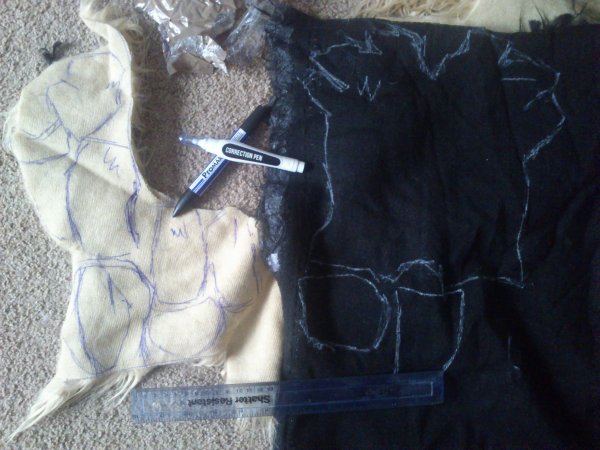
this is all of the pieces for the body and legs drawn out on the fabric. i use a correction fluid pen for the darker fabric, or tailors chalk if i haven't misplaced it again, and permanent marker for lighter fabrics. i use a craft knife to cut the pieces out so that i am only cutting the backing not the actual fibers. this fabric is not from mohairbearmakingsupplies or fauxthrow but from a US company called mendels and i had a friend in the US order it and then ship it to me. it was still very very expensive shipping it that way.
and finally
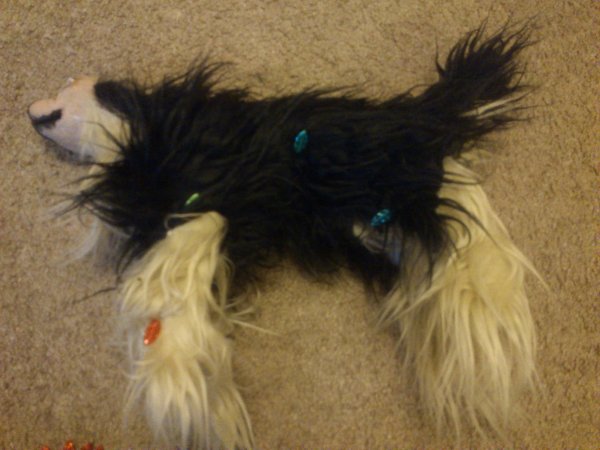
this is how i sew/attach the fur to the armature. i pin the pieces where they will go using long pins with noticeable heads, you can see them in the photo as the odd coloured dots. i then start at the tail end and use a ladder stitch to sew up the seams, basically enclosing the doll armature inside the fabric outer. i leave the legs slightly long until i've finished sewing and am ready to glue to the feet, same when it comes to the neck. i then trim the fur to how i want it.
for inserting an armature into a complete plushie you will need to leave the stuffing hole a fair bit bigger. unless you want to wrap the stuffing around the armature. in which case, if you are using the pattern you linked to, i would sew up the back completely and sew the inside leg parts to the outside leg part instead of the belly, so you basically have the complete plush without a belly, you can split the belly part into two by cutting at the chest area so you can sew the chin and neck part on before adding the armature. then you can insert the wrapped armature ton the legs and head, pin the belly piece to the belly like i do with my art dolls, and then close it up using a ladder stitch.
did this make any sense? i hope it did. 
The first one will clip to the lighter base colour, which may add a nice effect if you want a paler face.
The second one is one colour all the way down.  I actually have some of that one, its a very nice dense fur, though maybe slightly short. However its probably the longest you'll be able to get easily.
All of thier furs are stunning and are of the highest quality. They trim and clip well and the fabric backing has very little stretch. Its designed to be like real fur and I have used it fairly successfully with real fur, it does blend well. But to me it will never feel exactly the same, but only because im so used to both real and faux and spotting the difference is second nature to me XD
the remnants section has an excellent selection of the furs, and the by the meter section is truly amazing.
Also, beware ordering fur fabric from the US as postage prices can be astronomical asthe good quality stuff can be very heavy.
the fauxthrow.com is a uk company. :-)
I will get you some more pics in the morning, and will show you how I sew it on. Basically I pin the pieces to the body the right way and use a ladder stitch to do the seams.
For fabric you could try fauxthrow.com and look in the remnants and sale section.
SilverClaw - thank you for those links, that tutorial to make a pattern is great! I'm not sure what it means about the right angle bit though :/?
I have found this on google:
http://dollmaker.nunodoll.com/dog/kishu.html
Which is a fairly similar shape to a pom, so I thought maybe I could modify it a bit as it needs thinner/finer legs. I had planned on doing each bit individually (legs/head/body), but maybe doing it the way this person has would be better, then perhaps add in the wire afterwards.
I would love to see pics of your in progress chihuahua!
i think they are just avoiding tight corners in a pattern that are more difficult to sew:)
that pattern would probably work fairly well, although the muzzle will need adjusting to be smaller, like on a pom's and i would also make the tail and legs narrower. for the tail you need to be able to have all the long fluff for a Pomeranian without actual tail thickness as they have fairly thin tails under that fluff.
I would also move the ears higher and bring the eyes slightly closer together, and then use needle sculpting to adjust the shape further so that it looks right.
for a posable plush try to keep the legs as straight as possible, as the posing is what will add in the bends at the joints, as opposed to it already being there in the pattern, if it is there, it can be very difficult to stretch the leg out when needed or to bend in any other direction.
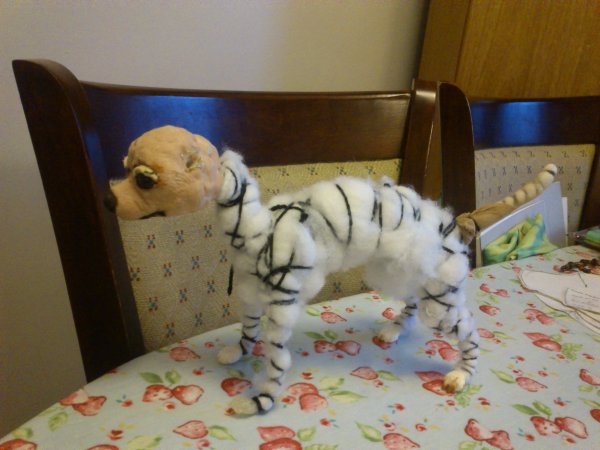
this is my wip of the chihuahua, as you can see the legs only have the knee and ankle as they have been posed that way.
the wire has been twisted together with sever strands of the wire, which makes it stronger. to go inside a plush i would recommend using an epoxy to cover up the sharp ends so it doesn't poke through at the feet and to also use duct tape to completely cover the armature to help its stability.
for the head to turn you will either need the neck fabric to be slightly loose so that it can move, or to do the head separately and use a joint in there. remeber, a dog has fairly loose skin at its neck to that it can move freely, and that your fabric is basically the skin of the animal.
i guess my biggest advice for something that is posable it to make all of the limbs, and other things which need to move, fully extended. think of it as the the animal being completely stretched out, or floppy, then the armature is the skeleton, the stuffing is the flesh and the fabric is the skin. by moving the skeleton the pose is achieved.
for the fur, you could try using long mohair for the tail, the kind they use for doll wigs, as poms have very long fur on the tail.
hope that makes sense in some way. if you like i can get a pic of my chihuahua in the middle of the pattern making to better illustrate if that would help.