For artists and collectors sponsored by Intercal...your mohair supplier and Johnna's Mohair Store
Here is the Wings & made with the liquid sculpey and how I did it. I know it's posted in another topic here on TT, but it's scattered over several pages of a large topic, so I thought I would put it all together in it's own topic here. 
I used a commercial art paper by Bienfang called Designer Series
Parchment No. 100 Tracing Paper for pencil, pen, markers,
charcoal,pastels. I simply traced the wings I wanted to make, using a
black colored pencils, then colored it in with various other colored
pencils. I put florist wire along the top edge on some & and all the
way around on others. I placed the parchment designs on an oven proof
glass tray and ran a bead of Liquid Sculpey around the egde of the
wings, being sure to keep the wire in place. Then I put a little more
sculpey in the center of the wings. I used a piece of wire to spread
the sculpty as evenly as possible. One set of wings I carefully added
glass seed beads along the bottom edges. I baked them at 300 degrees
for 15 minutes ( the suggested temperature from the manufacturer for
getting a more transparent look. I then removed the wings from the
oven & put them in hot water for a few minutes(which also seemed to
make the wings curve slightly,which was a pleasant surprise), and the
parchment paper slid right off the wings, leaving the color on the
wings.
Great information! :clap: :clap:
Thats it Brenda - the instructions from another board.
Thanks Charlotte for posting the instructions here. I didn't want to post something on the board without prior permission.
I'm having problems getting Liquid Sculpey and might have to order it from the net!! Where did you get the paper from?
Jane
Jane,
You are welcome. I think I got the paper from Office Depot or Office Max...I have had it around for quite a while...so not positive. I knew the whole thing was already on TT but I figured it should be all in one place...easier to find. Searching thru 6 pages of posts was a pain...lol
Brenda, Let me now if you have any questions.
Hugs &
wow, those wings look great! But how about the other side of them, are they so shiny there too?
wow, those wings look great! But how about the other side of them, are they so shiny there too?
Thanks, They are more matt on the other side. They are translucent. I have actually brushed a thin second coat of liquid Sculpey on the back side when I wanted them more shiny & baked them again.
Hugs &
Thanks! I've been wondering how to make wings.
Charlotte...those are beautiful....I was going to ask if the parchment was coloured..but then I read again...and you coloured it.
Wonder if baking parchment would work the same...hmmm...
Jane, next time you're up here, right by the new Cosco there is a micheals and they have the stuff........Just so you know.
Nice wings by the way
Thanks all...the parchment seems to hold the color of the pencils & lets it bond with the liquid sculpey...and when you dip the "hot wings" ( :crackup: ) into hot water...it just slides off. All the color stays on the wings. It is really fun to see! I remember the first time I tried...I was absolutely amazed....It is such fun to color the wings...and have it transfer like that.
Hugs &
Wondeful wings Charlotte. The colours are truely vivid. 
Wendy
:clap: These are fabulous Charlotte, well done.
Thanks so much Wendy & Karen!!!
Hugs &
"Hot wings".... u are too funny Charlotte....... 


 Who Me???


I just couldn't resist that Veronica...it hit me so funny when I was typing it!!
Hugs &
Really quite beautiful ,Charlotte, nice job!
dilu
Thanks Much Dilu!!!!
Hugs &
So.... if you DIDN'T color your paper with colored pencil, the L Sculprey would bake clear?
I'm seeing some other possibilities here... hmm...
As soon as they come out of the oven, or on the second side if you're going to treat the backside, would it be possible to press something like sandpaper in to give the surface a textured look?
Bobbie, I use this stuff alot so I should be able to answer your questions.
It will dry pretty darn clear but more shiney on one side. I don't think you can impress texture once it's baked, it's pretty solid then. But you could bake it on the sandpaper and get your texture that way.
You can also add things like glitter or whatever before it's baked.


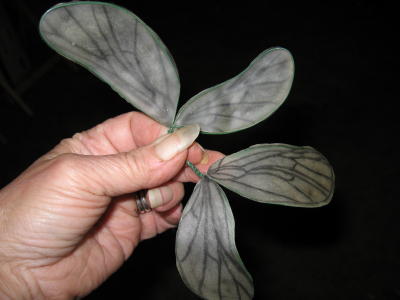
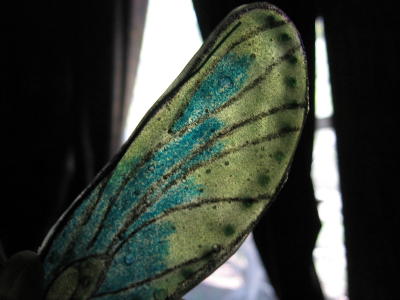
Great questions Bobbie! Here are pictures of a set of wings I did with only black vein lines, and they are translucent. I held them so you can see both the front side (Shiny) & back side(Matt). The second picture show how much light comes thru the colored wings when held up to a window.
I have not tried to sandpaper texture any wings, and I have a feeling that if you baked the Liguid Sculpey on sandpaper you could soak off the paper part, but the sand would be adheared in the wings. Heather, do you think pressing the sandpaper into the top of the sculpey at about half way thru the baking might work, once the sculpey is not so gooey? Looks like some experimenting needs to be done 
Hugs &
OOOOHHHH I am going to have to give these a try!!!! Thanks for the info!!!
You are welcome Kim, Be sure & share pictures!! It's fun making them!!!
Hugs &
WOW! Beautiful wings!  Charlotte your are great!! It is a very easy explanation on how to. The pictures are great too. I was thinking on making a pair of winged bear and I guess that minds connects!!
Thanks for sharing.
bear hugs and Golly smiles.
Gladys 
Hey Gladys!!! So glad the timing worked!!! I wanna see pics!!!These wings are just so much fun to create!!!!
Hugs &
I tried to bake some wings on the weekend and they had bubbles in them and were opaque. Can someone tell me what I did wrong.
I need some decent looking wings before Sat the 26th.
HELP!!!
Jane