Banner Sponsors


For artists and collectors sponsored by Intercal...your mohair supplier and Johnna's Mohair Store
 Just thought I'd post this here for your amusement and possibly, also, enlightenment.
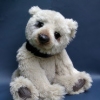
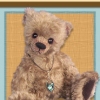
Here are two photos which illustrate perfectly why brushing up on your photo editing skills can rescue a bad photo session... and make a very nice picture in the end. I'm sharing not to boast or show off my own skills, but to encourage you to develops yours! If your aim is to sell your bears in an online environment, your pictures are the second most important presentation element for your product... after the bear itself, that is.
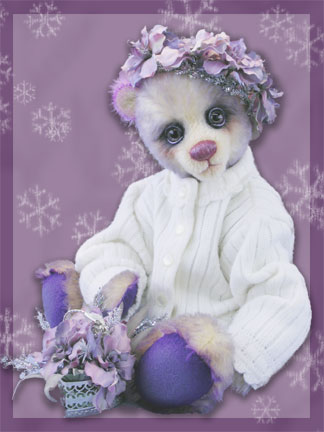
I inadvertently had my camera set to the wrong kind of lighting in this photo session. So even though I set my WHITE BALANCE prior to my photo shoot, as I should have, it did not entirely compensate for my use of flourescent lights. That's what the "flourescent" option is for! Oops, Shel! I ended up with the first photo you see -- a dark, muddy, low-contrast mess.
Since I wasn't planning to sell MISS LAVENDISH on eBay, but am sending her to a retailer who will present her in the flesh, there was little motivation to re-take all my photos and start from scratch. So I decided to give photo editing a whirl.
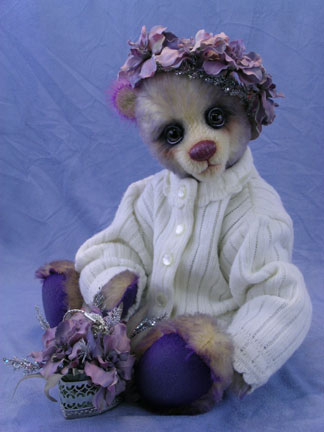
With a few tweaks and twists in PhotoShop -- including a switching out of the wrinkled blue background, which looked great with ANGEL, but horrid with this purple bear -- I think I ended up with a very nice fantasy shot of MISS LAVENDISH, from what would otherwise have been an entirely wasted photo session.
These two pictures are the exact same digital image. The second one is simply tweaked with a photo editing program. Amazing, no?
Some of the PhotoShop tools I used to get the bear itself up to par included:
Curves
Levels
Brightness/Contrast
And for the extraction of the bear from the original photo:
Filter>Extract
To add the background I created a three-layered effect:
1.) Deep purple
2.) Pure white, at 50% opacity
3.) Snowflake brush, with scatter, size, and texture dynamics adjusted to my preferences.
This sounds really complicated, but it's something anyone can learn in stages. Start with the fixer-upper photo itself, and grow your skills from there.
I really enjoy playing around with PhotoShop and have so much more to learn. I'm an enthusiastic user and will happily assist you if you need help; please just ask. PhotoShop Elements is very similar, and other programs have much the same "mindset" behind their features and functions, so these ideas apply broadly to all editing programs.
I hope this helps someone, who's been having trouble with photo sessions.
Thanks for the info Shelli. Hoping to buy some sort of photo editing programme post Christmas...I don't think my family would forgive me if I said I wasn't flying home because I was buying photoshop instead 
I'm sure I'll be picking your brains then!
and btw - beautiful bear!!
 Doodlebears
Thanks so much Shelli. I also love to play around in Photoshop and have found it the best photo editing program.
The two photographs of your beautiful bear just shows the amazing results that you can get with this program. I must try all the things that you suggest and see what different effects I can get. Thanks again for being so thoughtful and helping us out ...yet again!  You're a real sweetheart! :love:
Jane 
 Baird'sBears
 Thanks, Shelli!
This is great information.
I think I get it, but I have two questions
When you 'extract' the bear from the background, do you have to 'draw' around the outline of the bear first, or does the program just lift her off? :/
What does 'curves' do? :/
Eileen
 Apple Dumpling Designs
Amazing...perhaps someday...
 Posts: 1,277
Wonderful work, Shelli. I have Photoshop and actually know my way around...now I just need to use it!
 Kim-Bee Bears
WOW! i never knew you could do that much with photo editing software! Thanks, Shel! :hug:
 Winneybears and Friends
Hey Shelli ...thanks so much for sharing with us. It really helps to see the comparison and what can be done... Winney
 Past Time Bears
Wow, Shelli . . . I have Photoshop (got it for my recent anniversary), but haven't progressed beyond basics yet!! Exciting stuff awaits me, I see!!!
 UK
UKWOw that is AMAZING !!!
UKhaving had a quick look in PSP which i use (i dont have photoshop) ive found that PSP also has alot of those functions so those of us using PSP can achieve the same effects (almost)
I'm yet to find how to remove the bear from the background without manually erasing the background itself !!!
UK

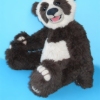
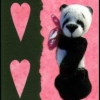
hokay. i had a fiddle in Paint Shop Pro.. not as good as Shelli's results but here are a couple of pics so those of you using PSP can achieve some good effects too !! before & after pic !
When you 'extract' the bear from the background, do you have to 'draw' around the outline of the bear first, or does the program just lift her off?
Yes, you have to "draw" around the outline of the bear. Then you "fill", and the program will extract.
In PhotoShop, on the menu bar at top, you click FILTER, then in the drop-down menu, EXTRACT. This takes you to a window where you use a tool that looks like a "felt pen" to draw around what you want to extract, or lift out of your photo. It shows up as lime green -- scary!
When you're done drawing the outline and have connected the line back to where you started, you then "fill" the image you want extracted with a tool that looks like a paint bucket. The filled part ends up being royal blue! At this point, your image looks ridiculous.
But then, you simply click the "extract" button, and PhotoShop will grab that outlined image and pull it out, placing it onto a transparent background (which looks like checkerboards.) If there are straggling dots, lines, or shadows, you can use your "eraser" to get rid of them.
Then, you can add new layers in front of, or behind, your extracted image. To do this you need a little familiarity with the layers palette (that's either a visible, or docked, menu called LAYERS, which appears by default on the right side of your screen), and the concept of "layers", period. Think of layers as a stack of transparencies, one on top of the other, with a bit of each peeking through when you view the stacked images from the top. They blend together to create one single image... but you can adjust, alter, delete, add, or rearrange the layers while you're working, to get just what you want. When you're finished working, you then "flatten" your image, which significantly reduces file size... and also makes it impossible to work in layers, on that particular file, again. So if you're going to want to revisit your image and rework some of the layers, make sure to save it as a file type that allows you to do so; in PhotoShop, the one I use is .psd.
Alternatively, you can drag and drop ("move") your extracted image onto another image... or prepared background... that you have opened in PhotoShop as a separate file. You simply grab onto the extracted image with your cursor -- click and hold -- and drag it into the new file window.
When you extract, be sure to choose a pen size that's fat enough; ideally, you want the penline to just barely cover both the outline of the item you want extracted, and a bit of the background. What the program does is look for the difference in color and contrast between those two things, then separates them from one another, and pulls out the stuff inside the lines, which has been colored in blue.
What does 'curves' do?
Curves, Levels, and Brightness/Contrast are all various ways of changing the light/dark/contrast tones of your photos. It's WAY easier for you to play around with this, than it is for me to explain all the sliders, grabbers, outcomes, etc. Just give it a shot!
 Beary Lovely ... Bears by Susan
 Ok, I decided to try this photoshop thing with my newest bear. Shelli, I sure don't know how you do it. Everything i have done so far, I have done by accident. I downloaded a trial version of Adobe photoshop. What photoshop do you use? can you get a book? I feel soooo stupid!
Anyway, here is a before and after pic, just the basics, and all of that was totally by accident. I am obviously not very bright, feeling pretty stupid right now....
Beary Lovely ... Bears by Susanit is not letting me upload the "edited" picture, now i am really aggravated. I think I need a break, I will try again in a little while. I think I am photgraphically challenged. GRRRR 
Susan
It might be too big. Do you know how to resize? If not, send me your pictures; I can help.
Don't feel stupid. I have probably invested hundreds and hundreds of hours in learning PhotoShop, and I know about 5% of what it does, and that, kinda slapdash-edly. I have read and bought books, and when I go to Barnes & Noble, I skim magazines. There are entire MAGAZINES -- more than one! -- on PhotoShop. That's how much there is to know; that's how sophisticated the program is, for image editing.
I happen to have the full version, 7.0... but it's more than I need, truly. It was a gift from my husband.
Pipa, very nice!
UKThanks Shell, im trying to figure a way to get the bear off the background in PSP (an easy way), you can remove the background the more solid of a colour it is the better but as the pixels are all different shades it's hard unless you erase it by hand,
Im gonna try what you said you do. draw around it and see what features PSP has to do something similar, I'm sure there is one 
Does PSP have something like PhotoShop's MAGIC WAND? The MAGIC WAND allows you to click on (select) a particular color, and then PhotoShop will select ALL pixels of color that match it, within a certain range you can specify. In PhotoShop, you choose the range by typing in number in a box called TOLERANCE. This is an easy way, in PhotoShop, to select all of a particular color, or pixels close to a particular color -- such as a background drape -- for removal.
You can also use the LASSO tool in PhotoShop, which allows you to "rope" what you want to select, and then you can move it, or change it, or SELECT INVERSE to choose everything NOT in the lasso, and delete it, etc.
UKYep PSP has the magic wand, you can remove alot of the background using that,
and the lasso PSP has that too which seems to be the best way of getting the bear off. by tracing around the edges of the bear you can then lift them ! (i just tried it on a pair of Pandas photograph and it works perfectly
Cool !! :)

Beary Lovely ... Bears by SusanI think I am doing everything backwards. I decided to try and extract like you said above, I traced around it then highlighted, but when I clicked ok, the background showed up and the bear had the checkered area. I didn't want to background. Grrrr, I think I am dyslexic (sp) or something. I do know how to resize normally, but do not know how to in photoshop. I am looking... I am used to using my very simple photo editor that came with my camera, it does very basic stuff. But I really want to learn how to do this......
Mmmm... No, you're not dyslexic. That's a common problem when first starting out, and don't think I didn't do the same thing.
What you did was to SELECT your bear. Thus, when you hit DELETE, you deleted your SELECTION... your bear!
What you want to do is SELECT INVERSE... in other words, to select everything NOT bear. Gotta open PhotoShop here, to remember how to do that... one sec...
Are you using FILTER>EXTRACT? If you are, and you traced the bear, and you filled the bear itself with the blue, I don't know why you would get that outcome.
For resizing, I'll be back in a sec...
---> Okay. If you're looking at your photo, and you somehow SELECT (using the LASSO tool, for example) your bear, and you want to delete not the bear, but the background... go to top menu item SELECT>INVERSE, and you will have switched what your program is "looking at" for deletion from the bear, to everything NOT bear.
---> To resize: Go to IMAGE>IMAGE SIZE or IMAGE>CANVAS SIZE.
The IMAGE SIZE option lets you choose photo sizing, including dots per inch; remember, for print work you want 300dpi or ppi (basically the same thing.) But for web photos, you need to stick to about 72dpi, otherwise your photos will be ENORMOUS!
CANVAS SIZE allows you to specifly a PRECISE sizing, such as 4x6.
Play around a bit, you'll get it. It's really a trial and error process. Expect to make LOTS of errors.
Oh... also useful is the menu bar tool VIEW.
VIEW>FIT ON SCREEN gives you the largest possible image for view on your screen, no matter what the real size of your image might be.
VIEW>ACTUAL PIXELS will show you how your image will appear online, on a computer monitor.
VIEW>PRINT SIZE will show you how large your image will print.
Have fun and breathe deep! It's a very long and slow learning process, but once you get some of this stuff down, you will feel like the queen of the world!
Beary Lovely ... Bears by Susan ok, well I went back and tried again, and got this far. I was able to extract, and resize, but do not know how to go any farther. Sooo, now what do I do for a background? Help!?!?! Your instructions make more sense than the help section on there.... Is it supposed to look so weird along the edges, or will that go away when you do the background?? Can you tell I am a blonde????
Thanks Shelli, for your help, see what you started? hehe
Susan
Susan, there may be a way to clean the edges up that's easier, but I simply use either the ERASER too (toolbox, left side) or the BLUR tool (same location), or both, to manually clean up. It helps a lot if you ZOOM (same toolbox) really close, to see exactly which pixels or areas you are erasing.
Looks good!
PS My photos often look like that too, especially if the background isn't all one color, or is too close in color and/or tone to my bear.
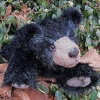
Beary Lovely ... Bears by Susan Ok- I tried something different, leaving the background and just doing the layering. Still very basic, but does this look better?
I will keep working at it, I will try and read up on it, I don't want to drive yuo crazy with it....