Banner Sponsors


For artists and collectors sponsored by Intercal...your mohair supplier and Johnna's Mohair Store
 Posts: 43
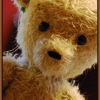
Yay! I finished my first bear this morning! It was great fun! A HUGE shout out and thanks to dangerbears for her help and encouragement. And thank you to SueAnn for her wonderful (and free!) pattern for "Goldie".
I did not have any mohair so I recycled a thrift-store purchased top end wool overcoat.
Here he is and he's far from perfect but I think I've gotten past the worst of the learning curve now. As you can see I opted to totally ignore the pattern instructions for reasons I will never understand and I set the arms too high.  I used plastic safety joints and I have no idea if it is possible to break those apart and try again.
I'm also struggling with ear placement and you can clearly see THAT issue - any tips or suggestions?
Other than that, I'm pretty happy with this little guy. I can see now that he needs more embroidery done on his upside-down triangle nose. I also set and reset the glass eyes about a million times because wow it's hard to get that just right expression. 
If I can't reset the arms....I think I'll knit him a red muffler! ;)
I really am enjoying this new-to-me craft and this forum is fantabulous!!!
Nice! Your first bear looks quite good, and using a furless fabric really gives us a good look at it. The paw pads look good; the eyes are placed and set nicely--what a great start! :clap: :clap: :clap:
I don't know whether it's possible to re-do plastic safety joints. I would suggest that the joints might have been too small for the arm size. I say that because the arms really stand out--away from the body. Using the largest appropriate joint usually gives you a nice slope from neck to shoulder to arm.
Ear placement is one of those things like nose embroidery--countless hours of practice seem to help.  For me, pinning them in place only helps me to determine where they should go. Once I know that, I start with one ear, and take a stitch so that the knot will end up underneath the ear and the thread exits the fabric right where I want the top corner of the ear to sit. At that point, I don't need pins anymore. I just ladder-stitch the ear in place with the degree of curvature that I want. (Congratulations on getting cupped ears on your first bear. I think my third one finally had some nice, curved ears.
  )
)
So now that you're hooked--welcome aboard!
Becky
 aRTy Bears
Well I think this is a good shot at a new bear.
First of all clever use of recycled materials, the wool felt overcoat fabric actually really suits what you've done with this pattern and makes this a classic antique looking bear.
The stitching actually looks good and good job on the pads.... I struggled for some time with feet pads. The eyes look well set although be careful of making sure each eye is even and as you've noted the nose is perhaps a little underdone even for a 'worn' looking bear.
The arms also could do with setting lower but as with Becky I'm not sure if resetting is possible with safety joints.
As for ears, for a first this isn't a bad job. My best tip is not dissimilar to Becky's and that is to pin and pin and re-pin until your happy. Take your time, sew slowly and evenly on both sides and then likely take off and re-do anyway (I put ears on so many times!).
To check the eveness (applies to both eyes and ears) try looking at the bear in a mirror and this will immediately show up imperfections which are not necessarily obvious to the eye.
Overall I would be so happy and what an original style you look to be taking on! Looks like some good stuffing and a fab job on using a fabric which infact can't hide any minor imperfections behind the fur! :clap:
Richard
x
Posts: 43Thank you Becky and Richard! Your words and tips are really helpful!
I read and read and read all over this forum for different techniques and tricks - there was one thread in particular that really helped me with the foot pads! I sewed those by hand. And velvet is so slippy, not sure I would use velvet again.
I had my husband look at the joints and he says there is no way to take them apart without damage and I live VERY rurally and can't make it to town for more until later this week.  They could be too small....hmmm....I've got some fiberboard/screws/nuts on order for this size. And some mohair!!! *scared but excited*
Does everyone sculpt the face before setting the eyes? I did not do that....
Yep, I can see the ears are going to take practice. Should I put the upper edge on/against the head gusset seam?
I think I'm going to take the buttons from the overcoat and sew them onto the joints as "fakes" and see if I can pull the arms in a bit tighter....

Does everyone sculpt the face before setting the eyes?
I don't necessarily do needle-sculpting. If the head is designed with a nice shape and you don't stuff it rock-hard, you can get nice "eye sockets" when you set the eyes.
Yep, I can see the ears are going to take practice. Should I put the upper edge on/against the head gusset seam?
Totally up to you. Mine usually start above the gusset seam, but the seam can be a good place to start, or some people prefer low ears on the side of the head. It just depends on what you like.
The button idea (as faux joints) sounds interesting, or maybe even some tummy buttons? They will enhance the bear's coat-y history either way.
Becky
 Past Time Bears
:clap: :clap: :clap: :clap: :clap: :clap: I think you've done very nice work with the Goldie pattern, Zag . . . especially with the type fabric you used. It's possible, also, that being a woven fabric, it stretched some when you were stuffing. That could account for the "puffiness" of the arms at the shoulders - in addition to the possibility that the joint disks were too small. And, no, it's next to impossible to remove the plastic joints. I can explain what I did with the ears and will be back with a graphic. It's so much easier to 'show' than 'tell' with some procedures. Later.
Posts: 43Thank you Sue Ann~! It's a wonderful wonderful pattern! I really enjoyed crafting the bear and just wish I had "trusted" the placement of the arms - it seemed so low. I feel dumb. Can't wait to try this in the mohair!
I'm looking forward to seeing your ear illustration!
Posts: 43Zagzagael wrote:Does everyone sculpt the face before setting the eyes?
I don't necessarily do needle-sculpting. If the head is designed with a nice shape and you don't stuff it rock-hard, you can get nice "eye sockets" when you set the eyes.
Zagzagael wrote:Yep, I can see the ears are going to take practice. Should I put the upper edge on/against the head gusset seam?
Totally up to you. Mine usually start above the gusset seam, but the seam can be a good place to start, or some people prefer low ears on the side of the head. It just depends on what you like.
The button idea (as faux joints) sounds interesting, or maybe even some tummy buttons? They will enhance the bear's coat-y history either way.
Becky
Thanks, Becky! I opened the arms back up, removed some of the stuffing, reclosed and then put the buttons on. I'll have to take another picture - it looks better! That's a great idea for buttons down the front - think I'll pick up a button card when I go to town this week!
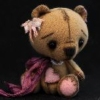
The eyes on your avatar bear are fantastic! That bear's face is just incredibly sweet! Do you use a larger eye on your bears?
 Tickled Pink Bears
 I like his ears, I think they look cute like that. How tall is Goldie? He's very cute!! 
The eyes on your avatar bear are fantastic! That bear's face is just incredibly sweet! Do you use a larger eye on your bears?
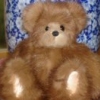
Aw, shucks... I'm glad that you like him. I do tend to use larger eyes, and I should keep better notes, but those are probably 12mm or 13mm, and he's a 16" bear.
I'm looking forward to more Goldie pics. :photo:
Becky
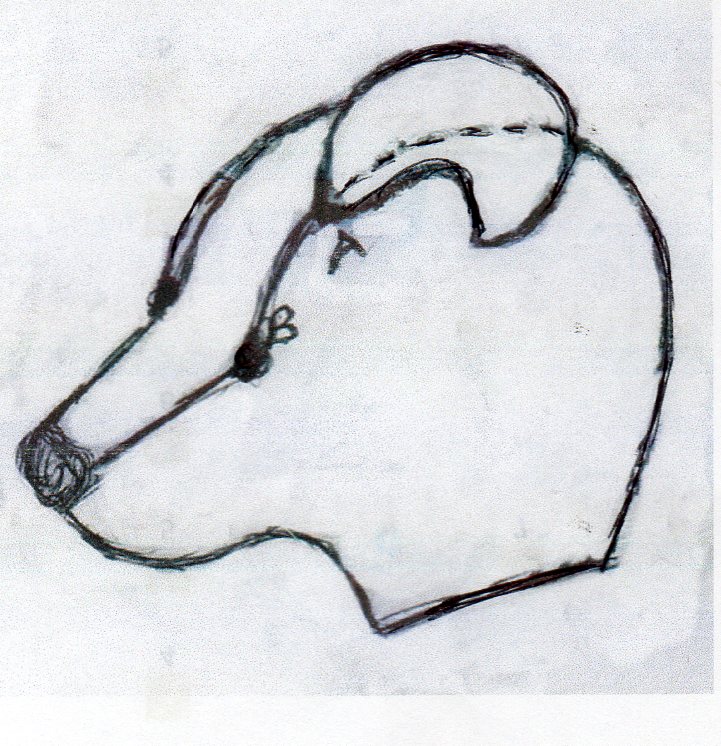
Past Time BearsOkay, I'm back with a rather crude drawing, but maybe it will explain itself. What I do is sew the front half of the ear on the seam line, then bend the back half down and finish sewing. This will give the ear its cupped appearance. To make sure the ears are even, I measure the distance between point 'A' (beginning of the ear) to point 'B' (the top of the eye). The distance on both ears to the eye tops should be the same. Clear as mud?
Posts: 43Thank you Sue Ann! I've removed the ears and will try again! This is exactly what I was after!
 Chaska, Minnesota
Goldie is darling! Your first bear turned out great. I struggle with ears too. Many of the bear making books give directions on this so I'd try out all the techniques until you find one that works for you. I just completed a Ted Menten bear class online with ezbear university. Ted gave fabulous directions on sewing the ears into the seams of the head. They came out perfect. If you are interested in looking at the bear it is called Toots-Bear with an attitude. Here is the link:
http://www.kranbearys.com/Ebearz/index.htm
click on "faculty of bears". Next click on the picture that says Toots. If you take the class (it's very reasonable) you will learn so many new techniques in bear making including the ears.
Posts: 43
Aw, thank you. I'm still working on getting them "just right". My "Goldie" measures just about 14" tall.
Posts: 43Goldie is darling!
http://www.kranbearys.com/Ebearz/index.htm
click on "faculty of bears". Next click on the picture that says Toots. If you take the class (it's very reasonable) you will learn so many new techniques in bear making including the ears.
Thank you so much for the encouraging words. I've been working away at "polishing" these smaller details and have grown happier with him overall. I think using the wool really helped me see the bear in its  nude
nude  form and that's been really helpful!
That site is difficult for me to navigate - I'll take a closer look at the class you've suggested!
Posts: 43
Reset the ears, removed some arm stuffing and used buttons as faux joints.
Got my intercal order today - now to try "Goldie" in mohair!

I think for your first bear you did a fabulous job! Your seams are nice and even and the paw pad sewing is fabulous!
Ears are one of the toughest things, I still have problems with getting ears even and usually spend three hours just getting a set of ears pinned down evenly and where I want them. So with ears it is practice practice practice.
I love the tip Sue Ann gave though, who would of thunk! Brilliant!
If you plan to do any needle sculpting between the eyes of your bears in the future it is best to do before setting the eyes in order to maintain the tension and keep your eyes set nice and tight. If you sculpt after you set the eyes, you are making the space smaller and it could result in loose eyes.
Great start! I can't wait to see what else you make!
Hugs
Krista
Sue Ann,
That's what I do with the Cat ears (although they are not always placed on the seam). I, also, measure from the same point on the eye, mine is the inside corner, to the bottom of the ears. A-C. I sew about a third of the ear at the top ~ the turn of the ear, then skip down to the bottom point and sew up the the turn of the ear. That seems to keep everything in control and even.
See, I'm even deeper in mud
Karen
See, I'm even deeper in mud
No, no - I understand quite clearly, and I appreciate the tip! For me, it can be difficult to get the bottom corner right where I want it, and I end up re-doing the whole ear. Your method sounds like it would end my woes.
Becky