Banner Sponsors


For artists and collectors sponsored by Intercal...your mohair supplier and Johnna's Mohair Store
Hi again all. I'm just busy as a bee "seeding" this forum with questions. But the truth is, I can learn from any and all of your responses! So please, do contribute if and when you can.
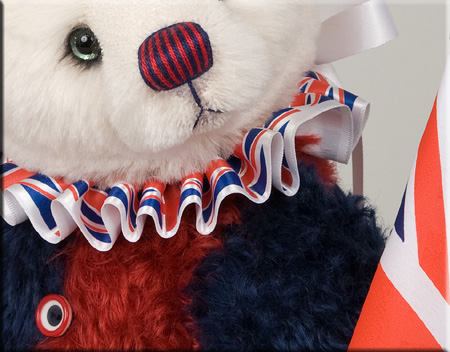
So my question is... How, exactly, do you get that wonderful "striped nose" look?
I imagine that it involves a second color of floss... :D... so I'm okay up to that point.
After that, tho, I'm wondering whether there is a specific method you use. Do you count strands of floss and insert the stripes at regular intervals? Do you add the stripes after, or during, the initial embroidery?
Just always looking for the "best" way to do things. (PS Yes, Laure; among others here, I'm talking directly to YOU with this question.)
Thanks,
 Winneybears and Friends
Hmmm, I always say thet when speculative...I thought it was done with 2 shades of emb. floss but I have a New (? )idea...stitch the same color twice then run a color fabric pen over the last stitch ...then do the next 2 stitches the same way.
I have another problem I am trying to overcome...I glue 2 layers of felt down for the base and scissor trim/ bevel the felt edges ...
I do fine with emb. thread , careful placement so stitches are straight and smooth....what happens when I get to the right and left edge of that base is ....there is an abrupt STEP down..
Now I try to do several layers to make up the difference as the thread wants to slide off the step...the only way I have tried to control this is to use a Elmers pen glue and place a tiny drop of glue at the top and bottom of those stitches...still, it looks kind of messy to me...anyway it is not perfect...perfect is what I want. Aghhhh !!!
Maybe I should try only 1 layer of felt ? ...but I want height in the nose too...... Winney
 Just Us Bears
Hi Winney,
A friend of mine who does really fab noses recently helped me with that exact problem. Firstly, it helps if you use two template layers...the first one that sticks to the bear is felt (a nice good quality heavy one) and then a leather or suede template over the top. The top template should be slightly larger than the one underneath so you can smooth the sides down. If you don't want a built up nose, just use the one template made of leather. Stitch the nose from the centre out..one stitch on either side of the centre and alternating..this gives you tension pulling from the direction you need to keep the stitches pulling tight together. Make your stitches slightly overlap the template and pull firm. Once you get to the edges where they start to fall off you need to bring your needle out just a few stitches back from where you would expect them to come out. wrap this stitch around to lay where it should and go back in a few stitches back at the bottom as well. These stitches will pull against the ones you last laid down and hold them on, each one pulling against the other one. This works best if you are laying one stitch each side of the nose, not if you work one side then the other. 
 Back Road Bears
OK, I'm trying to do a few quick posts and get back to my vacation so I only skimmed the above and see you gals are talking about using two different colored flosses.
Here's an alternative - albiet lazy - or perhaps just different..... :D
I have a wonderful embroidery supply shop near me with a fantastic selection of embroidery floss.... yes, they have the old DMC perle cottons in a rainbow of colors but they also have some wonderful verigated floss by Caron - Watercolors in Pima Cotton and Waterlillies in Silk. Both are just beautiful and make wonderful multi colored noses. If you like the thinner (#5 or 8) floss then they also have Waterflowers - a single ply in verigated. These are just gorgeous - all hand dyed.
I use two felt templates - one just a bit bigger than the other and glue the smallest to the muzzle first with second, larger template glued over that. This offers the foundation for a big nose with no 'bumps & lumps'.
If works for me and my bears noses get lots of attention.
My embroidery shop has a website and offers shipping - take a look at this link if you haven't seen these flosses by Caron before: http://www.abcstitch.com/caron.php
Hope this helps!!
Hugs, Daphne
Winneybears and FriendsThanks Haley and Daphne, I finally got it to work for me. I think I forgot to tell you I was using emb. floss not perle cotton, as I was this real smooth satin look.
I did one nose that had 2 layers and I beveled the edges with small scissors....that was a nose I had to tear out.Later on I found out the main problem was my edges....
The next nose I did one layer of felt and really took my time...I glued it down with Beacons Fabric tack then ....I used a needle , put a drop of glue on it then slid the needle down under the felt edges and corners one at a time and pressed to make them adhere really well to the face fabric...now all the edges are glued down tight .
I used all 6 strands of emb. thread...emb. like you said Haley, center to the outside edges...with a firm tension.....then there is the dreaded edge...not so, as the step is really very small now...I do about 3 or 4 stitches per side and start that 1st stitch in the same last hole of the stitch that was still on the template...then the last 2 stitches the same way....just have to go very slow, one stitch at a time....that's the name of the game...slow, pay attention like a fox, watch every move and see what it does....the tension all the way thru is very important..you have to develope a feel for this....practice is the key.
I will answer another thread near this one about using emb. thread here ...then I will post there to direct readers to this post.... TANGLED EMB. THREAD ....I use 6 strands. After the needle is threaded, be sure to run your fingers down the thread while watching it to see that all the strands are smooth and not twisted around each other.
Next...start the first stitch and BEFORE you pull it thru using your left fingers pull the strands straight up for a few inchs and make all the strands lay smooth....then I lay THAT stitch down on the template where I want the stitch to lay flat ...hold it there with my left finger while I pull the needled thread slowly thru with my right hand. Takes practice but you will be amazed at how nice the thread lays now....
I had one side of the nose sort of caving in on me ( its always the right side facing me ) so I cut a very small football shape piece of felt and first slipped a drop of glue under there then slid the felt piece under there...yeahhhh ! that worked ! It made that side pop back up so now the 2 sides look the same in heighth.
THanks too for the link Daphne....Winney
 Kim-Bee Bears
when I do my noses, It depends on the bear, sometimes I use three colors of emboridery floss (i use 3 strands of the one strand, if that makes sense) and sometimes I use embroidery floss and thread that is irridescent to give it a little sparkle!:)
Winneybears and FriendsOHHH, That sound very interesting Kim-Bee. I bought some very silky shiny floss a few years ago at a needlecraft exposition, it has beautiful multi colors in it...have not use it yet....Winney
I make my noses very simply. No templates, no glueing, no measuring. Just plain 'ol stitching and careful tensioning!
I always start in the centre and work out to the side ... then back to the centre and out to the other side. My noses require two layers of stitching. To make a stripey nose I simply use two separate coloured threads and two sewing needles and stitch one, then the other. :)