Banner Sponsors


For artists and collectors sponsored by Intercal...your mohair supplier and Johnna's Mohair Store
 Posts: 1,153
Ok Girls...I just bought Elements 3 and the book 'The Missing Manual' because everyone says they crop their photos. I have been reading about cropping and wonder why you crop? If you are using Elements or similar can you tell me what this feature is used for. I think I have just shown how little I know about all this. :lol:
Any help would be greatly appreicated....even if it is not about crop work.
Nanc..........
 Past Time Bears
Hi, Nancy. I crop photos to get rid of unnecessary background. You want your bear to be the center of attention, and cropping can get rid of distracting stuff around it. Also when you crop, your bear becomes a little larger. I don't have Elements, but do have photo software that crops, adjusts color, sharpens the picture, gets rid of redeye, lightens/darkens, changes the contrast, etc. So you can REALLY fix most anything that might be wrong with your photo!!
Nancy, if I may be so bold as to point you to an article I wrote on photography at Bears 'N' Buds webzine, you might find some answers there. It's a broadly written article for someone just like you, who makes great critters and wants to learn the basics and move forward, now, with photography.
Check the article out here:
http://www.bearsandbuds.com/webzine/Pho … Teddy1.asp
Or check out just the page that addresses Editing/Cropping here: http://www.bearsandbuds.com/webzine/Pho … ddyPg3.asp
Feel free to contact me any time for specific tips and pointers. I use Adobe's PhotoShop 7.0, which is a fuller version of Elements, but they have much of the same functionality (especially when it comes to the "thinking" behind the Adobe features) so I might be able to help.
As for answering your specific question... as Sue Ann said, cropping is used to eliminate background clutter/noise, and to better focus your photo on your subject; in your case, a soft-sculpture that deserves to be noticed!
Posts: 1,153Thank you so much girls for taking the time to give me such elaborate answers. I will definitely look at the webzine as soon as I have a minute to myself and can concentrate!!
You are right Shelli, I DO want to go further with my little critters and I know that photography is so very important.
I have looked thru my book "The Missing Manual" and it will take forever to learn all of this...so I am just going to concentrate on the things that I think are important and what you girls have mentioned in the past, that you do.
I am going to try to make an avatar and I remember you asking me, Shelli....about the resolution that I wanted.
I need to find out what resolution is and how to make the avatar the proper size.
I understand that the DPI is different when you are making something to be printed than it is if it is to be viewed on a monitor. I did get that far before I fell off into never, never land last night. :rolleyes:
Thanks again for all your help.
Nanc...........
Nancy,
For viewing on a computer monitor, images should be 72dpi. Anything larger than that is excessive, since monitors can only display at 72 dpi -- Dots Per Inch -- so any resolution higher than that does nothing for image appearance, but DOES increase file size... and slow down loading time.
As for your Avatar... I think for this particular board, the dimensions should be no WIDER than 150pixels. A pixel is a single, tiny square of pure color. Pixels combine "visually" -- meaning that your brain interprets them as "blending" -- to form digital images; but any given pixel contains only one color.
For print work, when it comes to digital files, bigger is always better. A resolution of 300dpi is adequate for most print work unless you are doing a professional job (brochure) and/or a gigantic size. If you get to that stage you're beyond what I can advise!
Most editing programs (Adobe PhotoShop for one) allow you to size your photos using either INCHES or PIXELS. When I want to size an image for printing I pick something standard, like 4 x 6 inches. When I am creating an avatar, I use PIXELS, and pick, for example, 150w x 175h.
You can find both RESOLUTION and SIZE options in PhotoShop under the dropdown menu Image>Image Size It's probably the same, or similar, for Elements.
 Baird'sBears
Thanks, Shelli,
I never understood the difference between resizing in inches and resizing in pixels.
So would be possible to resize in more pixels first and then resize that in inches, and get a larger, better quality picture?
Now here's a dumb question  : When you resize up in pixels, where do the new pixels come from?
Eileen
There ARE no dumb questions. This stuff is very, VERY confusing, and I'm not even entirely comfortable with my understanding of it. There are many areas which I just, plain and simple, have not yet fully grasped. So I'll try to stick to what I think I DO know!
For certain, I know that Upsizing a digital image is almost always a lose/lose scenario. It's better to start with a large photo (in terms of both resolution and dimension) and then DOWNsize.
Just to confuse things further... there are many ways to save digital image files. For example, .GIF, .TIFF, .PSD, .JPEG. Most people use .JPEGS. With .JPEGS, tho, each and every time the file is manipulated -- even just OPENED! -- there is a slight loss of quality.
This, by the way, is why sometimes when you are submitting digital photos on disk for magazines, contests, or ad placement, the magazine will request a certain file format. For example, I advertise with Teddy Bear Review, and they have a number of acceptable digital file formats, one of which is .TIFF. So that's how I save my images. .JPEGS simply would not produce as crisp and high quality an image for magazine/print use.
But forget that for now... ;)
If you do, for some reason, HAVE to upsize, the photo editing software that you use -- smart thing that it is -- "fills in" the extra pixels you need to get to a larger sized image, based on the pixels that were original to your photo.
Try an experiment if you'd like to see this for yourself. Take a photo at 72dpi (or downsize to 72dpi) and then change the resolution back UP to 300dpi. You might want to PRINT out each final image (original at 300dpi; downsized to 72dpi; upsized from that to 300dpi again) to best see this effect (since, as we discussed earlier, the computer will only "show" you 72dpi due to monitor limitations). However, sometimes this is plain to see just by viewing on a monitor.
Easier and more immediate still, to see how upsizing from a small image is NOT a good idea, go here: http://www.shortcourses.com/choosing/sensors/05.htm Find the red heading that reads, RESOLUTION: OPTICAL AND INTERPOLATED.
Look at the largest picture of a very cute little boy, smudged up with dirt, peeking out from behind his baseball cap.
Then, take a look at the smallest image of the boy, and the enlargement of that small image.
You can clearly see how, when upsizing from the smallest image, the editing software "guessed" about how the missing pixels should look -- and came up with a fuzzy, icky result. That's NOT what you want when editing your images.
The text above the largest photo reads, in part:
To improve resolution in certain limited respects, the optical resolution (of an image) can be increased (by your digital camera or scanner) using (pre-loaded) software. This process, called interpolated resolution, adds pixels to the image to increase the total number of pixels. To do so, software evaluates those pixels surrounding each new pixel to determine what its color should be. For example, if all of the pixels around a newly inserted pixel are red, the new pixel will be made red. What's important to keep in mind is that interpolated resolution doesn't add any new information to the image-it just adds pixels and makes the file larger. This same thing can be done in a photo-editing program such as Photoshop by resizing the image.
The caption next to the photo goes on to restate this concept, I think much more clearly, and reads:
When working with digital images, you always have a fixed number of original pixels to work with. ... To make an image smaller, some of those pixels are removed. To make an image larger, new pixels have to be added. Since adding new pixels doesn't add any new information to the image, it's a form of "empty magnification.
I can highly recommend this above-referenced website for more on all of this digital photography/editing stuff; they know waaaaaay more than I know. I still think of myself as very much stumbling around in these things, believe it or not.
You can find the full site at:
http://www.shortcourses.com/choosing/contents.htm
Baird'sBearsWow, Shelli, Thanks!! I've got to absorb this stuff in little bits, or my brain will explode :D
Eileen
 Pandy Potter Bears
I have invested in a new camera with macro, white function and light settings. I have got as far as the macro function. I finish a bear then always seem to want to skip the 'boring/confusing' photography part. Its got to be done and learnt though, so thanks for the links. I am guessing if I want to use photos for say, Ebay, then to use 72 pixel like I used for my avatar? See Eileen another 'photophobic'!
Posts: 1,153Oh Amanda...I don't think you want to size your ebay photo to 72 pix's. I put 530 in mine and it seems to do just fine. I really don't know what I am doing there either...but you are welcome to check out one of my auctions and see if it is a size you might be interested in.
http://cgi.ebay.com/ws/eBayISAPI.dll?Vi … 5591034693
I know there are ladies who must use a higher pixel than I do because their pictures are larger on ebay. But then I am not sure on this either because I read somewhere that when pixels are viewed on a monitor, the amount of pixels does not change the size of the photo.
Shelli.......is this in the info links that you just posted? have not had a free moment to go study with any amount of concentration.
nanc.............
 Here's a quick and dirty diagram I created in PhotoShop; didn't even bother to level out my grids and lines, but I think it might do the trick better than a lengthy explanation might.
Hope it helps!
Past Time BearsWooHoo, Shelli . . . just visited your updated website . . . TO DIE FOR!!! Great new look! 
 Thanks, Sue Ann. I needed to do something cleaner and easier to maintain. This is hopefully it! It's fun, besides.
On other resolution/sizing/editing photos notes...
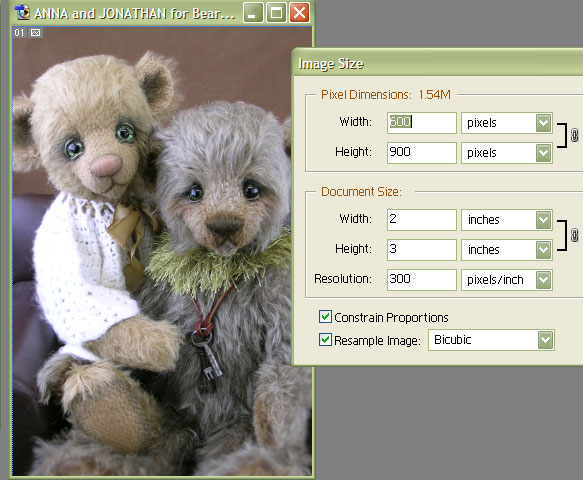
I went to PhotoShop and opened a picture of my bears ANNA & JONATHAN. Then I clicked Image>Image Size to get the drop down menu you see next to the photo.
Different programs will have different looking menus, but the underlying concept behind those menus will be the same.
Note that it's possible, in PhotoShop, to adjust SIZE dimensions either in PIXELS or in INCHES. The program is "smart" and will keep the same proportions (it will "constrain proportions", if that box is checked) when you change one dimension. So, for example, if I have a 2x3 inch photo and I change the "2" side to "1", PhotoShop will decrease the "3" side proportionally so that the photo retains its original shape and "relative" dimensions.
Note, also, that one can adjust RESOLUTION on this Image>Image Size menu. Right now resolution is set to 300ppi (think of ppi, pixels per inch, as equal to dpi; I'm not even gonna go into how they're not quite the same because it will just confuse things further!)
The resolution is 300ppi because this was a photograph I sent to Bears & Buds webzine for publication, and I wasn't sure how large they wanted it. Since it's impossible to UPsize to a good quality image, I sent a high-resolution version (300dpi) and let Ruth decide for herself how to downsize the end result. This resolution (300dpi) would also make a great photo. I could print this photo out in the dimensions shown and get a very nice photo. I could also DOWNsize the photo to smaller dimensions and get a very nice photo. If I UPsized the photo to, say, 8x10, however, I would get a LOUSY photo. That's because, as mentioned above, the editing software would be "filling in" the extra pixels required to size up and the image quality would suffer for it.
Am I getting redundant yet? :D
Hope someone finds this stuff useful.
Baird'sBearsNot redundant at all . . . keep it up :D
Eileen
I've been using ppi and dpi somewhat interchangeably, but there is a difference between the two. Technically, when discussing photo resolution and digital display, I should have been referring only to ppi -- pixels per inch -- and not dpi -- dots per inch, which more accurately apply to your printer settings.
Despite my misuse of terms, the concepts -- what RESOLUTION is, and how 72 tiny-bits-of-information-per-inch is different than 300 tiny-bits-of-information-per-inch -- are the same. Sorry for any confusion.
For those of you with inquiring minds who just HAVE TO understand the PRECISE difference between dpi and ppi -- it has to do with monitors (ppi) vs. printers (dpi), printouts (dpi) vs. digital displays (ppi), etc. -- click here:
http://www.tildefrugal.net/photo/dpi.php
If you're satisfied staying in the dark on this stuff, tho, trust me when I tell you that you'll be just fine. I can't say I even deeply "get" this stuff and for my purposes, I don't need to. It's enough, for our purposes (websites, eBay, photo printing for personal use and even magazine publication), to simply remember that --->
(1) Monitors display at 72ppi. So images created/saved for use on the web -- for digital display -- can have a resolution of 72ppi. Which results in a small, quick-to-load file size.
(2) Printed photos require a MINIMUM resolution of 300ppi.
Pandy Potter BearsShelli, thanks ever so much. You can't have put it simpler (just as well with me). I managed to do my avatar and so it will now be easier to do my Ebay photos right.
By the way, I left the computer on your Willy Wonka photos to show to my daughter who is a big Roald Dahl fan. She collects the Roald Dahl magazines and is in the fan club. When I went to kiss her goodnight there was your Willy Wonka on her wall alongside Britney Spears. Shes now a Potbelly fan!
Posts: 1,153Oh my gosh...I have really been doing things wrong.  Holy smokes!!!
I just set my pictures for ebay by pixels and didn't do anything about the "inches"....I thought they were ...one or the other.
I am going to try setting the pixels and then the size...right?
I got the pixel thing from right clicking on some auction pictures that I liked the size of. Actually the one I clicked on used a pixel setting of 640...but when I tried that, the picture on my monitor got real tiny and I assumed that was what it was going to look like on ebay.
Are you following me on this Shelli? Hahira!!!
Oh, I can see I am going to be up late tonight going to all these links.
Shelli, will you make me an avatar and let me see what you did? Do you still have my pics? If not I will send you a mouse pic. or yorkie. Please, Please, Please !!!
Fingers tapping on the desk...I am anxiously waiting for your reply.:D
Nanc....
Well, Nancy, you can size your photos using either INCHES or PIXELS. It's kinda like measuring in centimeters vs. inches vs. yards vs. miles. You can measure a given linear length in ANY of those ways; it's a matter of preference, and the particular application of your measurement, that determines which measure you select.
When I edit photos the order of operations is:
(1) Crop
(2) Correct for brightness/contrast/color/hue/saturation/etc.
(3) Resize and Adjust Resolution -- and that is all done on the ONE PhotoShop dropdown menu, as shown above. For web use, I set the resolution to 72ppi, and then size the picture EITHER by inches or by pixels. Usually I choose inches, because they are more familiar. However, in the case of such tiny things like Avatars -- which must usually fit within a very specific pixel area -- I match my resizing to the specified pixel dimensions.
For Intercal -- if memory serves (I'm a bit muddy in the head today) -- the maximum WIDTH for an Avatar is 150 pixels. So, on the dropdown Image Size menu shown above, I input "150" for "WIDTH" under the heading "Pixel Dimensions."
If you were able to watch me do this, you'd see that the DOCUMENT SIZE numbers change, too; the "INCHES" part shifts.
Just look at the dropdown menu for IMAGE SIZE above and do the math: the resolution is 300ppi (pixels per inch) so a two inch wide image is 300 x 2inches wide... or 600 pixels wide. The pixels match, and are just another way of expressing, the inch measurements.
Am I making any sense at all? Yeesh!
Oh, and Nancy (and everyone else reading this...)
If you set your image width to 640 pixels and your resolution is 300ppi, then your image will be just over 2 inches wide when viewed in "actual pixels."
-----> 300 ppi divides into 640 pixels 2.something times. So a 300ppi image that's 640 pixels wide is 2+ inches wide.
If you set your image width to 640 pixels and your resolution is 72ppi, then your picture will be MUCH larger... about 8 inches wide.
-----> 72ppi divides into 640 pixels 8.something times. So a 72ppi image that's 640 pixels wide is 8+ inches wide.
This is the challenging thing to understand, but once you understand it, everything become easy cheesy!
 Winneybears and Friends
Wow..I am going to have to wait til my mind is fresh..I have been shopping all day with my friend and we can't out do each other..we actually spur each other to look for some " more stuff " at more stores...there is no stone left unturned around this town when we are out on the prowl looking for good bear stuff....It's fun ...Winney
Posts: 1,153Shelli, thank you so much...things are starting to make more sense. I had a little time last night to study all the links and mostly what you put in this thread.
I was adjusting mine by pixels rather than inches, so I guess I was doing ok. Up until now, I was using Picture IT and there was no resolution option (at least I never saw one...I will have to go back and check)...so that is probably why the pixel setting worked ok for me.
After reading the one link you sent, I can see what the cropping is used for. Since I try to keep my backgrounds very plain, I couldn't imagine why I needed to eliminate something from the background...but I enjoyed your pictures showing the closer pictures and really tuned into the part where you said to place what you want to emphasis, down one third from the top of the picture. That really makes it pop.
I am working on another yorkie right now (I designed a pattern to be life size) and I really want her pictures to be special. I will try this cropping for sure.
I think I need to go to Staples and get a rubber stamp made that says...."Thank You Shelli" :D
Nancy