Banner Sponsors


For artists and collectors sponsored by Intercal...your mohair supplier and Johnna's Mohair Store

Hi everyone,
I am very frustrated today....I have spent the last day and a half trying my hand at hand painting clear glass eyes the way that Shelli and others have described...I am having quite a bit of luck and am happy with the results, until........I go to put them on the bear, I thread the thread through, and when I go with the pliers to crimp the backs the wire is popping right off....I have ruined 4 pairs now of Intercal premium glass eyes just as I go to put them in...needless to say this bear will now have to go with black eyes and I am down two days work...and am so annoyed I don't even want to finish this bear now 
Any suggestions....just so you know I am not reefing on the wire with the pliers, just gently squeezing.....
Hugs,
Krista
 Donna's Duin Bruins
Krista,
Crimp your wire down before you spend the time painting. If they are going to break, you want them to break before you have invested the time and energy in painting them. What a bummer for you! I only squeeze the tip of the wire not up close to the eye. You could have some bad eyes. Years ago that happened to me, the better part of the ten pair that I ordered all broke.
Donna
 Flying Fur Studios
I wonder if you'd be able to get your money back. That seems like alot of waste.
Worth a try.
Now, I only buy the expensive ones that are already crimped for you. They are good quality and the wires are very sturdy. Worth the money for sure.
Sure sucks to try soo many times though.
 Ruby Mountain Bears
I have had the same problem before too! Have gone through the as many as three pairs of eyes.
Some times it is just that a bad batch of eyes.
kathy
 Back Road Bears
I never crimp the wire loops. Yet I get pretty vicious with my tappered awl and make a good whole for the wire loop so I never have a problem getting the eye in securely. I tried buying the precrimped ones but I use such a big doll needle as most of my bears are bigger, that I can't get the eye through without uncrimping and that's when the wire breaks off. I guess if I HAD to crimp I too would only do the end, not up near the back of the eye.
What a bummer!!!
Like Heather I use only the pre-crimped eyes..after the bad experience of eyes popping off the loop when using the uncrimped type I decided they are well worth the extra money!!
The other advantage is they all seem to be an even size so don't I have to match up the sizes...
Pre-crimped eyes! Whatever did we do before them? I love 'em. They are good and strong, easy to insert and easy to paint because they have a nice straight post to grab hold of!
thank you soooo much everyone for all your advice I think I will first with the pair I have left do the crimping first before painting, and after that order the pre crimped ones!!!!
Hugs,
Krista
 Creative Design Studio (RKR4CDS)
If you must crimp, because you found the Perfect color/size/etc, hold the top of the wire(s) where they enter the glass with forceps (for Larger eyes) OR a tapered awl (Small eyes) and DO NOT LET the wire shape change near the glass from the original shape as it came from the manufacturer. This also holds true for the prs on a single wire: cut them apart and form your 'loop', with a slight point at the end, but DON'T wiggle the wire where it enters the glass bead!
All you need is to form the bottom of the loop into a more pointed shape so that it slips between the warp and weft fabric threads and allows the rest of the wire to follow w/o splitting the threads or making you have to pull very hard to get the loop inside.
Just that small taper at the end (opposite the bead) is enough so use whatever tool you have to hold and isolate the entire rest the wire to keep it from moving while you ease the end into a 'point'.
The glass eyes pop off because as you crimped the wire(s) yourself, you even ever-so-slightly wiggled the wire where it entered the glass material and broke the bond that had formed between the wire and molten liquid as they were cooling and curing at the manufacturer's. With only the slightest bit of pressure while setting the eye into the socket, they popped off, and better it happened in your workroom than at a show, in transit or in the collector's home!
Can some one tell me what they mean by crimped or uncrimped. I haven't heard that expression before.
Thanks Shelly 
Pre-crimped eyes? Tell me more, tell me more! Come on Brits, tell me where you get these amazing sounding eyes from  I have to order some new sloth eyes for a custom after decimating my last pair of 9mm's with my pliers XD
 Laurie Lou Bears
The crimped eyes have a narrow u shape loop and are the english glass eyes that you buy in the uk and are of the best quality and are consistent in size and shape and are more expensive than the uncrimped german eyes which have a rounder loop.The german eyes come in sizes that are a pain to match up and have funny shapes.I gave up using these types of eyes not long after I had just started making bears as although they are cheaper I don't find them worth the hassle.
Laurie :hug:
Creative Design Studio (RKR4CDS)These are Intercal's #500 Eyes - Pre-crimped. Because I use such small sizes, 1.6 mm, 2 mm & 3 mm, I don't have the option of getting clear ones that I can color, but one of the BEST features, besides the fact that the bond between the wire and the glass is NEVER weakened, is that THEY ARE ALL UNIFORMLY ROUND!!!
I stood behind the eye makers at Lesch and watched for almost an hour, while they manipulated a glass rod and wires over a flame and then 'rounded' the outside end off in a half-dome plate of metal to form the eye, but it was done with a very quick flick of the wrist as the glass cools very very quickly in this size of glob and they work very quickly (in 20 to 30 min shifts - it's quite hot work and very tiring on the eyes to be staring at this gas jet of flame for 30 mins) so they are 'usually' perfectly round, but not always.
These do look as if the pre-crimped wires were held in some sort of device that dipped them into the glass (which is perhaps already in the mold?) and then cooled before being released as an integrated unit.
The same tempering coloration line appears on each wire, which is what makes the (frustrated) Industrial Engineer in me imagine how a production line could have created these, combined with the memory of how Lesch produced their industrialized lines of the larger glass and plastic safety eyes.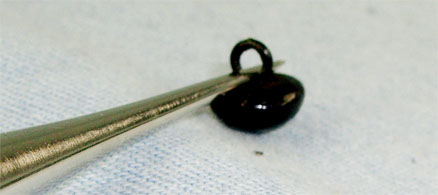
This is what I was describing in my previous post about making absolutely certain that you do NOT allow the wire to move where it enters the glass—I hold the eye between my left thumb pad thumb and the awl and squeeze the end with with a toll in my right hand—if you are going to make the wire a bit more pointed or oval, allowing it to slip into the fabric a bit more easily.
You can see how the eye loops are MUCH wider than the eyes in these small sizes and it's imperative that we use the skinniest loop that's available!
You also MUST hold a tapered awl or similar tool very firmly against the base of the glass, to keep the wires in their original positions before using a forceps, 'Kleins', pliers, etc... to give the rounded end a little bit of an oval or point to help it ease into the fabric and stuffing.
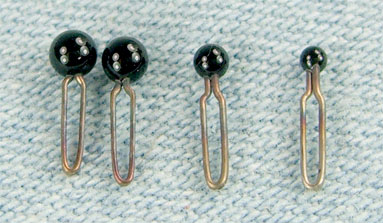
Intercal's Series 500 - Size 3 mm, 2 mm, 1.6 mm (sold as 2 mm but you often receive smaller ones - great for us miniaturists!) Note the color banding on the wires from the tempering effect of being applied to the molten glass material

For Size reference - I hate using onyx beads after knowing the ease of using these!
Hi Everyone,
Just thought I would add a note too. The English eyes are the ones which come with the strong narrow loop (pre-crimped!!). They do not need to be squeezed together because as previously descibed so beautifully in the previous post you may well cause the glass to break!
I have sold these eyes now for over 10 years and won't use anything else in my bears!
Happy Bear-making,
Hugs,
Susan
www.bearbasics.co.uk
 SUE GORRIE FOLKART
Just had this happen to me last night. :doh: My beautiful blue glass eyes! ACK! The eye in question actually arrived bent over, so I guess it was doomed from the start.
So what does everyone do with all the broken eyes? I wonder if you could use rubber cement or something like that as long as the bear was not going to be played with. Or maybe throw them in a glass jar with buttons etc. for decoration.
Any ideas?
Sue
 Bear-Hands
hi just reading the post and i have decided to make a big bear for a change and am waiting for the eyes to arrive. they are glass with the wire. how is the best way to attach these, i have a block on how you can pull the eyes to sculpturer the head, if i have to put the eyes in before i stuff
as i dont want to waste any eyes, especially since reading this post. i normally make mini bears so advice would be good.
thanks for reading
susan bear-hands x
Hi Susan,
I make big bears and a while back, posted an 'eye' tutorial on my blog which you might find useful.
Hi Paula,
Excellent tutorial and a very interesting way to attach the eyes. I always have one coming loose and I have to redo. I think I'll try this method next time although it might be a little trickier on a mini.
Hugs,