For artists and collectors sponsored by Intercal...your mohair supplier and Johnna's Mohair Store
In another thread Tynna posed this question:
Ok guys i have a question i have Nancy,s Tillberg,s 101 ways for bears and i must say it is awesome just one thing i don,t understand is how to do the double jointed neck ...have read it over and over again and i,m just not getting it lol...so much for pics for me. Lol
Tynna
Thought I'd post it separately so those who do double jointed necks might see it and help her out.
I've done exactly 4 double jointed necks..... from published patterns. I have a lot to learn myself so am of no help!
I seem to do a lot of double-jointed necks, so I hope I can be of some assistance. A few pointers from the way I do double-jointed necks, though I know there are many different ways that people accomplish the same tasks.
Presuming you don't have a paper pattern yet... Your neck piece pattern should be in the shape of a wedge. The best way to check the angle of it is to play with your paper pattern, cut out all your pattern pieces and set them on the table so you get the silhouette of your bear. If your bear is on all fours, place the neck in the down position (longer side of the wedge up), to make sure it looks like you want it to, this should show the normal profile of the bear. Then flip the neck piece so that the longer part of the wedge is now on the bottom, just like you'd rotated the neck on the bear, he should be looking up now. (If you have more of a teddy upright pattern, the long part goes on the back of the head to check his normal profile, flipping the longer side to the front of his body should make him look up.) With the bear looking up, make sure the head is not pointing so high up in the air that the neck looks dislocated. Your bear will thank you. Too great an incline will make it look painful, too shallow an incline and you won't notice any difference in the position of the head no matter which direction the neck piece is in. Of course, make sure you have added in seam allowances to your new neck pattern piece as well.
When you have your pattern piece all set, here are a few more things to remember. Depending on your pattern, you may either be using the same size discs at the top and bottom of the neck, or you may be using a smaller pair of discs on the top of the neck, where it joins to the body. Get your neck piece all sewn up and ready to go, flip it so that the outside is out, just like your finished bear will be. Find the correct disc size for each end by inserting various sizes of discs in that end and seeing what fits... a good fit is the largest disc you can put in there WITHOUT distorting the fabric and bulging it outwards. I close the wedge by capping it, NOT gathering, although some do the latter. I find that gathering a double-jointed neck makes for the dreaded "bubble neck disease", where there is a visible indentation where the joints meet and the center of the wedge section seems to puff outwards.
To cap the wedge, first you need your correctly sized discs. I use ultrasuede for my caps in a color that blends in with the color of the bear (you should NOT see the cap on the finished bear if you do this correctly, but it never hurts to use something that matches just in case!). I take my discs and cut around them on the ultrasuede to get a circle of the exact same size. Then I carefully cut around my circle of ultrasuede and shave off a small amount all the way around. I literally take a shaving off for a small disc, I may take 1/8" inch or more off for a big disc. This is because you want your cap just a bit smaller than the disc, that way it will disappear when the bear is put together, and you won't be able to see or feel a big lumpy seam where your joint meets.
That's the gist of it. Only other thing to remember is this... I leave an opening on the long side of the wedge for turning once the end caps are on and stuffing the finished product. This works great if you are working with a big enough neck, just make sure the opening is sized so that your largest disc can still pass through it. If there just isn't enough room for that disc to pass through the opening, you'll have to plan things out a little more carefully. In that case, I will sew the cap on the smaller side of the wedge completely with the neck piece inside out, as usual. I will sew HALF of the larger cap on with the neck piece still inside out. Then flip the neck piece rightside out through that opening. Insert your discs now, both the little one in the finished end, and the big one near the unfinished end. NOW finish closing the larger neck cap, rightside out, with whatever secure stitch you are comfortable with. Use the opening in the long side of the wedge for stuffing, tucking your cotterpin or bolts through the discs that are inside, and so forth.
Hope this helps!
Kelly
:clap: :clap: :clap: :clap: :clap:
Brilliantly explained Kelly. And I picked up a tip as well. Thankyou. "" shave a bit of the for the disc. This is because you want your cap just a bit smaller than the disk" I never thought of that myself. I just went about sewing really really carefully.  :redface:
I have never done a double-jointed neck, but after such a great explanation, I just may try one! Thanks for the tip.
pandamac
I have made double-necked joints before but never happily. With those great directions I'm going to try again! :clap:
Marion

:clap: Well put Kelly, I do quite a few double jointed necks, and there isn't a thing that needs to be added to Kelly's amazing instructions :clap:
Hugs,
Krista
Ooooh, I thought of something else to mention... with capping the neck wedge, that does mean the base of your head and top of your body will need matching caps as well, to keep both ends of the joints smooth. This does mean you will need to leave an opening in the head for turning and stuffing as well. I try to leave the opening under the jaw if there is enough room, if not I leave the opening running down one side of the forehead. I just look for the largest space without a bunch of curves, really. If you're working on a smaller head, you may need to use the same trick mentioned above for inserting the disc. Sew the smaller cap on fully, half the larger cap, flip the head rightside out, insert the disc in the head, then finish closing that cap. The body is always the easiest one to cap, there's tons of room in there!
Wendy, I don't know why shaving a bit more off the caps makes such a big difference, but I've tried it both ways, and it really does seem to help. With sewing the caps on, technically you lose the width of your seam allowance once it's sewn anyway, which makes the cap wind up that much smaller than the disc anyway. Oddly enough, it seems to need just a bit more taken off first, for that seam to really roll under the disc when it's all put together.
I'm laughing at using the term "bubble neck" above, I think I borrowed the term from someone on this board when we were last discussing double-jointed necks. Can't remember who said it, but it's so brilliantly descriptive that "bubble neck" has been stuck in my head ever since!

Best wishes,
Kelly

Good Point, and I did think of something else....you should adapt your head pattern into the equation so that you don't end up with a giraffe necked bear!!! I usually do as Kelly said and lay the pieces out sillohette like, and then figure out the best head shape, usually adapted from behind the ears and back, and leave the front as is, and then under the chin gets shortend as well, and don't forget to shorten your head gusset as well, and like Kelly said a head cap....lol....just another disk circle at the base of the head...for this one though I usually use the fur so that you get blending down the neck a bit...
Hugs,
Krista
I am hoping Oliver here is showing some examples of the neck wedge...sorry if it isn't the best example, maybe Kelly has something better, as well I am just making one so will take a couple pictures for you as well.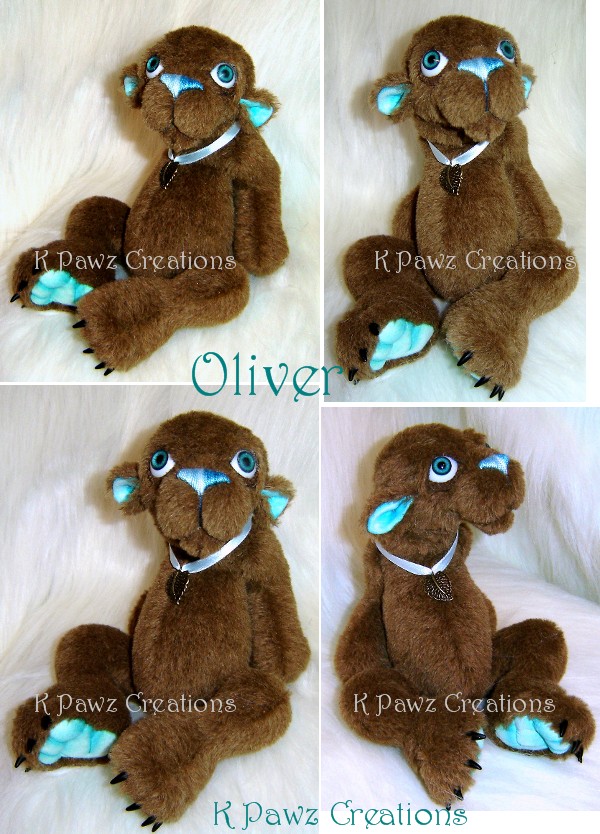

alright so Oliver wasn't great for showing how, so here you go....the final result for me with this process is a bear positioned like Oliver above, and oh yeah I usually make a cap for the top of the body as well
Hope this helps
Krista
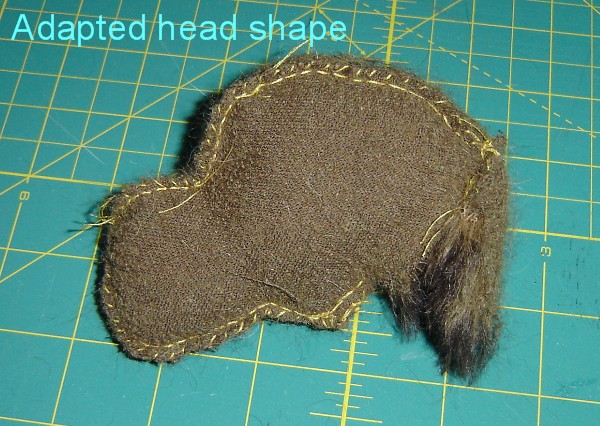
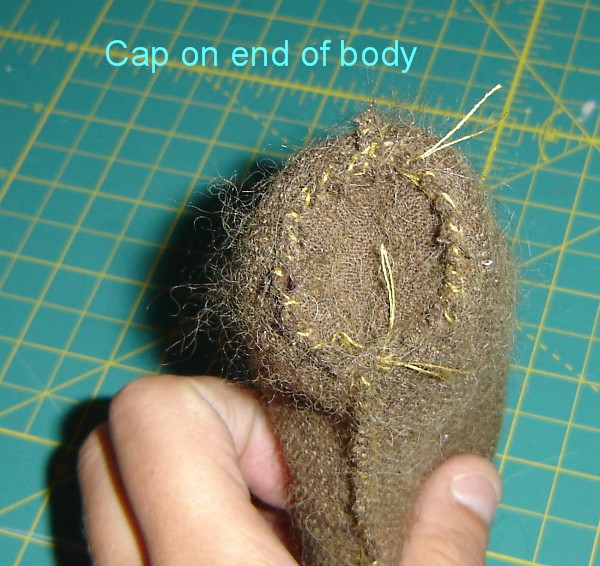
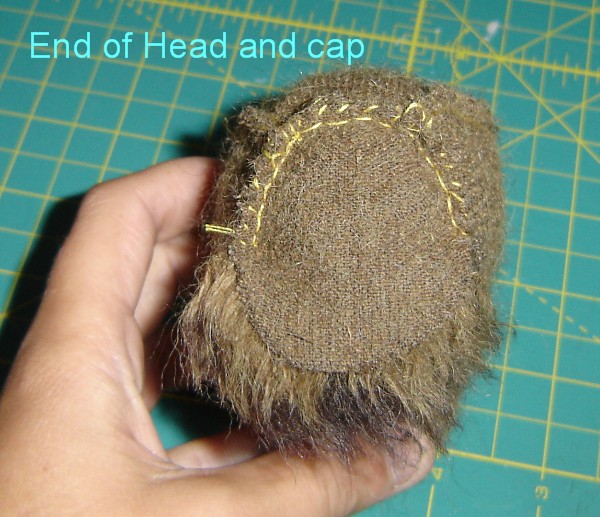

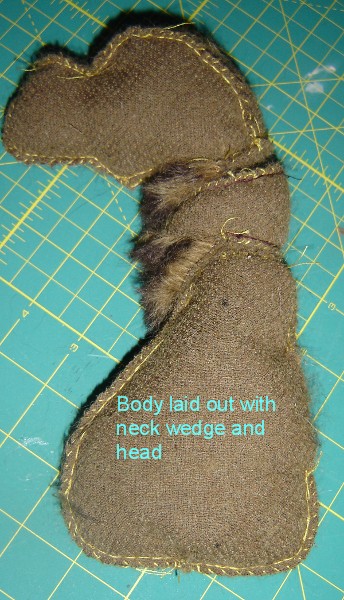
Awesome instructions and great photos girls!!!!!
Now I want to try this again!!
Wow, great photos Krista! As they say, a picture is worth a thousand words 
Excellent point also about adjusting the pattern so you don't get "giraffe neck". (OK, I admit that a few giraffes have wandered through this studio...) That is absolutely correct, the bear pattern that you're adding a double-jointed neck to undoubtedly already had one neck, so it's a good idea not to just slap on a second one without taking that into consideration. LOL!
Bear hugs,
Kelly

thanks Kelly, I just so happend to have one that I was getting ready to turn this morning....so voila!!!
lol...I have had a couple of giraffe necks myself!!!
Hugs,
Krista
Thank you so much for solving the second of life's mysteries - How to do double-jointed necks. :clap:
The first mystery.........................how do snowplough drivers get to work????? :crackup:
So sorry - its been a long day -but I do try.................some say I'm VERY TRYING..............
I'll just go lay down in a darkened room...........................
I have done a couple of double neck joints and yes they were "bubble necks",
Am definately going to do the capping next time, Thanks Kelly..
Ah! Thanks Kelly for the great instructions and Krista, great photos!
There has been a certain bear with a double jointed neck (and maybe double jointed wrists too!) wandering around in my imagination for a while. He's not quite ready to come out yet, but when he is, this will all definitely help. Thanks! 
Those photos are great, that is really helpful.
oh my, you girls are great.
Kelly, you have a gift for explaining things
Krista, awesome pics. Totally helps
 Thanks for these instructions and photos, everyone!
Now I'm inspired to try a second neck. My first one looked like a goiter 
I have used fabric circles at the neck/body joint instead of gathering. I like the look better.
Instead of sewing the fabric circle on first, then inserting the disk, I cover the disk with fabric (touch of gluestick helps to keep it in place) and then ladderstitch the fabric-covered disk into the neck/head opening. Since the fabric covered disk is set into the neck, not on top of it, the joint becomes invisible.
Thank you to all my fellow bear people I just remembered that i had posted from my first day here and then i didn,t know how to find it lol, but all your pics and explanations should be great....thanks again Kelly and Krista...I,m going to give it a whirl and will let you know how it goes !!!! 
Bear Hugs
Tynna
>>>>>>Presuming you don't have a paper pattern yet... Your neck piece pattern should be in the shape of a wedge.<<<<<
The 'wedge' description didn't register with me when I started these. Another way to describe the wedge is like a tube like a frozen orange juice concentrate: instead of only removing just the metal top lid, the cardboard sides would be cut into, with one side of the tube lower than the other.
The other end of this tube can be flat or angled also.
>>>>>>>>I close the wedge by capping it, NOT gathering, although some do the latter. I find that gathering a double-jointed neck makes for the dreaded "bubble neck disease", where there is a visible indentation where the joints meet and the center of the wedge section seems to puff outwards.<<<<<<<
Capping seems to be the best option for most. Depending on the length of the nap (removed if using self-fabric for the end cap) the ultrasuede works best as a surface that can stand up to much abrasion with many turnings. If tightened together very well, I'd worry about some of the mohair backings wearing through.
There is a bear maker who gets top $$ for her work, and her necks always look as if she used disks too small for the tube (way too small). Now I wonder if it isn't instead because the fabric is gathered instead of being capped. They look awkward and I thought it was only me who was seeing this bubbled neck instead of a smoothly extended line.
Chowlea Bears: The first mystery.........................how do snowplough drivers get to work?????
:crackup:
:crackup: :crackup: :crackup:
The third? Why is "bra" singular but "panties" plural?
Its ok...I'll find my own dark room! :redface:
Cheryl 