For artists and collectors sponsored by Intercal...your mohair supplier and Johnna's Mohair Store
Have just bought a lot of silk threads to try out for embroidering noses [which, quite frankly, I suck eggs at embroidering noses!], and I usually just make my own polymer noses [they're so much easier than embroidering], but I was looking at Sassy's resin noses to save time of making mini noses and wanted to know what the difference is between the ones that have a screw-type end, and the ones that just have a wire?
I make my clay noses with two wires, and then use 'em like a cotter pin with a mini button...so both of the resin nose options are completely foreign to me.
Amelia
Without seeing a pictue it's hard to be sure but I think the ones with the wire sew in like a glass eye. But I don't know anything about the screw type end...maybe it is like a safety nose?
Amelis, how small are your small noses? I need realistic looking ones (Polar, grizzly & panda are all different shapes) but I have to make them 1/8th inch to 1/4" at the LARGEST as the bears are 2" - 4".
I've never wired them in - I was afraid that they're not thick enough to be able to put pressure on them of sucking the wire ends into the face/muzzle completely.
And while baking them - not to rest on the fronts w/the wire ends sticking up (they're so small they change shape in the oven).
I could build a sort of 2 sided rack for the wire ends to extend down into... just musing out loud here....
when I make my clay noses and hold the wire in the oven with one of my sugical holders, I can not remember the right name for them, it works really good if you are not making to many at the time.
Lena 
Keep musing folks. My air dry clay has arrived and I'm wanting to make noses with it.Plus lots of other stuff. So any info here will help me tremendously. 
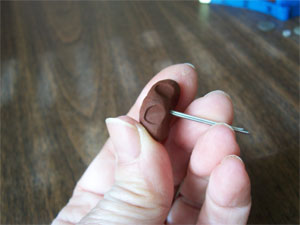
Bobbie, my smallest noses are the same sizes as yours...what I've noticed that helps TREMENDOUSLY so they don't lose their shape in the oven is initially cooking just the surface with an embossing gun. This hardens the top---so if you were sculpting it, sculpt the front on a flat surface without worrying about the wires, take a heat gun/embossing gun, blast it for about 30 seconds to a minute to set the clay [only the surface of the clay facing you is going to become hard], and then you can pick it up and, while handling the front without smooshing all that sculpting effort, you can then sink your wire into the back side of the clay, and THEN place it all in the oven to cook.
Did that make sense? Oh, and for baking---if you have a wire rack, you can just place the noses on the rack, with the two ends of the wire extending down and the nose atop the rack, they sit just fine for baking.
The way I do the wire into the backside of the nose is to make a complete circle overlapping, so that I'm sinking the little circle into the clay---then I have TWO wire ends coming out of the back, not one. Just my opinion, but that makes it more secure. Then I use a mini button to make sure the nose is flush up against the material..sometimes, in the tinier bear cases, I just twist the wire together.
I can get photos to show if need be. I know I sent someone photos a longish time ago, can't remember who though. Am hunting through emails to try and find it, but am unsure.
Amelia
Ah-HA! Found 'em!!
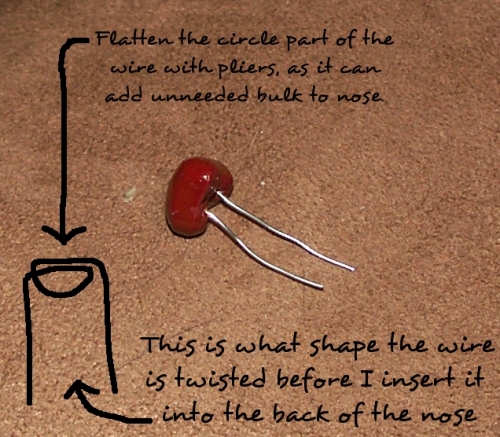
Another view of nose:
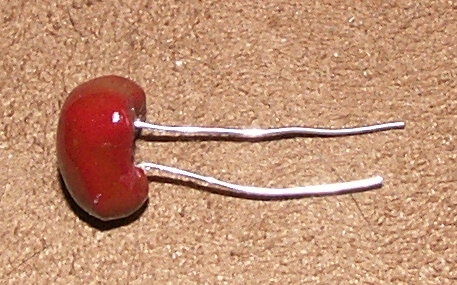
You can tell that in between the two wires there's enough space to put it on one of the wires on a wire rack, and the length of the wire will prevent the nose from falling off of the wire rack.
Amelia
Amelia
Back to your original question about the two types of noss. The noses with the screw in end have a thicker plastic stem rather than a wire - you set them much the same way - but thy don't appeal to me as you have to make a fairly big hole to get the plastic stem through and if you make a mistake you're basically stuffed on a mini bear. I think they put undue stress on the fabric too as you have to break fibrees to get them through the fabric.
I have some of the resin noses but haven't used them - basically you use them like the eyes on stems - cut the wire off shorter - loop it and wrap the end around itslf so that you have a looped back - and then stitch it in like a glass eye. It would be so much asier if they had a pre looped back in them.
Keep practicing your stitched noses - it gets easier the more you do - stuff a baby's sized sock firmly and practice on that. I have only tried silk thread once = I found the one I had a little "crunchy" for want of a better word and hard to get nice and smooth. But I haven't played around with different brands. I use a single strand of dmc cotton. I'm not going to explain this well but once you've made the stitch .i.e. brought the thread out at the top of the nose and inserted it at the bottom with the thread not yeat puled tight. At this point slide your needle horizontally between the thread and the surface of the bear with it laying flat against the nose. Slowly pull your thread up so that it lies nice and flat against the needle and then slide the needle out - if you keep doing this, it makes it easier for you to line the stitches up nice and close to each other and also helps you keep a smooth tension without pulling the stitches too tight . Build up several layers - it gets easier to make the layers smoother the more you have.
Wendy, the air dry we have here 'may' crumble. The brands we have here recommend allowing 24 - 48 hrs drying/curing. I know it's hot there with humidity around 50 - 60% - I let mine dry more than a week (needle tops) and still have had some tops loosen where it suirrounds the shaft. Which would be good to make your 3 or 4 needle holder right next to each other cuz you could break them free if/when one breaks.
Amelia, I've got sevral bears nearing completion now. I put their noses on today. They measure 1/4" across and 3/16". As both Premo and Sculpey III (the only ones I have on hand) are quite soft thriough handling I had the devil's own time getting the shape to hold while I transfered them to the baking sheet. I should say that first I stretch clear Saran® wrap over the head tightly and create the noses in situ. That way they fit the curve and the shape & size.
I'd like to get more detail in the flares of the polar noses, but it mishapes when I move them so I just kept the side slots.
Thx for the recommendation on the heat gun. That would set the surface and I can then play with the details. Home Depot here I come!
I haven't painted over the noses yet for a bit of texture & then seal them. The wool surfaces get their final grooming when all details are complete. The claws come now and polymer foot pads/toes, #42 needle goes to work and they'll be done.
Let's see if I've figured out how to upload multiple shots yet.
http://www.teddy-talk.com/upload3/N3.jpg
Speaking of new tools, I look for new & unusual items for some of the writing I do. DH sent me this link today in an e.
Subject: Information, Just Not For You - $140 each
He knows my coping-style strofoam cutter was under 20. Ratzzz... never should've told him what a good deal I got.
On to bear claws - 'gnite all!
What a brilliant thread. So interesting - Thank you all for the discussion and the pics. :clap: :clap:
The link didn't paste:
"Speaking of new tools, I look for new & unusual items for some of the writing I do. DH sent me this link today in an e.
Subject: Information, Just Not For You - $140 each"
http://www.kk.org/cooltools/archives/001538.php
Surely there're some bear uses hiding in this tool. Give me some reasons for owning one!
The noses with the screw in end have a thicker plastic stem rather than a wire - you set them much the same way - but thy don't appeal to me as you have to make a fairly big hole to get the plastic stem through and if you make a mistake you're basically stuffed on a mini bear. I think they put undue stress on the fabric too as you have to break fibrees to get them through the fabric.
Melissa, thank you so much for your expertise on this subject. I hadn't even thought about the noses on the screw totally ruining a bear's face---I will probably buy some just to use the shapes to form my own, but won't be using them in a bear anytime soon.
I did get a baby sock and began practicing with DMC floss---I was happily surprised to see improvement within the first ten noses. Have tried the silk thread, but so far am going to have to practice more with that, as I buggered it up and didn't get it straight enough.
Thanks to everyone for their responses, and good luck to us all on noses!
Amelia
DH said yes, he has a heat gun 'somewhere' in the garage... In the meantime, he suggested I try a hair dryer. I have one that's almost too hot to put nearer than a few inches from skin surface.
Needless to say, I'm still planning a trip to Home Depot. The surface of a tiny nose firmed up, I lifted it off the alum foil and when I pressed the wire as you described into the back, the whole thing crumbled.
I was thinking about the title of this thread; you called it a resin. I tried both Premo & Sculpey III with the dryer. Are we using two different materials?
Hi you guys.
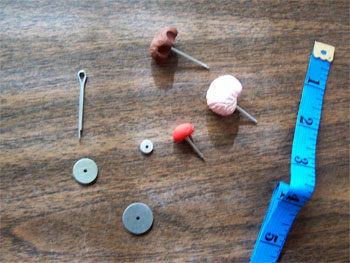
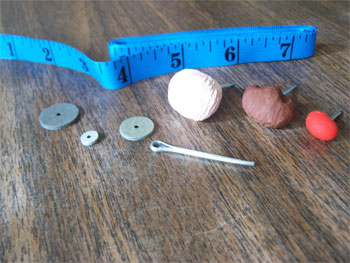
What an interesting topic this is!  Here is how I attach my Cernit OR Fimo ( clay like compound ) noses. I "cook" different sizes . This is the kind that you put in your regular oven. I attach them with a cotter pin that I bake in the nose and I do attach them like the arms and legs joints. I use a small disk to attach them that way it will not interfere with the shape and look of the muzzle.
Hope my pictures give you an idea.
bear hugs and golly smiles.
Gladys 
DH said yes, he has a heat gun 'somewhere' in the garage... In the meantime, he suggested I try a hair dryer. I have one that's almost too hot to put nearer than a few inches from skin surface.
Needless to say, I'm still planning a trip to Home Depot. The surface of a tiny nose firmed up, I lifted it off the alum foil and when I pressed the wire as you described into the back, the whole thing crumbled.
I was thinking about the title of this thread; you called it a resin. I tried both Premo & Sculpey III with the dryer. Are we using two different materials?
No, Bobbie, when I was typing about pressing the wire into the nose, I was referring to polymer clay noses---I have mainly used Fimo [Fimo seems to be a stronger and more flexible clay, although it is firmer to work with]. Am wondering if part of your problem losing details when you pick the nose up is because you might be working with a too soft clay. You might get some Fimo and try that out---but in the meantime, have thought up another way to perhaps form the nose with the heatset.
Now, what you are having problems with is getting the wire into what you sculpted---what if..? you took the wire and baked a small [miniscule] amount of clay onto the loop, and then took your nose with the two end wires and poked the wire ends through a small piece of cardstock---then you could have a baked base to form your nose on, it would form with a flat area on the back. You could also potentially bake it with the cardboard on the nose, and then if the clay stuck to it [I don't think it would though], you could merely rinse the cardboard off the polymer nose after it had cooled.
I've attached a quick dirty diagram of what I'm talking about, since I was rereading what I wrote and it didn't seem very clear. And, with the clay crumbling, that means you cooked it longer than necessary to set the clay---but not long enough to completely cook it---I think you might need an actual embossing gun, you can spurt heat it for mere seconds at a time and then check to see if your underside nose clay [that would be closest to the bear's nose] is left uncured.
Did that make any sense? Hope this can help!
Oh, and I just thought of something...you could also make your sculpted nose WITHOUT a wire, bake it, and then make a mold from it to form your next noses, put the clay in the mold and then the wire smushed into the soft clay in the mold, stick it in the freezer to harden the clay, and pull the nose out using the wire as a handle.
Amelia
Thx for your input, Gladys. My only problem is that you have the luxury of ALL THAT SPACE!! LOL My bears' heads are smaller than your noses!
At one quarter inch to three sixteenths inch across and a very very thin depth, I'm trying to get lots of detail into polymer. It CAN be done because sculpturers (sp?) do it - I just haven't mastered it yet...
Amelia, I understood what you wrote before. I have some #26 wire that I formed the flattened loop out of but I'm pretty sure I held the dryer on more than 30 seconds. Before that the pieces were still too soft to remove from the Saran Wrap® or foil. When they crumbled I suspected what you suggest.
I'll try the original Fimo. I've found that putting the small ball in a little baggie and tucking it into my bra for a few hours really helps my ole arthritic finger joints. Ther! How many times will the word bra appear on our list??!!!
You've given me much food for thought, about both pre-forming the bit of clay over the wire as a base, as well as creating my own molds. I never would have thought of that, as each bear's muzzle is a different shape and size.
BUT, if I think about the needle felting in a different way, I can just as easily not create the tip that the nose must fit over perfectly, or even better, cut off the tip - Thk goodness for very firm needling!! - giving me a flat surface as the backing of the clay to meet, rather than trying to create a concave shape that fits the needle felted tip perfectly. And a thicker nose will look the same on the outside but be much stronger. I think that's going to be my next experiment!
As to price, I should think that the embossing gun at a craft shop will cost more than a heat gun at a DIY. Have you found this to be true?
..actually, a DIY store would probably be more expensive---as a regular heat gun usually has at least three temperature settings, and an embossing gun has one. However, you can definitely do more things with a regular heat gun.
Another thing to think of, a regular embossing gun might not be as big a blower as a heat gun---after all, one doesn't really WANT a ton of wind speed when trying to heat up embossing powder, otherwise the powder will scatter to the four corners of one's craft room.
I know I paid $29.99 for mine [but it was a deluxe model, whatever that means!], but I think you should be able to pick one up off eBay for fairly cheap---women are always trying to dump their stamping supplies there.
..mmmm, stamping supplies on eBay..
Amelia *aka extraneous craft stuff addict*