Banner Sponsors


For artists and collectors sponsored by Intercal...your mohair supplier and Johnna's Mohair Store
There was some discussion on nose making techniques at the show last weekend and it occurred to me that we haven't discussed noses in a while. Jodi originated a great topic about a week ago, asking about your best overall bearmaking tips. I thought I'd borrow her great idea and narrow it to noses.
Any great nose tips & techniques you'd like to share?
I'll start with my two best nose tips:
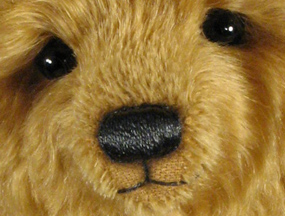
-- I embroider most of my bear noses using six-strand floss and a vertical satin stitch, and find that it helps enormously when I gently hold the stitch against the mohair backing with one left finger as I pull the thread tension tight with my right hand.
-- I always draw my nose shape (in my case, usually an oval) onto the mohair backing with either permanent, ultra-fine line Micron pen or with air-drying ink before I begin stitching.
 Back Road Bears
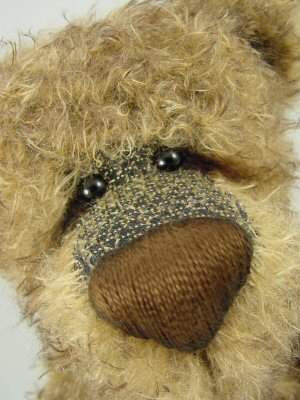
I use #3 Perle cotton, the thickest diameter, and double it on my needle meaning I use one long piece, thread it, knot the ends together, bury them in the head and work with the doubled strand. (Perhaps there is a term for this?) Anyway, I am careful to pull both strands firmly and equally against the fabric to form a smooth nose. I find it goes much faster with the double thread and it being so thick. For little bears under 12" I use #5 perle cotton.
 Matilda Huggington-beare
Great tip Daphne! I'm going to file that one!!!! 
Wendy
 Posts: 1,836
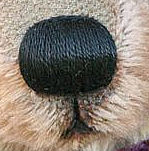
I already did a 50/50 water glue sealant on my stitched noses, but I wanted a sheen and couldn't figure out what particular "varnish" people were talking about in older threads. There are lots of "varnishes" and I went blank on this one :doh: 
So I'm putting away brushes when one of the huge tubs of Aleene's instant decoupage screams "duh" at me. It's a non toxic, non yellowing, water based glue (I'm already using 50/50 to seal....) and it's a
gloss finish (you can get it in matte as well). I gave it a try that night and now I call it a wet "healthy" nose. I've only used it over a totally dry lightly sealed nose (50/50) and I don't water it down at all. Just a little bit right out of the tub, using a good bright or flat brush.
Here are a few examples.....
:hug:
~Chrissi
 Storytime Bears
Great Noses and great tips
It's hard to "pick" which nose I like best. :crackup:
OK seriously my noses "blow" :crackup:
I couldn't resist
I am humbled by these noses, not a stitch out of place. I love the wet look using Aleen's instant decoupage.
my goal in life is to one day make that perfect nose, but it is so hard to spend time making the bear and then messing it up with a bad nose, so I just stick to sculpting one.
Bear Hugs
Jodi
I have been needle felting my noses lately and love the realistic effect I can get with this.
When embroidering I always put a light coat of clear glue on a nose template before embroidering so that when placed the thread stayed where I wanted it instead of moving around.
hugs,
Krista
Jodi ..... don't forget with an embroidered nose... first of all...jut take your time with each stitch..check it carefully as you go along...and....BIG "and" here........you can always just take the stitches out if you don't like it....it is not ruined...it is a "do-over" opportunity...... how great is that?
 Gold Coast QLD
Daphne - what a scrumptious nose.
I love the wet look you have there Chrissi.
A tip that I read on here that really helped me as I am a newbie was to sink the eyes before doing the nose. I was doing it the other way around and always found the nose to be a bit off center.
Kirsty
Melbourne, Australiahttp://www.woodlandspublishing.com.au/abc
"Beautiful Noses" You can download the page if you want to...it has step by step with pictures
Sandi.....
I saw that article last night in my search for that particular mag. Great job explaining it and great pics to go with!!!....
it is so hard to spend time making the bear and then messing it up with a bad nose, so I just stick to sculpting one.
Hey, that counts too, Jodi! If you're willing -- or if any other nose sculptors want to share their tips & pointers -- please add your comments here, too. There's not just one way to create a teddy bear nose and there are MANY people out there who also use clay or resin or even glass for a bear schnozz. You're very much included in this topic and your input, very much wanted.
Sandi... Wow, what a great resource you've written on nose embroidery, and the photos are so explanatory and great! Thanks for sharing that. 
Melbourne, AustraliaThanks Shelli....I enjoy helping when I can. 
Thanks Veronica....I think photos seem to help better than drawings somehow. :hug:
 Strange Bears
HI Everyone
Just a quick note.....Australian Bear Creations will be doing a series on noses.....like Sandies on the embroidered noses, next issue is a leather nose and the following ones will needle-felted and waxed and polymer etc .......so if you like the step by step class keep an eye on our technical pages in the mag. More techniques and skills will follow in the same style.
bearhugs
I did a 'nose photo shoot' showing my technique step-by-step, on my blog recently, if it's of use to anyone here it is ... http://allbear.blogspot.com/
Storytime Bears :clap:
After taking a class with an artist friend, I learned to keep the neck OPEN while doing the nose. When I am embroidering the nose, the stuffing inevitably shifts resulting in a crooked muzzle  Now I leave the neck open and constantly push that stuffing back into place. My noses are so much easier now!
Also... just learned this a couple of months ago on another board.... try using wool instead of polyfil for the nose. My gosh the needle glides thru almost like butter!! (I use core wool for needlefelting)
Miss Dorothy's TeddyFolkNow why didn't I think of that! Wool in the muzzle! Great idea
thanks, Dorothy
 Sunshine Coast, QLD
I'm a little slow on the uptake here, I know! But I was wondering - those of you who draw your nose shape on rather than using a template underneath - do you have to take your stitches slightly larger than the shape you draw? I find when I use a template underneath, if I insert my needle exactly on the template edge I end up with a nose much skinner than I had intended (think sausage!).
I'm thinking of trying the drawn on method for my latest bear but I want to start off on the right foot instead of having to do layer after layer to get it bigger!
Thank you!! 
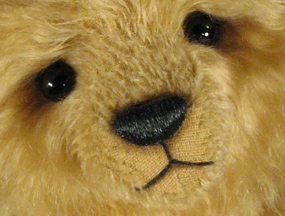
Hi Erin. I'm one of those who uses a VERY FINE LINE Micron permanent pen to essentially create an "outline" for my nose stitching. I don't use anything underneath, and I do shave down every last hair right to the backing before I start.
I actually tend to insert my needle directly ON the line I've drawn, piercing the line right at its center with my needle with each stitch. The line is so fine that the diameter of the needle is basically the same width as the line I've drawn. As I stitch, I pull the threads very slightly - - VERY slightly -- so that the nose gets to look a little "stuffed" even though it's not. When I'm done, I encircle the nose with an embroidered outline of two or three very long stitches; one across the top, and either two or three (depending on the bear) across the bottom.
Hope this helps!
 Blondheart
I make distressed looking bears so my noses are pretty easy since there are gaps...BUT...I do know how to do a filled in regular nose and I do it the normal way with perl cotten. The size depends on the size of bear I am making, and I simply sit there and stitch it. Back when I learned how to make bears we didn't have any nifty tricks so it never occurred to me to draw anything on or anything like that, so I just do it.
But over the years, I have heard of things other artists do. A lot of artists use a felt template under their stitches to give the nose a more three dimentional quality that stands out away from the face.
Now if you've ever seen Ted Menten do a nose you probably want to cry! (Just kidding) He has the most convoluted method I've ever seen for making noses, but they are perfect every time. So since he isn't here, I will do my best to describe what I saw him do when he asked me to sit in on a class one afternoon.
First he takes all the hair away from the area he wants to do the nose on. Then he puts a felt template on the inside of the nose. (I am not sure why.) Then he uses scotch tape to hold down all the hair around the outside of the nose so it doesn't get caught in the stitches. He then colors that area all in with permanent marker. Then I think it was him, but it might have been Diane Gard who put a straight pin horizontally on the top of where you want it to be to use as a stitch guide. Then he rubs glue stick on it to hold the stitches in place while he is sewing them. I don't ever condone the use of glue, but it's part of his method. Then he embroiders his nose.
Also the same as using wool that the ladies mentioned above, a little excelsior in the nose cone works really well, especially if you have carpal tunnel and have a hard time pulling the needle through.
 I'm like you Kelly, I just eyeball it and stitch straight through the mohair ... no templates, marker pens or pin markers (mind you, I've never heard the pin marker suggestion before but it sounds pretty practical!)
My advice would relate to pre-nose sewing, to ensure a good nose ..
Head gusset has to be absolutely central and symmetrical.
Gusset seams need to be exactly the same width on both sides of the head.
Stuffing also needs to be very evenly distributed in muzzle area.
Inserting the eyes first helps to keep the nose straight (as long as the eyes are straight too of course!)
Nose area needs to be very carefully trimmed, shaved or plucked back to expose fabric backing.
If like me, you prefer to stitch a vertical satin stitch nose (and so long as your gusset is stitched into place straight and even), the weave on a good quality mohair backing should give you a row of tiny horizontal holes to stitch through at the top of your nose, ensuring it's stitched good and straight. No need for marker pens etcs, but you do need good eyesight or a decent magnifying glass to work by! (Incidentally, I've just invested in a daylight simulation lamp and it is so useful for nose sewing!)
Finally, and I know this sounds like unnecessary advice, but making sure you have a strong, sharp, unbent needle to work with helps a great deal too. Trying to stitch a good nose with a too skinny, flexible, slightly blunt needle is a frustrating waste of time ... 
Sunshine Coast, QLDThanks for the quick answers guys! If I could achieve a Shelli or Paula nose I would be extreeeeemely pleased with myself!
I wouldn't say that I've ever really "struggled" with noses, because I always get there in the end. Ears are worse for me (is that weird?!) - getting them even and getting them both curved the same.
I'll probably try the micron pen thing that you do Shelli. I used to use no guide at all, but I'm more fussy now and wasn't satisfied with the felt template so it seemed to be the next step. Suspect that my fine point Sharpie wont be much good though!
Thanks again!!
 Bear-Hands
http://www.woodlandspublishing.com.au/abc
"Beautiful Noses" You can download the page if you want to...it has step by step with pictures
hi sandi
i went to the page but couldnt see it, is it under one of the headings...... i did look through.
thanks susan x
 Waggle Bears
Chrissi, thanks for your tip on "wet noses." I think Nancy D. told me 50/50 with craft glue; haven't tried it yet. But the decopage glue sounds good, too. I wouldn't have thought of that.
I've also tried Shelli's micropen trick. It does work, too.
I was going to suggest going to Paula's nose instructions. She makes great noses and she does it free hand. When I stated I was told to put pins on the nose in the shape you want then go in and out at the pins to give you a shape. I hated that; always uneven. I tried the felt templet but again I had trouble. I tried Paula's nose technique on a bear for the B/W Ball and it really worked! It took me a while longer than it does Paula, but I was very pleased with the outcome. One of her tips is to hold the head between her knees when sewing. I found this awkard for me but maybe with practice, it will become easier.
I think Paula's tip about holding the head straight while sewing is one that would help make all the other techniques work. I didn't realize that I was putting the nose in while holding the head sideways.
Daphne always makes perfectly straight up/down stitched. And, of course, Sue Ann is the queen of waxed noses, another things I've not yet perfected.
Sandra, I very much appreciate the new Technique section of the magazine. It helps to see photos to explain the process.