For artists and collectors sponsored by Intercal...your mohair supplier and Johnna's Mohair Store

So, those of you who have already completed your challenge, would you mind copying your pics and comments into this thread please and we'll take it from there ...
Thanks everyone!


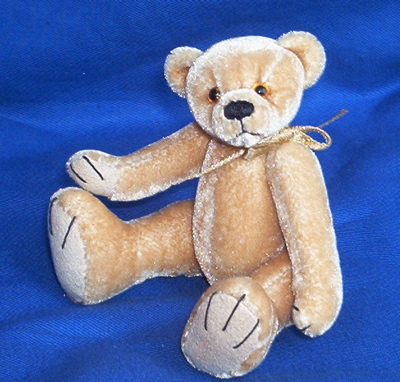
As I said he is 4.25" tall, which is a bit bigger than my usual size bear. He is made from upholstery velvet with ultrasuede paws. The head shape said to me"traditional bear" so I first worked out the size of the body and then thought that the arms should be fairly long and thin. Then I drew the legs but had to make them a bit shorter than I originally drew them as he looked a bit strange and top heavy. Then on to the head gussett, which I felt should be fairly wide and evenly curved to go with the shape of the side head. I then did the inner arms and all the paw pads. Most of the heads I have designed before have a much higher forhead, but I think I like the shape given by the shallower shape so I will have to experiment.
It wasn't really that difficult to resize and shrink the pattern so much, it's more a question of keeping the proportions right rather than the size.I don't know about anybody else, but when I am designing a pattern I sort of draw the bear in profile then draw the pattern pieces in place then trace each bit off individually, I suppose maybe that doesn't work so easily with larger bears, but its easy enough with my usual size of 2 to 3 inches LOL . How do you do it?
Tiny Hugs,
Gail
I could do with a bit of help - I've manage to find a really good article in Teddy Bear Club International on designing bears which has helped me draw my gusset, body, arms & legs but I am stuck with the paw pads :redface: I would really like to have foot pads shaped like a foot and not just an oval shape - I know tha shape I want but how do I get the right measurements so it fits the foot I've drawn?
Many thanks in advance, Ali x
Thanks Gail! 
Hi Ali, congrats on getting so far with your design work! Here's a couple of thoughts which may (or may not!  ) help with the footpad and leg:
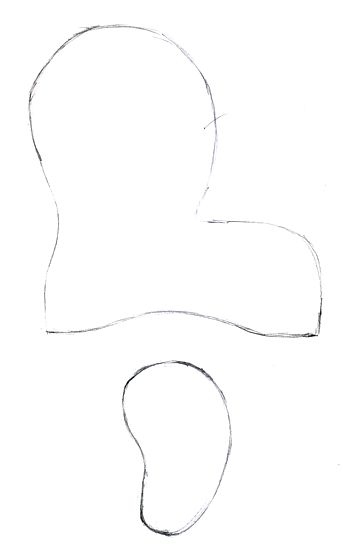
I'll start with a scribble ... 
Before I go any further, this is my disclaimer! This really is a scribble, no measurements taken, no pattern copying, no nothing, just a pencil, an eraser and a piece of paper! It's not sized, proportioned etc., so not intended for use because it like as not won't work!
Right, that said, I've used foot shaped pads on the feet (of course!) in the past and like the effect. I'm not sure if you had this kind of shape in mind, but I think if I was you I'd do a couple of things ...
First, it might be worth sketching out your footpad FIRST to get the size and shape you like. Forget about it fitting at this point. When you have the footpad you like, THEN look at your leg pattern. Lay the footpad against the bottom of the leg (ie foot part of leg) and see if the pad is a good bit shorter than the width of the leg foot pattern ... for example, when I am making a bear I make sure the footpad is at least half an inch or so shorter than the leg foot pattern.
That's your starting point. From there on, you can either wing it and keep adjusting the footpad or leg foot pattern until they fit, or use a piece of string to measure the circumference of the footpad and compare that to double the length of the leg foot pattern (so that you are measuring the circumference of the hole for inserting your footpad) taking into consideration your seam allowance, which will of course reduce the amount of space available when both leg pieces are stitched together. I think it's easier to make the leg foot pattern longer or shorter, than it is to fiddle with the proportions of a footpad, so my preference is always to take the path of least resistance and adjust my leg pattern, rather than a footpad I like the look of!
Another thing I always do, is work with a slightly curved leg foot design. This gives potential for wider toed footpads without distorting the shape of your footpad and should work well with the kind of shape you've mentioned.
Having just reread my instructions, I'm praying that they make sense! I'm sure someone else can step forward with some clearer written advice .. anyone out there able to lend a hand here please??? It's not easy to translate this process onto a keyboard!
Just had a thought, there should be some good advice in the 'Hints and tips' section of TT for this ... will hunt some links down ... back later ...
Found it! Try this link! http://www.teddy-talk.com/viewtopic.php?id=1029
the way you could do this, (not sure of the size you are going to make, if you make minis this way could be a bit fiddley) is to cut a length of thread the same size as the base of the foot on your leg piece and then use this to make the shape of half the foot pad shape you want, then draw this out.Next, fold the paper in half( fold going between the start and end of your half a foot) and cut out you should have a foot pad the type of shape you want with the correct measurements. When the leg pieces are sewn together and you are ready to sew in the foot pad, put a few stitches to anchor the foot pad at the centre front and centre back, matching the seams, that way it wont shift and you should end up with the right shape foot. Hope that makes sense, it is much easier to visualise than to describe it in words.
Tiny hugs,
Gail
oh whoops, we were posting at the same time. My method of course will only work if your foot pad is symetrical. Duh! I hadn't thought you might want one more complicated, when of course Paula's method will work for you. My bears are so small that asymetrical foot pads probably wouldn't work too easily.
Tiny Hugs,
Gail
Many thanks Paula, I read your post twice reeeeeally slowly (the sketch really helped) and I think I've got it :dance: I will read the other posts you recommended if I get stuck - my poor wee brain can only take in one instruction at a time! 
Thank you too Gail I will remember your method for the future when not using foot shape pads  Forgot to say how much I love Cedric such a strong character for such a wee little fella
Hugs Ali x
This is my little Mouse, Scooter.....he is just about 3" made out of a lovely shade of Sassy fabric with ultrasuede, wired arms and tail!
My hubby has just about finished making him a scooter to ride on, I will post a pic of him riding on it asap!
Hope you like him!!
Hugs, Shirley x
Oh Shirley, he's so sweet! It's lovely to see that you've been able to use the pattern piece to create an entirely different animal ... and another tiny one too! :clap: :clap: :clap:
What a cute little mouse Shirley, I love his fat little tummy  :clap:
tiny hugs,
Gail
wow.. cool.. i need to get started too... :doh:
Ali, you remember what month the article in teddy bear club international? bec i would love to read the article on how to draw the gusset and all.. i never drawn a pattern yet so this will be my first time and that article would surely help me.
Paula, love ur challenge  and ur tips on drawing the foot is pretty good. can't wait to draw my own legs, but i just need to figure other parts hahhaha i hpe my work will look like a bear or some type of animal and not a mutated animal :pray:
cute little mousey by the way shirley.. nice one.. i think i will try sassy thread soon, heared its pretty nice...
Hi Shirley I LOVE your little mouse - sooooooo cute 
Hi Lee, I used two magazines to help me so far, the TBCI Sept 2007 helps design head, gusset and ears and the October 2007 issue helps with the body. This is my first pattern and I found these articles really helpful (and easy). Good luck with your design. 
Hugs Ali x
By the way, Shirley, please could you add your lovely mouse to the challenge gallery, I love seeing all the challenge pieces together!
Wonderful bears and friends everyone. Its also great to see a couple of beginners attempt pattern making :clap: :clap: Brilliant ;ladies. cant wait to see what you come up with.
My critter got a wee tad stallled when I had a slight mishap with an eye. Head is restuffed and only have one leg left to sew. It's not far away Paula. :dance:
WEndy
That's great Wendy .. can't wait to see him! :dance:
Thank you for all your comments everyone......it is so lovely to see the different designs using the same head design!
Thanks Paula for letting me know about the Challenge Gallery, I have put the picture in now  :thumbsup:
Gail, Cedric is adorable too 
Good luck Ali and Lee with your designing......hope to see pics of yours when you are done 
Shirley x
My last show is finally done and I can't wait to start on my challenge bear!
I'm planning on shrinking it down to my 10" sized bear pattern, and using all my own pattern pieces except for the side head ( of course!) I will make the necessary alterations to my gusset to fit Paula's side head piece. I can't wait to see how he turns out!
Here is my challenge bear. Her name is Isabella and I will be giving her to my son for his step-daughter. She is into ballet.
Sonya
Sonya, she's beautiful! Very feminine and dainty - the perfect ballerina! I like that you've used a centre seam gusset. What size did you choose to make her?
I love everyone's bears so far - it's fun seeing how everyone interprets it. I'm looking forward to seeing some big bears too
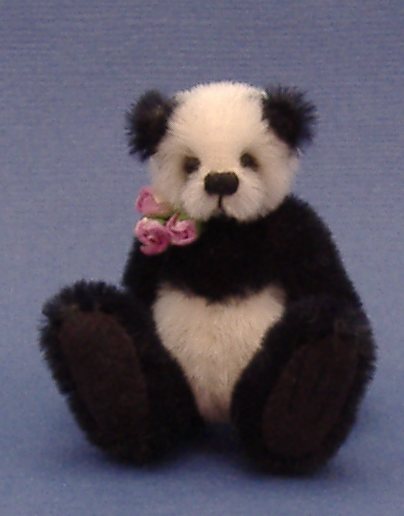
Here's my Posy again. She's 2 inches - I really shrunk Paula's head  I was temted to make a bigger bear but the thought scared me too much! I used one of my regular patterns and though the side head was not much different in size to my regular pattern, the different structure caused it to look much smaller in proportion to the body and limbs. I like these proportions so now want to play around with my regular pattern and body pieces - sizing them down and up respectively to create similar proportions but with "my" head. So thanks Paula - you've made me think!!

Sonya, she's beautiful! Very feminine and dainty - the perfect ballerina! I like that you've used a centre seam gusset. What size did you choose to make her?
Thank you! She is 16 inches tall
Sonya
I was temted to make a bigger bear but the thought scared me too much! I used one of my regular patterns and though the side head was not much different in size to my regular pattern, the different structure caused it to look much smaller in proportion to the body and limbs.
Maybe you'll get brave with the bigger bear next time Melissa! 
It's interesting to hear how the one pattern piece affected your existing pattern ... I'm glad it has given you food for thought for future designs.  Beautiful work, I love panda bears! :clap: :clap:
all of these bears are so lovely and so different! Hope to start mine later this month!!!
Marion
 gosh, pressure are building up for me.. everyone's work is so great..
paula, please dont forget to email me the design.. i have not received it yet  hehehe thanks all..
Thanks ali, i will find that issue and get started after our bear show here in Taiwan..
oh by the way, im called ming  and not lee
  lee is my last name
~ming
http://www.teddy-talk.com/upload4/Flippie.JPG
Here is my Challenge bear. His name is Flippie and he is made from a dark brown mohair. He measures 13cm in total.