For artists and collectors sponsored by Intercal...your mohair supplier and Johnna's Mohair Store
I am looking for ways to better secure clay noses to muzzles... I am using the embedded eye technique to physically sew them but that is not enough to secure them and keep them from wobbling...so glue is necessary in addition to hold them tight. Also, it seems to me that 'asking' an eye wire to hold a large, heavy nose pulled against the muzzle for any length of time is asking alot. One has already broken under the stress and I have only broken one other eye wire in all of the time I've worked with bears.
However, I have read that glue will go bad after a period of say, five years and then I expect the noses would loosen...not a good thing. So I am uncomfortable about depending so heavily on glue to secure the noses to the bear. 
Is there some other way to attach a clay nose...securely.
Pat Klein
PS: I have read everything in the available library on the subject...and I've seen some pretty substantial and wonderful clay snozzes out there....so there must be a substantial method of which I am unaware.
PPS: My noses are big--about 1 1/1 inch across...about 1/2 a FIMO block
PPPS: HELP 


I use wire (not en eye) in the back of my noses. I make a U shaped piece and insert it into the unbaked clay to form the holes. It is left in their during baking. Once cooled take out the wire and use superglue gel to glue the wire in. Once completely dry you can then put your nose as for an eye. I use a bit of leather glue on the nose to hold it in position.
----
Therese
Thanks Theresa...could you also thread through the hole you made with the wire? I'm just wondering if that's a possibility. Cutting out the middleman, so to speak 
Does leather glue have longer lasting properties than superglue? I'm not familiar with this product.
Pat
 Popped in to check out this topic. I've been thinking about clay noses myself. Thanks for the thread and the info


The holes I make do not go all the way through- about half way through the nose. I also have seen patterns where they make a hole through both nostrils - all the way through. Then you can sew the nose on through those holes. I use superglue for glueing the metal wire onto to the nose for strength. I am not sure about lasting properties of leather glue. It was recommended to me to use on mohair fabrics as it drys clear and is flexible (you can water it down for use as a fray stopper as well).
---
Therese
Pat , when we do our clay noses we insert a very small eye into the back of it. The nose is then baked, we attach the nose the same as an eye with a bit of crazy glue gel on the back of the nose. There is no need to pull on the nose that much , but insert the same way you would and eye and just tie it off in the same way as an eye. We have never had a problem, again if you pull to hard the nose will snap because the clay will break.
hugs
Shane
Hi Pat,
I use Apoxy Sculpt to make my clay noses. It is a 2 part compound that you kneed together. It is incredibly solid and almost impossible to break. You can even sand and drill it. I insert a strong wire in a loop shape, and the clay air dries. I've never had a wire come out. It also will adhere to anything I am told, and your nose could even be molded right onto the mohair and would adhere permanently by itself.
You can learn about it here: http://www.avesstudio.com/Products/Apox … culpt.html
Because you make much bigger noses maybe you could insert a stronger wire loop on the left and right, or top and bottom instead of 1 wire centered ??? Then you have 2 loops to sew on for strength and support. I also use a strong glue for added support like E600 or superglue. But, with the apoxy sculpt I don't worry about the nose breaking off. I always make my wire loops with little tails that I bend sideways so they hold in the clay better too.
I have used Fimo/Sculpy but had lots of wires break off the noses.
I hope that makes sense and helps.
hi i do the same, but to secure a bit more i have started putting the thread that i attach to the wire loop, through the hole of the disk, and tie off the thread before i attach the cotter to body.
it seems to be working and i havent glued the nose to the fabric.
hope this helps
hugs susan
Most of my noses are molded around a small glass eye with the wire loop attached I made a mold type stand out of clay so that I can bake them together. looks like a round rock with a hole in the middle. If that makes any sense  Anyway I also use e-6000 and glue the noses also so they sit firmly. I have never heard of glue breaking down fabric. I have some bag ladies that I made close to 20 years ago out of fur and fabric and they are basically all glued together and holding up fine
Ladies you have some really interesting suggestions that I want to try. What is E-6000? Where do we find it?
I like the firmness of FIMO because it doesn't loose it's shape and 'flow' when I am working with it as the taxidermy compound did. And I like a clay that doesn't have a time limit and start's hardening before I am 'done' with it. 
Tami, thanks for the resource for Apoxy-Sculpt...I will certainly check it out...sounds very challenging but I like the sound of your technique adding the loops to the noses and in my case, being able to add additional wires for more points of attachment.
How about the characteristics of these two products to work with?
My insecurity about glues comes from things I've read here on TT and things I've heard about pieces and parts glued on popping off. I suppose different glues have different aging properties...but a bear does need his nose to stay put! 
Pat
HI again Pat,
I buy E-6000 glue at Michael's craft store. Here is there page explaining the glue and how to use it. It is a bit strong smelling so use in a well ventilated area ! The smell does go away after awhile on the items you adhere to . I used it to glue wood moulding to my laminate floor and it is rock solid LOL
.
http://www.michaels.com/art/online/disp … Num=gc0181
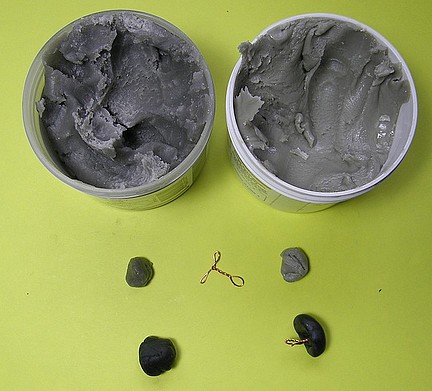
The Apoxy is a little sticky when you first start to kneed the two parts. It is like putty. After kneeding well, I let it set for about 1 hour then it is easier to work with. You have about 2-3 hours working time before if starts to harden , and is fully cured in 24 hours. After I shape my noses, I add the wire. I let them sit for about 30 minutes and then smooth out any areas that need fixing.
Here's a pic of my process ( I added black acrylic paint to my clay during the kneeding process ):

Pat, I would see if you can purchase Apoxy Sculpt in a small quantity. I do believe it is very similar to All Game. I think that after you get used to sculpting with FIMO you be able to use epoxy better.
Joanne
Like Tammy I let it set up a little while before working on anything larger than claws.
 I agree Joanne, Apoxy Sculpt is very similar to the ALL GAME maybe with a little more work time. In appearance they look identical. However, FIMO and ALL GAME do not have the same properties when it comes to the "feel" or workability of the clay. My beef with ALL GAME was that first it's really gooey and too soft to hold shape and then suddenly the last fiften minutes it gradually becomes too stiff...then hard...I feel like the window of opportunity is very short in there somewhere. And I also agree, I have to speed up the sculpting before I can go back to a self curing product again.
My plan is to use it for claws, eventually, since it is so strong and that would be a fragile part of the bear (after all they use if to make antlers!)
However, Tami, Apoxy Sculpt sure looks exactly like ALL GAME in the pictures you sent. But there isn't sufficient time to allow ALL GAME to sit for an hour after mixing before working it...as you do.
I like the wire insert you make up...that is really cool...two of those per nose should do the trick! I'm going to start with those in the FIMO blocks right away and discard the eyes.
Thanks for the sight for the glue...sounds P-E-R-M-A-N-E-N-T 
I really appreciate the time and effort on behalf of the bears...and their maker.
Off to find some 6000.
Kthanx
Pat
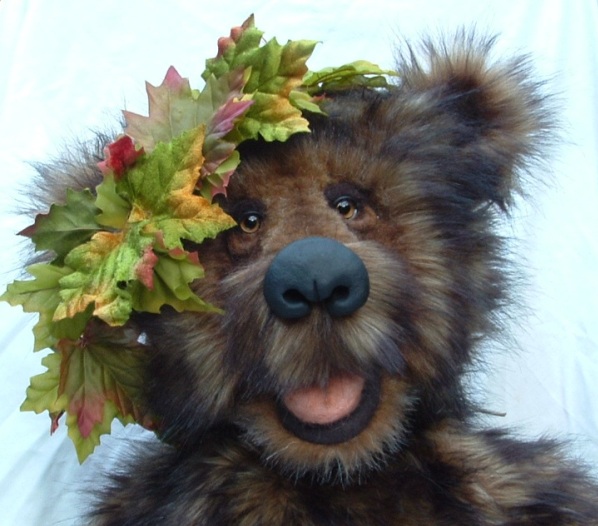
What a fantastic bear Pat. His face is personality plus!
Joanne
Well, I know this is an older topic, but I use Magic-Sculpt. It comes in a few different colors including flesh tone and black, and can be painted VERY nicely. It is just a little tacky while mixing the two compounds together, but becomes quite nice and easy to work with within 15 to 20 minutes. It's never runny or gooey. You also have a good window of time to work with it before it starts becoming too stiff (I've never run out of time with it) and has a 24 hour cure time. Unless something more magic comes along, I wouldn't use anything else!  And since it air cures, I sculpt it directly onto my bear's face.