Banner Sponsors


For artists and collectors sponsored by Intercal...your mohair supplier and Johnna's Mohair Store
 Posts: 1
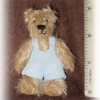
I made a 2 1/2 inch bear at a class but the teacher no longer does the class. Does anyone know where I can find a free pattern online? It doesn't have to be 2 1/2 inches but just around that size. Also I would like a pattern for clothes to fit if possible. Thanks!
 Teenytinyteddybears
Hi
I had a look yesterday, thought I had a few links. But the smallest I could find was this http://www.funkyfriendsfactory.com/Memb … ttern.aspx
You could reduce it by photocoyping. Otherwise I have one of mine I could scan and send to you.
Hi,
There are a couple of small ones on this page: http://sabears.homestead.com/MAIN_FREEPATTERNS.html
Hugs,
Posts: 16Hi Carollyn, I just love your little Pip bear. I can print out the pattern but not the directions, which are super explanatory. Everytime I try to print them, my printer wants to print 143 blank copies. How do I correct this. Thanks, Audrey
TeenytinyteddybearsHi Audrey, Pleased you like the one I found but isn't my design. Wish it was, but aint. The artist's name is Pauline and she is from Brisbane, more than that I dont know about her. But it is a really cute little bear. And you are right the instructions are good.
I haven't tried printing that one but perhaps if you select the parts you want and paste them into one of your word programs? I use Powerpoint to do things like that.
Would like to make a suggestion though. And this is honestly my opinion and dont want to knock anyones way of doing things. I wouldn't cut the leg on a tiny bear for the pin. You end up with too many seams. But I did pick up a stunning tip somewhere along the line that I cannot remember who posted. But it works so well for me..... Sew up the leg but leave the top curve open. Stuff and put the washer and pin in place. Now you can stuff the outside of the leg and taper it and the washer gives you a nice guide to ladder stitch around.
Have fun with your bear
Posts: 16Thank you so much Carolynn. It worked. I copied it into my Windows program and I got it. You taught me something that will prove to be very useful. Audrey
 Sarian Miniature Bears
I made a 2 1/2 inch bear at a class but the teacher no longer does the class. Does anyone know where I can find a free pattern online? It doesn't have to be 2 1/2 inches but just around that size. Also I would like a pattern for clothes to fit if possible. Thanks!
Hi, I know this is quite an old thread now but if you PM me your email address I can send you one of my patterns for a 3.5" bear if that's of any use to you? It has full instructions too. It's a PDF copy which I can't attach to this forum.
Best regards,
 Creative Design Studio (RKR4CDS)
Sew up the leg but leave the top curve open.
Excellent suggestion, Carolyn!
Like you, there are at least 3 reasons why I also like to put my closures at the top of the miniature limbs:
- stuffing
- jointing
- ease of closing
Stuffing: pushing the stuffing down into a column and continuing to tamp it down as you stuff is much easier to control and get it evenly/firmly stuffed (especially in the area of narrow ankles) than it is to stuff when the limb is shaped like what I always thought of as a 'canoe' - higher at both ends and lower in the middle, where most pattern designers placed the closing spots. I always had a difficult time getting the seam closed on the back of very firmly stuffed legs because it was difficult to get the needle tip to emerge back out of the fabric again. Some designers even placed their openings along the front edges (in the area of the 'knee') then the foot was in the way while try to sew!
With standard back openings you then had to keep both top and bottom ends back in place while adding a bit more stuffing at that center point and sew the seam closed, all in a very awkward place - compared to using another choice.
Jointing: when the opening is along the back of the limb it's quite awkward to insert the washer and pin into the exact spot to get the washer right up against the seam. The dot which marked the cotter pin insertion point is now hidden up inside a sewn top-of-the-limb and after sliding the washer up in place, holding it there while you also insert an awl or large needle to spread the fabric - - well it truly is a shot-in-the-dark.
When you switch the seam closure to the top of the limb you can stuff to the place the washer is inserted, slide it into position, actually SEE the spot to insert the awl and cotter pin because you can see whether or not the washer is lined up with the curve of the top edge. Finish inserting the joint, Stuff as much as needed and sew closed, adding a bit more stuffing as needed.
Ease of Closing-
On tiny seams like the top of a miniature limb, using the short, straight needle and trying to get it to go in and out of the straight section of the closing seamline along the back of the leg is much more difficult than around the top of the curve, where the needle tip emerges from the fabric immediately and automatically upon pushing through each stitch.
Just before pulling each stitch snug, the seam allowances are eased down inside with another needle or a finger nail.
Posts: 114Thanks for a great tip.
Creative Design Studio (RKR4CDS)I certainly don't want to ruffle feather or step on any toes here, but feel that I must insert this here: as an artist and pattern designer many of us are finding that Picassa is one of the sites that has caused many of our patterns to be posted illegally by others who have obtained them in one way or another (purchased or shared..) and are actually depriving the designers of further sales by giving away the same patterns that—at the same time—are being offered by the designers.
It would be different if what gets posted were retired patterns, but sadly it's not - and they are sometimes full magazines-worth of patterns.
While this looks like a good deal to the receiver, think of how this affects those who have taken the trouble to design this pattern - it's not just the $12 or $20 but all of their attendant fees for education/experience and the suppliers they've kept in business along the way while they produce their patterns.
I've too often been in the company of artists and collectors alike who are bemoaning the fact that magazines (and by association - our beloved TB shows - - are becoming so slim nowadays - the current TBR is only 42 pages and is as thin as a comic book) that they no longer subscribe - and it all becomes a vicious cycle/circle.
Picassa was set up originally to host picture Albums for those who didn't have websites - to post their work, to show the kids off to grandparents, for any informal setting like this. Unfortunately it is many times used for something much more devious.
In Picassa's Rules & Guidelines (I've forgotten which numbers) there are strict rules against posting Copyright work (they've covered themselves with this Disclaimer...) and a legal © exists from the moment that an idea is put into tangible form, whether it's ever officially Registered or not, and there are provisions made for having one's own (stolen) work removed from the offending albums, but it's a tedious job of doing it: first searching for them page-by-page, album-by-album out of the (hundreds of?) thousands of Albums, then filling out a form for every single page.
Please think about sharing links to patterns and check first with the Copyright holder on their conditions for posting.
Most do contain some wording about sharing/storing/posting. Thank you!
Best description online - http://www.craftdesigns4you.com/stop.htm
UPDATE - and I had forgotten this - I've never used it because I design my own, but other members reminded me -
We do have a section called Free Patterns.
Donated by our TT members, many of the small/mini patts can be reduced down to a 2.5" size on any copier. There are some old links which a reno longer valid but still some cute teddies there!
And of course, our old friend Google! In just a few minutes I located quite a few sources by just typing in Free Miniature Teddy Bear Patterns.
Many of the designers have specified - For Personal Use Only - or whatever they've chosen to present with their patt.
There are loads of sources online for tiny teddies!!!
http://www.freepatterns.com/?source=001FRP
http://www.iloveteddies.com/documents/document_735.php
http://www.webcrawler.com/webcrawler300 … Kgod-RKgoA
http://teddiesbylauralynn.com/free-patterns/