For artists and collectors sponsored by Intercal...your mohair supplier and Johnna's Mohair Store
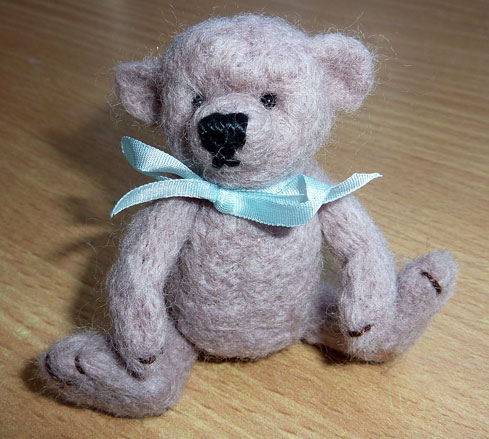
 I'm interested in learning needle felting to enhance the faces of mohair bears, so I started by making this little fellow. It was easier than I expected and quite relaxing to do. But can anyone tell me how I avoid having lots of visible indentations in the felt? It's nice and firm but just doesn't look right! Also, which needle is best for felting into a mohair fabric? The weaves are quite dense and the needles look a bit fragile.
I'm no expert by any means.. but I've been needle felting for about 2 years so hopefully I can help.
For your first go this guy is really sweet and has such a good shape! I think the visible holes are down to him being not so evenly felted.
Work the needle more on the bumpy parts that are stuck out a bit and still look like lengths of wool, don't keep stabbing into the same holes you've already made as you'll only deepen them.
Usually I work with a medium sized needle to get all the main form worked out and then at the end go over with a much finer needle to get a smoother appearance. For me this applies with working felt into faux fur/mohair. Just hold the needles nice and straight all the time, if the needle shows resistance don't shove it in, it'll break and it's a real headache trying to fish them out!!
I can usually tell which needles are needed by simply stabbing and seeing how it feels. You should feel the needles grip the wool whilst smoothly entering your work.
Don't be afraid of adding more wool in areas that need it such as your lovely bears wrists which just look like they could do with a little extra.
But I don't think you need too much help because your bear is really wonderful!
I hope I could help and didn't go on and on too much!
I think the post above says it all FrancesAnne. When you start felting the bears face it should be more that nice and firm, it should be hard. Especially the muzzle area. which means you keep going till it's there. It will shrink down a bit as you go and you keep adding wool till it is the size you want.
This little bear is really cute, and you are very good at getting a nice shape.
Joanne
I  him!
him!
He's very cute!
One of the things that helps with seeing the holes that the needle leaves is to start with larger needles and switch to smaller ones for detailed work. I always start with a 32g or 36g and work my way down to a 40g needle. The smaller the needle the less you'll see of the holes or needle spots ^_^ But yes like Joanne said make sure it's very hard and firm & that will help with the holes too.
As for felting onto mohair you have to start again with the larger needles and them work your way to the smaller one's for detail. Joanne is an expert on felting muzzles onto mohair & I no somewhere she had a blog tutorial post.
Hi Frances,
I marked this thread on the 13th to reply to but I'm sure that everyone else was also busy getting ready for the holiday; I'm glad that others have also jumped in now.
As I look at your sweet teddy's face (was this a Barbara Allen book instruction?), I can see areas especially across its forehead (you did ask for us to express what we'd do in your circumstance!) that don't look needled enough yet. Those are the ones that I'd first go after.
Every single bit of surface must be needled evenly across the entire 'skin' surface from your very beginning core layers or you won't be building a very sound foundation for the rest of your structure.
Perhaps I should back up and ask this first: has this bear been formed by rolling lengths of fiber (log-style) into the different body parts? This helps me in understanding how you'll be able to add more fiber to say - the wrists, as was suggested previously.
Whether you form your individual parts that way, or through the method of building the parts from a fluffy mass of needled-down, carded fiber and adding more bits to build up the design in selected areas, you still need to needle the inside core/base firmly first.
I've found that many of the students I've taught have gotten to certain stages of their needling and discovered that (I'll use the forehead as a example here, if I may!) that the profile line is exactly what they were hoping to achieve and don't want to thrust the needle in one more time!
But they didn't understand that the fibers inside the forehead weren't yet bound together (with each other) and are likely to shift over time with handling.
It's only through thorough needling the fibers to bond with each other, and adding more fiber on top, until they've built that area back up to that 'perfect profile' outline again that one will achieve mastery over the fiber and design work.
If one is afraid to change something then you'll never be able to achieve any look on purpose but only by accident - a very chancy thing! So needling with the largest diameter needles very thoroughly first is most important, through the fiber mass, enough so that the needle goes past the center and through the other side, to be positive that the fibers from both sides (front and back) are being mixed together and bonded.
When the needle begins to meet with too much resistance as it's thrust in (not sliding in as easily) it's time to move down one size, or change from the Tri to a Star in the same size if that's all you have.
Work your way down through the needle sizes this way (most ppl start with 36 depending on the fiber breed they are working with) ending with the smallest—40 or 42—because the narrowness of the needle shaft in those working ends leave almost no discernible hole in most breeds of fiber.
I always recommend choosing your project first, then choose a fiber breed that will best match the project for its inherent qualities, i.e., strength, length, crimp or curl, sheen, possibly natural color...and the last step is choosing the needles that best needle that fiber and at different stages according to the 'feel' of it as you work.
When you describe your bear as
quite dense and firm
I've always gone by this proportion: use a large rounded area like the tummy or head to test for Firmness.
Squeeze it VERY firmly between your thumb and fingers:
If it squeezes in and loses more than 40 -50% of its volume/thickness, it's very softly needled.
If it squeezes in and loses about 25 -30% of its volume/thickness, it's on the verge of becoming firm.
If it squeezes in and loses less than 5 - 10% of its volume/thickness, it's almost Firmly Needed.
The breed of sheep will sometimes make some creations appear to feel firm while inside they really aren't bonded to each other yet. Squeezing and bending the pieces is the only way to tell.
Another test is to touch the tip of your thumb to each finger tip (like the butcher who gives directions for Rare, Med Rare, etc to Well Done cooked meats) - and lightly press on the fleshy triangle part where thumb and hand meet. (There are the Downs breeds - dual-purpose breeds - which will never become firm/rock solid so I'm not including them here.. a whole different type & set of rules apply!)
Thumb to forefinger is very softly needled, thumb to middle finger - on the way to firm but still rather soft, thumb to pinkie finger, rather firm but still could use a bit more needling to become perfectly firm, again - depending on your breed of sheep fiber.
Also, which needle is best for felting into a mohair fabric? The weaves are quite dense and the needles look a bit fragile.
Using a medium grade of fiber, like Romney/Rambouillet/Perendale/Corriedale or that type of fiber I'd say to start with a #36 Triangle RBA needle (the A in any needle description means that the first barb is placed almost at the tip—3.2 MM instead on the normal 6.4 MM of the standard needle barbs) so you don't need to penetrate very deeply for the bonding action to begin. Anything larger, like the #32 needles, might tear the cotton backing...especially in the beginning when one isn't as cautious about re-needling in the same place too often, where it might break the fibers.
The needles aren't as fragile as they look as long as you keep in mind something you've probably already heard: Rule #1! - Always pull the needle back out in the same direction that you thrust it in!
If you pull it out at even a slightly different angle than it went in, it will likely snap at the reduction point where the needle tapers in for the barb placements near the bottom third of each needle.
If you find it difficult to bond the sheep's fiber to the muzzle I would recommend 2 things to try:
- pluck or shave the nap off the muzzle in the area that you will be needle felting over. The mohair fiber here creates a natural lofty space which holds the needling fiber away from the surface of the mohair (cotton) backing and it'll be a little more difficult to get those fibers to bond into the inner fibers, through the muzzle backing, unless they're in full contact. Until you gain more experience, it might be better to remove them completely.
- stuff the inside of the muzzle very very firmly with the same fiber you'll be needling onto the outside of the muzzle. This will give the fibers you're driving in with the needle barbs, places to instantly grab onto and bond permanently onto: like-fiber-to-like-fiber, and real wool as opposed to polyester has a natural structure which lends itself to locking into each other when rubbed together in the action of needling.
In traditional Wet Felting, Felt is formed through the mechanical action of friction/pressure, moisture & alternating heat/cold.
Dry or Needle Felting has only friction - the action of the needle barbs pushing the fibers past each other. We have to give it as ultimate conditions as we can to speed up our hours of labor!
He's very cute!
Joanne is an expert on felting muzzles onto mohair & I no somewhere she had a blog tutorial post.
Thank you so much Nina for the compliment and I do have one. It is here.
http://desertmountainbear.blogspot.com/ … orial.html
But while we have Bobbie's and Nina's attention, and needles have been mentioned I have a question.
I use Navajo-churro to felt the bears faces. I get it from a lady who seems to breed sheep with finer than the usual wool, and I remove the 'hair', so anyway it is not real coarse. I can not get a star needle to grab on this stuff, I felt the whole thing with a fine needle. It seems to grab and felt fastest with one. Is it because of the coarseness of this wool?
Or do you think that a star would work when it is already getting firm? I have a whole bunch of medium star needles, and I feel like it was a complete waste for me. I have been using them to root doll hair.
Joanne
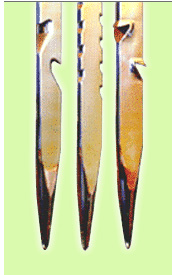
Generally, Joanne, the barbs of the Star needles in the same size as the Tri needles are smaller in the 'cut-out' portion or below the 'kick-out', as some manufacturers call the vacancy in area below barb, so they accomodate less fibers as they push through the mass that you're thrusting through.
When you say that you use a 'fine' needle, I'm not sure what size that is... and is it a Triangle then?
Is it because of the coarseness of this wool?
Yes, coarser fiber will matt together faster than finer fiber due to the shape and size of the scales on the outer, cuticle layer of the fibers. But it's more difficult to 'capture' in the smaller barbs of fine star needle.
Or do you think that a star would work when it is already getting firm?
There is no hard & fast rule about when a Tri or a Star needle will work at any particular stage; it's all by feel and experience. It's a combination of the stage of needling you're at plus the fiber breed you're using and the size of the needle (36, 38, 40 & 42.) Star needles are available in all of these sizes, just as tri-s are.
It's also important to choose needles with the barbs located in the 'zones' for the type of work that you're doing.
In the beginning, I use needles with the barbs spread out across the whole working shaft. I also like the first barb to be located at 3.2 mm from the tip (the other choice is 6.4 mm) so the action begins as soon as possible. But in the finer needles, I'm only working the surface areas because I've already made the core and subsequent layers solid as I applied them, so I choose a needle with all of the barbs located near the tip so that all of them are in work without needing to plunge in very far to tighten the surface and bond/smooth the final layers.
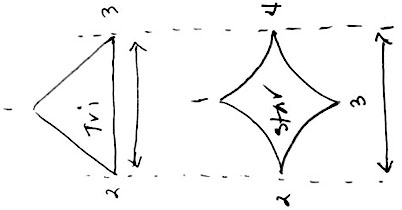
Here is a cross-cut section of a star and a tri in the same size, it is the same for all sizes: you can see that the outside dimensions reach the same WIDTH but there are 3 edges on a Tri and 4 to the Star. And that the inner, working shaft is the same size diameter for both (this is a quick hand-drawing so you'll excuse the crude sketch!) but the accuracy should not be reflected by my drawings. 


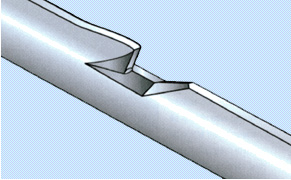
You'll also see here how the brand I use (Foster) creates their barbs with all beveled edges and some other brands cut their barbs into the edges, leaving sharp edges which cut through the stretched fibers while needling them. These edges will wear down over time with use and no be as effective. Only examination under a magnifying glass will identify which type of barb is on which brand: there are less than half a dozen major manufacturers in the world.
1 - the Star slips into the firmer needled fiber, even though it's the same Number, because of the convex shape to the sides of the shaft between the barbs, giving a leaner, slimmer, less blunt profile meeting the wall of fibers. Hold a coin (like a dime) over the centers of the two drawings of the needles and you'll see that the needle shafts are the same inner width, while the outer 'wings' flare out as straight sides on the Tri and curved/convex sized on the Star.
2 - the Barbs are proportionately smaller on the same sized needles of a Star (with its thinner winged edges) than on the thicker, straight-sided Triangle needle.
And Yes, definitely, the breed makes a difference. While I do have Navajo/Churro samples here for the manuscript I'm working on, I've never personally used it in my needling, as it takes too long to get it 'working' (bringing the fibers together and getting them to matt together.) It's like Merino in that respect but that's at the opposite end of the spectrum, Merino being so fine in texture.
I've always been amazed that you get N/C to work for you Joanne. It's too coarse for me, even in the final stages and even the undercoat. But it's also the proportion of the size of our work that comes into play. You work with full sized teddies while I'm a miniaturist and I've always said that the Project comes first, then the fiber/breed of sheep/animal fiber is chosen that best matches your project - for its inherent qualities - and finally the needles are chosen that best work that fiber.
My pieces are usually around 4 inches tall/long at the most. It would be silly for me to attempt to work in fibers that were much longer than 4 - 5" long.
A 3 - 4" long fiber is ideal for a 4" tall/long project and the N/C fibers are longer than that. If I were to be needling a 12" tall project, I'd also avoid breed fibers that are only 3 - 4" long when I was working on a 12" tall project. Am I explaining this principle well enough?
A short fiber, once it's been further shortened by needling it into its neighbors just isn't long enough to cover the areas stretching over a 12" tall project. The shorter fibers tend to be softer fibers as well and aren't as self-supporting, so this would be the place for a longer, stronger fiber like N/C, Lincoln, Columbia, etc.
Well, you asked about needles and I hope I answered something them...
One thing that has always been my personal pet peeve has been retailers who sell needles by "Coarse/Medium/Fine" or by colors, which they've created by dipping the crook end into paint or lacquer. (This also wears off as the needles arrive coated in machine oil to protect against rusting so the 'paint' hasn't made a good bond with the metal.)
Many individual purchasers I've written to have also agreed that the company who sells by color family seems to have redundant descriptions and it's more of a marketing ploy to sell more needles, because the sizes/styles seem to be the same for many of the sizes and styles and that 16 - 18 different needles aren't needed or all that different from each other.
But - all needles ARE identified by size and style (and barb placements) on the boxes which the wholesalers receive from the manufacturers and they can ID the needles with this info at the time of the sale.
I would recommend that everyone ask, no - demand this info from their suppliers at the time of your purchase because you'll all find needles which work best for you with the fibers you like to work with: a Medium from one supplier might be a #38 and from another company it's a #36 and another it's a #40.
You see the confusion?
The only way to get what you wish every time - and avoid the styles you don't like! - is to purchase needles by the Number Size and Style, which also means barb placement, reflected in the lettering, also available on the box (RB, RBA, CB, CBA, HDBA...) I could go on.. but this hasn't been very organized in layout and I'd be writing my book!
Thank you for your answer Bobbie. I know that I know the sizes, but not right off hand. I think that the needles that work the best grabbing and felting that churro are 40s. The coarser needles will not grab it. And I can stab forever.
Joanne
Well, you've found what works for you by process of elimination: the needles must be Triangles, then, which have slightly larger notches (carrying places) within the barbs than Stars do.
Stay with what works, though I'd be slightly more comfortable with knowing exactly what size and style needle you have!!
WOW! Thank you all very much for taking the time to reply with such detailed help and information. I understand far better now about the firmness and density needed to achieve a well finished bear. Yes, he was a Barbara Allen bear created from 'log'shapes, and I know just what you mean about students being reluctant to go on needling once they have the shape they were aiming for, I felt the same. No pun intended!! Going by Bobbie's squeeze test on my bear I'd say he was 'on the verge of becoming firm', so next time I'll have a better idea of how he should feel. I've been tied up with household duties for the past week and haven't been able to do anything bear related. I really miss it now. So perhaps later this week I'll have another attempt.
Thank you all once again, and I'm sure a lot of other people will find this an interesting and helpful topic.
Frances