For artists and collectors sponsored by Intercal...your mohair supplier and Johnna's Mohair Store
can anyone tell me how you can make small claws for 3 inches bear? as i have seen an artist bear got lovely pulled toes and claws... and i guess she was not using clay?!
P.S. i just got one oven at home and it's only for food :doh:
A while back people used claw shaped beads for minis, they looked pretty effective. Or You could maybe use leather?
I imagine if you were careful you could make clay claws- I'd use Fimo for them if possible, as Fimo is stronger than Sculpey. Baking the tiny amount of clay for claws in your home oven isn't likely to give off enough fumes to harm you, but if you were worried you could maybe put a 'tent' of aluminium foil over the top of them when baking.
I heard once from the use of the material for artificial fingernails....
However, unfortunately, I do not know how it functioned.
thanks Karen and Conni,
actually, i have consider using microwave cling film, but thinking about kid's meal, perhaps i have to invest a tiny toaster-oven...by the way, what is the temperature and time for baking fimo claws?
cheers,
susana
I have heard of fake nails being cut up for small claws. I did buy some but it was too thin for my larger bears to give them the look I wanted, but I do think it would work for smaller bears. I have also heard of straight pins being clipped, filed and bent to become claws for very small bears. I like this idea too. They would certainly be unbreakable. You could probably even use some kind of wire with a larger gauge in the same way. I think Fimo may not be strong enough if rolled too thin.
Joanne
guess i will try the fake nails first, and there should be something cover up the tips of wire, will try.
cheers, susana
Susana, I have added claws to bears as small as 2"
For the really small ones I use perle thread. Dip the end in PVA glue and roll it between your fingers to shape it to a point. Then use a needle threaded onto the other end to pull it into the bear's foot, you can adjust the length by the amount you pull it in. For slightly larger bears I use 1mm leather thonging. Cut small lengths at an angle so both ends have a point ant then make a hole in the bear's foot with an awl. Use a very fine nozzled bottle with PVA glue in it to get some glue into the hole and then use tweezers to insert the leather "claw". Both types of claw can then be painted with oil paint, I usually give them a bit of variation in colour so that they look more realistic. These feet are on bears 5" and smaller and they all have claws, the larger ones are leather and the smallest is just over 2" and has perle thread claws. Hope this helps 

Love this Linda. Thank you!
Joanne
Wonderful idea for the wee claws, Linda! Susana, PVA glue is simply Elmer's Glue (Polyvinyl Acetate is what PVA stands for) :O)
I would love to give this a try sometime, too!
Hugs,
Janice
Great tip Linda, thanks for the detailed reply
I'm one who creates claws for my realistic bears from pins, as Joanne describes but it's a labor-intensive process and not one I'd recommend. It just happens to work for me because I'm needle felting miniatures, 2" - 3", and don't have a seam nor true fabric to insert through.
However, Joanne is being too modest in not recommending her own site - she is the most upfront, sharing artist on the forum!!
She has many true *classes* linked through from her blog to her instructions on what most artists just don't share, or what they'd wish to protect as 'trade secrets' - Joanne will tell you how she creates her wonderful bears!
And I was just reading hers on claws just last week. ... amazing how she's worked out the obvious and presents it in such a simple-to-understand pictorial.
I agree, Bobbie, Joanne's blog is wonderfully informative!
Hugs,
Janice
Such a great idea! Already marked down those necessary tools and materials, i wanna to explore, say what will the difference between using perle thread and leather thonging (not leather cord??) and pins, really curious on the making...
i appreciate all your generosity of sharing, and i believe the road to creation and making is no more lonely, cos i got some people to share with the same interest.
you are my stars :hug: :hug: :hug: :hug:
i keep trying and have this done recently.
it only need nylon thread, make a loop and then add layers of white glue.
takes quite a long time for applying glue once it's dry until the desire thickness.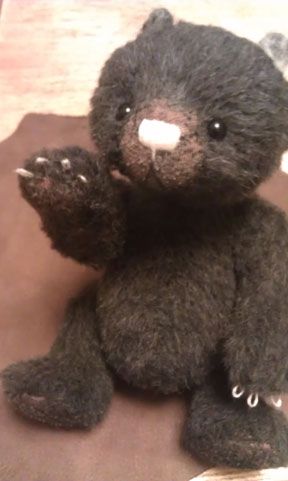
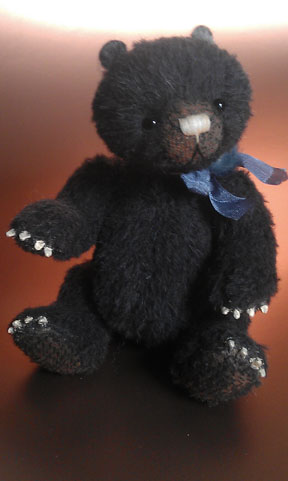
Susana, I do the same but use thin wire instead of nylon thread, so I can bend it to shape before adding the glue.
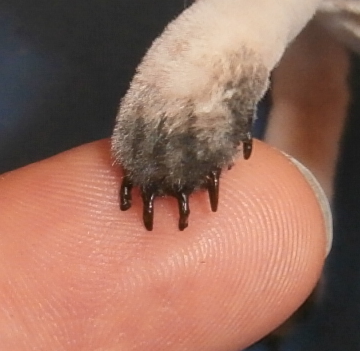
that's amazing, Elli. it looks great on such a small bear, but how can you sew in the wire?
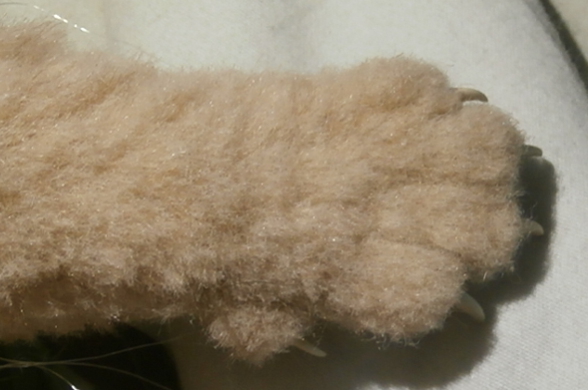
It's a kangaroo paw. 
Since most of my creations have an armature the simplest way for me is to just poke the armature-wires from inside through the paws before stuffing. But you can also form a wire-loop and pull it into the paw, then you have the two open ends sticking out of the toe and form one claw, which can be cut to lenght and covered with glue.
I hope my English is understandable. 
is a clever way to do 2 in one time, thanks for your clear explanation. 
your English is very good!
It's a kangaroo paw.

Since most of my creations have an armature the simplest way for me is to just poke the armature-wires from inside through the paws before stuffing. But you can also form a wire-loop and pull it into the paw, then you have the two open ends sticking out of the toe and form one claw, which can be cut to lenght and covered with glue.I hope my English is understandable. :angel:
Although I rarely do super small bears, I love the above idea using the wire especially because you have the ability to direct the wired claws and avoid a splayed out look. I am anxious to try this now that I saw this post. I think I might lack the patience to do the PVA glue (doing larger claws) or worry that I will smear onto my fur. I will try using Apoxie resin clay. It is similar to Fimo or Sculpey but you do not have to bake it. It is a two part epoxy clay that comes in various colors and you can form it over the wires (I would actually make a tiny coil for more surface support) and you have a long working time before it fully cures. After it cures you still have ability to take xacto knife and carve it or shape with a file and it is paintable/stainable as well. I use this resin clay for all my 'realistic' dog or grizzly noses and for teeth and for alternative art projects due to it's durability and not needing baked. I believe there is another similar product called Magi-Sculpt.
Forming mutiple matching size balls of clay, then slicing in half and sandwiching the wire between and smoothing the top spine should make a nice claw. Thanks for the tip!!
Apoxie/epoxy clay is also very good for claws and teeth (though not for very tiny or thin ones). But I like to work with glue because it's cheap, I can buy it everywhere and it works for all sizes. This is a paw (still missing paint and the fur, I'm working on it) of a two-thirds lifesized wolf and a lifesized falcon's foot: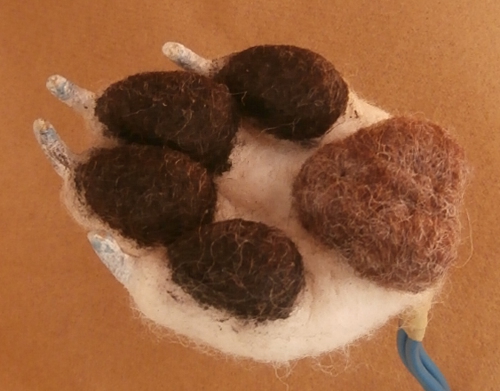
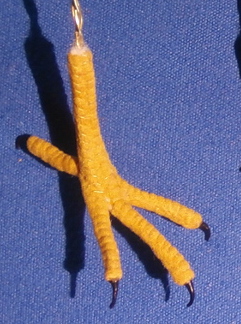
For the wolf I used a thicker insulated wire and covered it with layers of glue and tissue, I like the effect that the surface is not completely smooth. 
But for some animals I just have to use the fine epoxy and carve and sand the claws until they are perfect. 
Thank you girls for sharing, it has been a very interesting read. It's really time to think on an upgrade on my claws technique, you gave me food for thought! 
