For artists and collectors sponsored by Intercal...your mohair supplier and Johnna's Mohair Store
I'm not sure if we've discussed this before, but does anyone know how you go about getting those nice puffy cheeks?? The kind I mean.......um I think Jenny does them, Melissa does them, and Tammy and Terrie...... um if I think of anymore I'll add later 
I'm sure it's pretty much scissor sculpted, but well, really I haven't a clue..... help!! I'd love to try it!! :hug:
EAT LOTS 


 No I do plenty of that!!


I've re read my post, I'm not sure I've made sense though, no one will know what on earth I'm on about!! 

Yeah i do Clare - but as i have never made fat cheeked bears i can't help you.
I suspect that you need to do a little needle sculpting and some scissor sculpting to get the look.
Let me see the results of the bear Clare 
Penny x
I will, should be hilarious!! 

:hug: x
Clare, it's mostly scissor sculpting, as far as I know. Yes you can needle sculpt as well. But if your bear is made of a really long pile, than it's possible to use scissors and just sculpt out puffy cheeks that way.
Should be interesting to hear what everyone else does!
My puffy cheek bears are scissor sculpted - I have done it with long pile
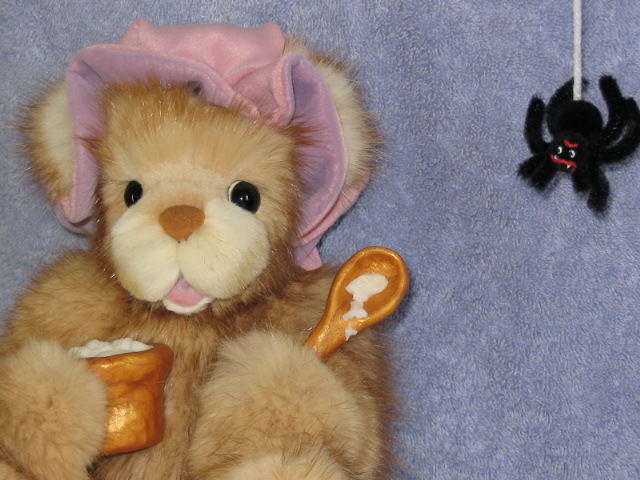
Debbie...she is a cutie...and she does have " puffy cheeks" , actually what people are calling cheeks is the muzzle ...hmmmm, and does include the cheeks on bears...lol...
Now..I have done some puffy cheeks...it is difficult to explain. Talking dogs here ...I once saw a book at the library on clipping poodles, all kinds of cuts...that would be a great place for anyone to look for info. as poodles have ball poofs on their tails and feet.Hmmm again, wonder if there is any info. on the internet ????? You know...a web site that had photos of how to do the poofs?
I have heard of people putting a rubberband or tie a string around the muzzle to start with...I just try to visualize it.
I will try to explain...you can look at Debs bear above... I start by getting rid of what will be some shorter areas of fur like... clipping across under the eyes, then I trim the muzzle between the eyes short ( my nose is already emb. ).
Work on blending from short to longer above the muzzle on the forehead...now we are getting to the actual muzzle part....
I use a bunka brush or small comb and brush/fluff the fur UP with every clip I make. You want to create a ball shape but you have to do it in some sort of order so you dont loose your place...
fluffing the fur Up or in a certain direction does 2 things...visually you are always checking the length you clipped against length that is left...and always check for the shape you are trying to get.
Visualize a line around the muzzle ...how short will this fur line be ? Id say no shorter than 1/4" on a 10 - 12" bear ....so I fluff the fur up , hold my breath and hold the scissors pointed towards the bear nose and clip but NOT straight across the fur ...
the scissors need to grab the first part of the fur then if held at a slight angle (away from the fur ).... you can grab less fur as you cut so you are BLENDING towards the end of the cut...blending into the longer fur on the muzzle....
I did say this is hard to explain . This is a technique you have to experience to learn... so practice ..or go spend a day at the doggie parlor ?
I just go real slow..fluff and cut , fluff and cut...My first few bears I cut that muzzle line around way to short so try to leave it longer to start with then gradually nip and snip ....
Can anyone else explain better than this ?? Have at it!!!....Winney
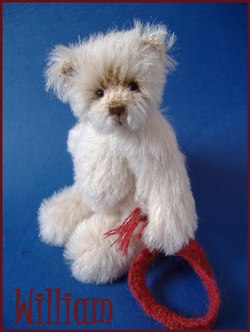
 Now Miss Jenny is a good girl and does lots of complicated head pieces and can cut like a pro (as hairdressers tend to!!
  ). Her bears "chops" as I call them are to die for and I will never approach that scale!
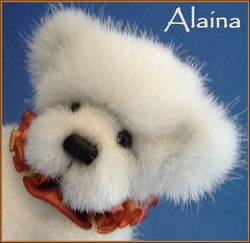
Hmm...first thing, start with a good dense fur. Alaina in the head shot photo is made with european synthetic. Now I don't do things the orthodox way at all. ...and I'm trying to think out my process so bear with me.
Your design shouldn't have a really deep muzzle bit - it needs to be reasonably shallow so that the fur will pooch outwards.
Firstly - trim all your seams right back before sewing - this way you avoid tufts of hair that ruin the effect later. With the ultra dense stuff like the synthetic, I actually trim slightly larger than my seam allowance on one piece - just a smidge - and you definitely don't notice afterwards. I usually trim the top of the gusset some before sewing too - but not right down - i do the finishing bits once the head is sewn up
Now it may help you to take a rubber band and pop it over the muzle at the demarcation point between muzzle and head (i.e. just under eyes).
The first thing I do is trim a very narrow strip up this line - from the bottom up to the base of the eye - it's basically cutting a teeny little strip only a couple of hairs wide to create a little demarcation line between the head and the chops.
Now, I do a little bit of the nose to give me it's placement and then I put the septum and mouth in - I trim the area between the "v" of the mouth so its just stubble.
Now I have my canvas to play around with. I use more than one pair of scissors - I have a slightly blunt pair which work quite well when I'm shaping down the cheeks and pair with teeny tiny tips to snip individual hairs when shaping.
I tend to hold the head so that I am looking straight down on it at first. I take the blunt pair of scissors and with the handles pointing straight up start to trm the sides of the cheeks, angling my blunt scissors around the curve of the cheek. This only cuts tiny bits of hair at a time and don't do this with really sharp scissors!
Once I have done this, I hold the head straight on and with my sharp scissors start slowly snipping the individual hairs - I basically work in a widened U from the nose down around and up to the eye.
I tend to blunt off the underneath so that it's almost flat across = the outward hears of the cheeks will be longer than the hairs closest to the chin seam - this helps give it that extra pouf.
I spend about 4 or 5 hours trimming - no joke!! I'll do a bit of trimming put the head down for a while - pick it up again an hour or day or two later and take a few more snips - this way I do a much more considered job and the time out makes me look at the bear much more objectively again. If I don't do this I lose sight of the big picture and end up focusing on one thing and then make mistakes (but that's just the way I work!)
Now - people who can cut properly are probably not liking the way I do it, but it's the way that works for me. I'd actually suggest trying the imported synthetic, while it is very dense - it's so uniform and the hair doesn't kink or curl off in different directions like mohair and alpaca can.
Now I think I've probably just confused you - it's really something that you learn by feel and I'm still learning - I think I would shape a bit more differently if I had alaina now.
I've never tried real fur so can't comment about that.
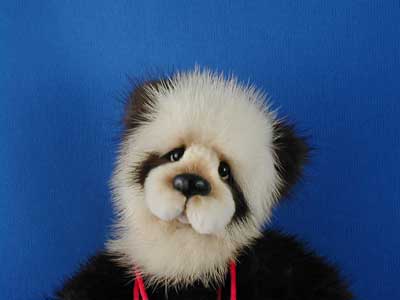 Melissa, you explained the process perfectly. I create my mink faces the same way...and it does take hours of scissor sculpting!
~Kathy Myers
I actually build in the shape into my pattern pieces..I don't want to publish my actual pattern for obvious reasons..but if you look at the undulations in all head shapes you can create these type of shapes by careful pattern cutting and then a combination of needle and scissor sculpting.
The short snout is central to a puffy cheek design as it convolutes the head shape and by definition, widens it. Stuffing then plays the next important part in the this process making sure that you shape the head as you stuff. Strategic needle sculpting pulls in areas too....further definining the shape.
I use scissors and comb together when I scissor sculpt, adopting exactly the same techniques I do for hair cutting. I use the finest toothed comb available...a flexible ( important to follow the head shape) barbers comb that goes down to about a centimeter at one end...I also have one of those eyelash combs which I use in nooks and crannies. ...which I wouldn't be without. I constantly comb the hair out as I cut and therefore achieve a rounded chubby look. It does help to have done 32 years in the salon as cutting is now second nature and I have worked on all types, textures and shapes and do know how to use my scissors to good effect these days. I can't stress enough that sharp scissors are a must have...I use my old hairdressing scissors. ...which though they are old they are razor sharp...I would add though that hairdressing scissors...the decent ones...are upwards of £150...which is why I use my old ones!!!!!
:clap: Beautiful bears!!! :clap:
There is no 'right' or wrong way to scissor sculpt....only lots of practice to see what works for you. And it does take a LOT of time to get the cheeks just so. I'm another one who combs, snip, comb, look snip. I usually do the one cheek, then match with the other, always erring on the side of leaving the fur longer. Unlike the dogs, this hair won't grow back!
If you've got access to a dog groomer that's working with poodles, and they're amenable, you might ask to watch them scissoring the topnots, or if truly lucky the poms on a show poodle. Be aware that many groomers won't let you watch, not because they're doing something horrific to the dog, or they've got trade secrets to hide, but because you'll be distracting to the dog...which makes that moving target move all the more! Its much easier to see the process, though if you're right there and can ask what they're aiming for as they scissor.
I think Nancy Tillberg suggests using the elastic around the muzzle to get a starting line. Then think of each cheek as 1/2 a ball. Trim it accordingly so that the front and back , and bottom of the cheek have short hairs and the sides of the cheek have progressively longer hairs. This will give a round , puffy effect. Ultimately practice seems to be the key. I'm still working on it. 
North Country Teddy Bears offers an online course for extreme scultping. It is very helpful with lots of pics.
Good luck !
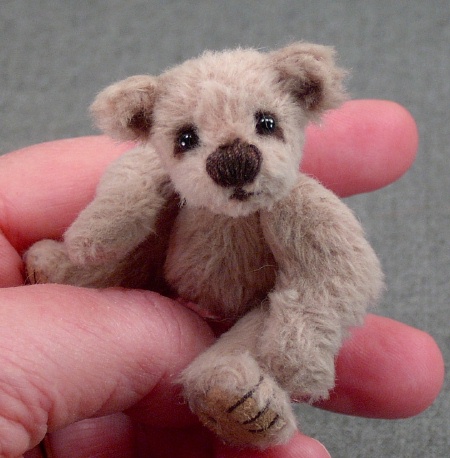 I do my long haired bears like Melissa explained but I have one on the go at the moment that has short hair that I have tried to get puffy cheeks on. He's not quite finished and doesn't have a name yet but I am pretty happy with his little puffy cheeks. I cut his muzzle a little larger so that there was room to "stuff some cheeks".
AWWW! Terrie... that little guy is simply adorable!!!!!
Beary truly,
Kim Basts
Wild Thyme Originals
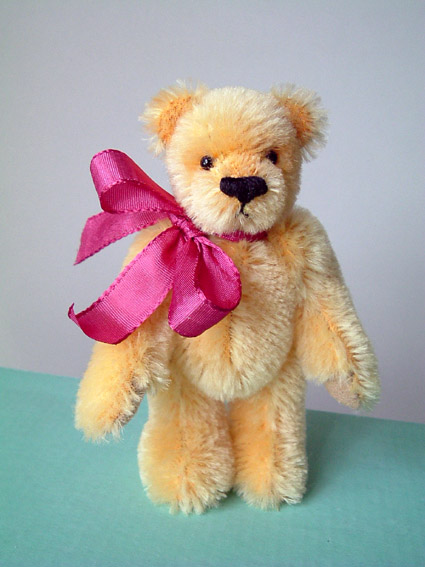 I too love chubby cheeks. I learned by trial and error and from looking at pictures of bears with chubby cheeks. My first tries endedn up with clean shaven muzzles
  but now I got the hang of it using a technique as described by the others here. On short pile mohair I have cheated
  I just cut a line to offset the muzzle from the head, shaved the nose bridge and cut the mouth short. The shape of the head with a short muzzle also helps.
You can also do a sculpting stitch on mohair bears that goes from the outside corner of the eye to the outside stitch of the mouth then back up to the inside corner of the eye. This gives the bear a nice little poof at the cheek area.
Donna
Terri ...When you cut the muzzle larger ...where do you allow/ add to cut it larger?
I visualize some places where one could add to make the cheeks " poofier"...maybe
Make a dart just under the cheeks....
Make the muzzle seam longer on side head pieces than the center piece muzzle by say 1/2".... then " work the excess in when hand sewing ".....Winney
Winney, this little guy is just over 2 inches tall, so his head is really tiny. All I did was make the muzzle deeper and then stuffed cheeks very firmly. On a larger bear I think that either of the two methods that you mentioned would work really well. You could get 3 different looks by doing one or the other or both together.
Thankyou so much Kim!
Oh....he is tiney.....Winney

 I find that if I wish to trim the faces that to put the critter on the dresser in the living room so I can see him for a day or two . Ive ruined so many bears by being way toooo impatient.
Also if unsure about the finished look. Photograph it. Look at the pic for a day or so. You will get a clearer picture in your head of what you are really after AND what you have already done.It also gives a clearer picture to when enough has been done.That's real important that one.!!!  This face isnt finished in this pic. Even though I thought it was at the time. Then I used a copic pen and gently coloured very carefully the tips of the fabric. It is only a simple face but I like the shaded version best.
Matilda 
I think looking at a pic of a bear is about as important as looking at one in the fur! There are so many things that you dont catch looking at a bear that you do catch when you take a photo!
Matilda...the shanding sure make a difference, make those puffy cheeks stand right out...Winney