Banner Sponsors


For artists and collectors sponsored by Intercal...your mohair supplier and Johnna's Mohair Store
 Posts: 119
can you reduce any normal bear pattern and make a mini out of it or are there special factors involved? I'm new and have only made one (regular) bear so far... forgive me if this is a super common or silly question.
 Creative Design Studio (RKR4CDS)
Some patterns reduce more appropriately than others. What looks balanced and in proportion can be totally wacko when enlarged or reduced.
That being said however, there's a lot of room for personal interprtation: some like smaller heads, eyes placed where others wouldn't even consider them, etc.. see the current country/primitive styles, the anime & amiguri (sp?) styles.
Keep a supply of fabric like muslin on hand to try out your resized patterns first, though the overall look will change according the the nap length you eventually do the bear in.
Be a cutting edge trend-setter!
If you reduce a pattern to make a mini, keep in mind that if the larger pattern has a seam allowance already INCLUDED -- likely 1/4" -- then when you reduce, the seam allowance will reduce as well.
It's probably best to reduce patterns WITHOUT their seam allowances... and then add them back to the reduced pattern.
Good luck!
 Pandy Potter Bears
Interesting as like lots of mini bear makers I came from big bears first. I have reduced large 14" patterns down to about 4 1/2". I tend to do it by reducing then making a 9" then use that and reduce and make smaller. It helps to iron out any mistakes. Seam allowances I do like Shelli says, knock off then add back on.
You might need to get rid of bulk so on my miniatures things like tummys and arms need more shape as there is'nt always room for darts. I use a simple two piece body shape. Also I use the slit method for limbs. Sew all the way round, small slit vertical at top, turn through here, cottern pin in, then ladder stitch close. It helps to keep the limbs smooth and you don't see anything as its against the body.
Good luck, my best tip would to work your way down in sizes until you feel comfortable. If I went from large to mini without the bears inbetween I'd of given up!
 Posts: 8,574
Many bears will have parts that don't fit well-like muzzles.
when you reduce on your printer your seam allowance reduces as well.
so if you go from 100% to 50% that means your 1/4 inch becomes 1/8. right?
so what I do with the bears and the gollies is figure that 20% is about 1" reduced. (your printer may vary) and if I want 6 inches I figure out how much of a percentage this would be.
I cut around the piece leaving about 1/4 and then I sew on the line that I drew. It makes it quite easy, and we all know dilu looks for easy...since I hand sew the minis I can take a smaller seam,
The really critical thing is that you simply must have the besty quality fabric for minis....I prefer the fabrics at Sassy Bears and
http://www.sassybearsandfabrics.com/fabrics.htm
I have never had anything ravel from there and therefore it is easier to take small seams on.
dilu
Pandy Potter BearsI've sent you an email Alan. Let me know if you don't get it as my email was playing up.
Creative Design Studio (RKR4CDS)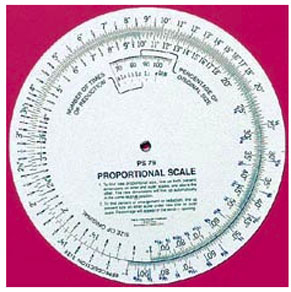 Thank goodness for Toby - I salute Organized People!! She reminded me recently that she'd bought a Proportional Scale from me when I sold these as part of my product line. I have mine.. somewhere...
When this topic started earlier this week, I began to search for mine. Serendipitously, I found my old sketch that I've posted in the Bent Leg topic, and I know that I'll find my scales as soon as I'm looking for the next lost/misplaced item...sheeesh.....I'm too old; there's no hope for me!
The C-Through Ruler Co:
PS80 Proportional Scale by The C-Thru Ruler Company, Bloomfield, CT. Distributed by C-Thru Custom Products, 860-243-0303.
The prices run from $4 to about $10, depending on size and source. One of your best investments!!
Calculates enlargements and reductions of just about anything from photo to quilts. Provides the number of times reduction as well as the percentage of enlargement or reduction. Calibrations for fractions below an inch are printed in a second color.
http://www.artcity.com/ctr-ps79.html
Not having one in front of me, I'm going to describe its use in reducing as well as enlarging from memory of past use, in bear-making, sewing, knitting, etc...
The tool is of heavy plastic; 2 dials grommeted together. I think it scales everything between 1/8" up to 90", both reducing and enlarging. When you have a known size, say your bear measures 10.75" tall and you'd like a 3.25" bear, or the other way around, you line up one of the numbers on one dial and the other number on the other dial (outer or inner depending on if you're enlarging or reducing) and in the little cut-out window in the inner dial, the exact percentage that you set your copier to is shown.
Depending on how much you need to change, you may have to do the copying in 2 steps. Most of us don't have the huge 4' beds of the industrial blueprint services copiers at our disposal!
I've sometimes found these scales at Michael's and Hobby Lobby. They're available online from many sites; finding them locally saves shipping. My smallest one was 5" across and I think the largest is 8". The smaller I packed for teaching and found the larger one was easier to aging eyes to use in the studio!
In case you hadn't noticed this, some copiers don't reduce or enlarge evenly. They may actually render something a bit narrower or wider than a true reduction/enlargement. I always made 2 copies: one set with the pattern template pcs set North to South and the Other from East to West. Laying them on top of each other on a window pane will show any difference and you can draw a new line half way between any differences.
Yes, I agree with the creators of our larger-sized furries. We miniaturists don't allow true seamlines with selvedges because we know we're going to stitch right next to our cutting lines. Reducing.enlarging patterns need removing the selvedge and adding it back on.
Posts: 119I've sent you an email Alan. Let me know if you don't get it as my email was playing up.
I sent you a thank you e-mail... I have got it, but I wanted to post another thank you here too.
Thanks to Amanda's inspiration, guidance, and practical sharing I should be on my way to bear two, my first miniature bear. Right now with the holidays my normal graphic arts and mural work is pulling all my time... but come the beggining of the year I can get to sewing hopefully.
-articicle
 Cleathero Creations
can't wait to see what crops up!
 Sassy Bears & Fabrics
In my experience, you can shrink a pattern down a few inches and it should be OK. But taking a big bear and turning it into a mini is not likely to work. Well, it may work, but it won't look like a small version of the big bear.
Proportions are different on minis. The muzzle needs to be a little bigger and the arms/legs fatter for them to look right.
I do like Amanda. Shrink it down a bit at a time and tweak it as I go.
My best advise is to just try it and see what comes out.